
Format and Introduction
The Multi-Step Module is used in two problem types: synthesis and mechanism.
For a synthesis question, you’ll be asked to draw or modify structures to complete a multi-step synthesis.
For a mechanism question, you’ll be asked to draw curved arrows (and structures in many cases) to illustrate the flow of electrons in a reaction mechanism.
In both synthesis and mechanism questions, the Multi-Step Module is constructed of sequences of Molecule Drawing Module (MDM) windows, or “boxes.” Thus, the same icons and templates that you see in regular MDM problems (e.g. Bonds tool, Cyclohexane tool) will also appear in Multi-Step problems. Remember that there are two important settings: Terminal Carbons ON/OFF and Lone Pairs ON/OFF. In synthesis problems, various combinations of these settings may be used. For example, if Terminal Carbons are ON and Lone Pairs are OFF, then hydrogens attached to heteroatoms are automatically drawn for you, and you do not need to draw nonbonding electrons in your structures. For mechanism problems, Terminal Carbons are OFF and Lone Pairs are ON, so you will need to explicitly draw hydrogen atoms on heteroatoms and draw all nonbonding electrons in all structures. Recall that you can always draw in explicit hydrogens as long as you do not exceed the correct number of hydrogens for a particular atom.
When you are working on a multi-step problem, you can always submit one step at a time to get feedback. However, it is recommended that you do this only if your instructor does not limit multiple attempts and does not deduct points for multiple attempts, because otherwise you could lose points. If you are unsure about this, check with your instructor.
A Multi-Step problem will begin with a general set of instructions at the top. In the screenshot below, the general instructions are outlined in green.

Below the general instructions are a set of smaller boxes that show the steps of the entire problem, outlined in red in the screenshot below. To work on and edit a step in the problem, click on the box of that step, and its contents will appear in the large main drawing window below it, outlined in blue in the screenshot. The main drawing window is where you will do your work using the editing toolbars. In the screenshot, the border around the first box is darker than the others, meaning that this is the box the user is currently working in (i.e., this is the box displayed in the drawing window). To work on a different box, simply click on the new box you want to work on and its contents will appear in the drawing window, allowing you to work on it.
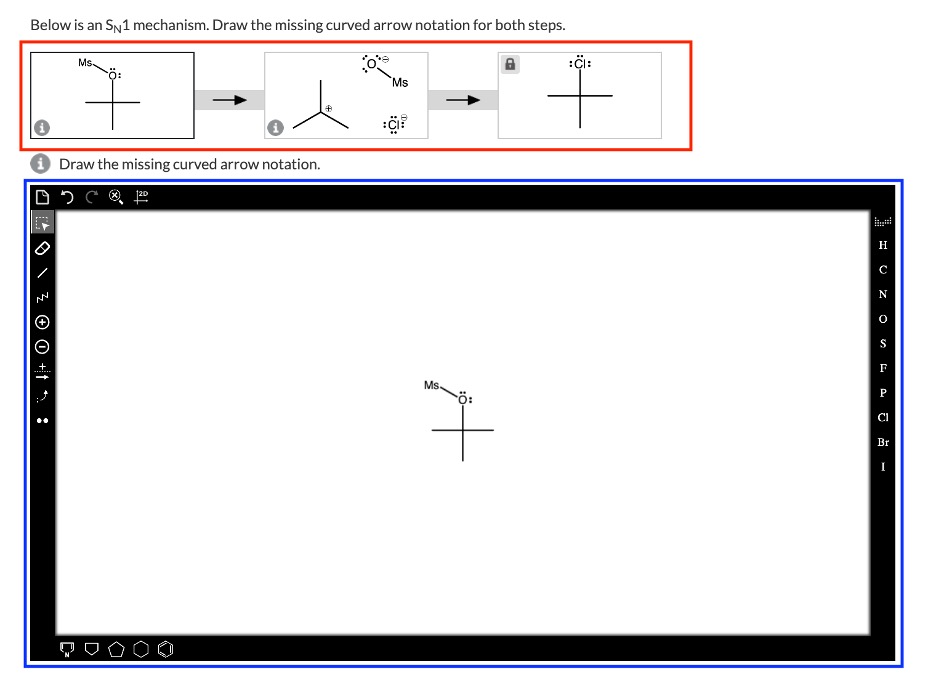
Each box of the problem will also have its own instructions to help guide you, outlined in purple in the screenshot below. As you click on each box to work on it, these specific instructions will appear about what you need to draw in that box.

Notice that the third box of the problem, outlined in orange, has a “lock” symbol in its upper left corner. This means that the box is locked and the structure in it cannot be modified. In other words, you will not be able to draw in that box, and that box is not counted toward your grade on the problem.

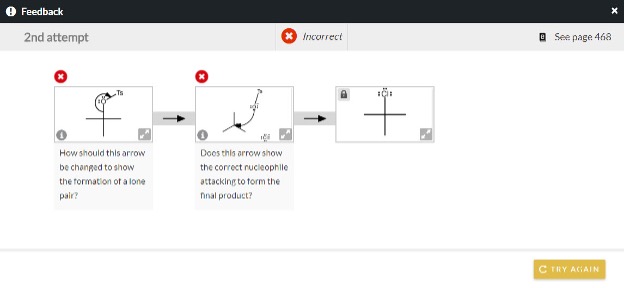
Once you’ve submitted a problem, feedback can take two forms. There will be specific feedback for the common errors encountered in each box, as demonstrated in the example shown in this screenshot. Each box has its own specific feedback:
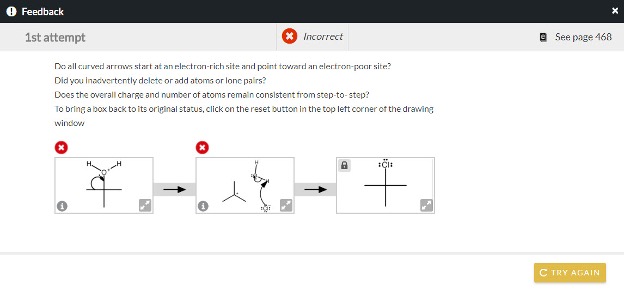
However, generic feedback can also be displayed when a student has made multiple or uncommon errors. The generic feedback usually encourages you to review your work to double check things that are easy to overlook, like including lone pairs, adding formal charges, or ensuring arrows go in the correct direction:
Copy Feature
Often in a Multi-Step problem (whether it’s a synthesis or a mechanism problem), you will need to draw structures in empty boxes. In that situation, once you click on the empty box to begin working in it you will receive a message asking you if you want to copy the contents of the previous box, as shown in this screenshot:

Note again that the second box above the drawing window has a darker border, meaning it is the box currently displayed in the drawing window. Within the window, you have the option to copy the contents of the previous box (YES, COPY) or draw the structure yourself (START NEW). Click one of these two options to start your work in the box. (You can click on your desired option either in the main drawing window or in the smaller box above it.) Copying structures from previous boxes can save you time and avoid the common errors of accidentally omitting or gaining atoms. You simply modify the copied structure so that it conforms to what is expected for the current box.
You only get one opportunity to copy the contents of the previous box; the prompt is only available the first time you click on an empty box. If you copy the previous box, begin modifying the structure, and then decide you want to start over, resetting the drawing window means you'll then need to draw the structure yourself.
Here is a video showing the process of using the copy feature:
Adding Curved Arrows
Multi-step mechanism problems require you to show how a reaction occurs by drawing curved arrows on structures. (In some problems you will also need to draw the structures themselves.) To draw curved arrows, you’ll use the Electron Flow tool found in the left toolbar. Clicking on Electron Flow icon twice reveals a dropdown menu with two options:

Electron Flow Tool Dropdown Menu Options | Tool Name | Tool Function |
| Electron Flow Double Arrow | Draws a double-headed arrow to show the movement of a pair of electrons. |
| Electron Flow Single Arrow | Draws a single-headed arrow (“fishhook”) to show the movement of a single electron. |


The majority of Smartwork Multi-Step mechanism problems involve the double-headed arrow type; the single-headed arrows are used only very rarely for specific topics. Since both arrow types (double-headed and single-headed) show the movement of electrons, they must always originate either at a bond or at nonbonding electrons (lone pair or radical). Arrows will always point either to a bond or to an atom.
Arrows always start at a bond, lone pair, or radical. Arrows always terminate either at a bond or at an atom.
Drawing an arrow of either type requires you to
1) click on the origin bond or nonbonding electrons on an atom,
2) drag the cursor to the destination bond or atom while holding down the mouse button, and
3) release the mouse button when the destination bond or atom becomes highlighted.
Let’s go through each of the steps. First, select the Electron Flow tool and choose which type of arrow you wish to draw. If you are starting the arrow at a lone pair or radical on an atom, move the cursor over that atom until it is highlighted with a blue circle as shown in this screenshot.

To make sure that the tip of your cursor arrow is pointing at an electron, not at the atom symbol itself, you can double click on the atom to enlarge it on the screen, shown in the screenshot below. This is so that you can click specifically on an electron where the arrow will start.

After selecting the starting location of the arrow, drag the cursor to the destination (atom or bond), which will then highlight in a blue circle, as shown below.

The screenshot above shows arrow drawing (bond forming) in progress. The arrow is pale gray, meaning it is in the process of being drawn; once it is completed, it will appear black. The blue circled hydrogen is the destination for the electrons—the termination point of the arrow. Once the destination atom or bond is highlighted, release the mouse button and the completed arrow will appear. Notice in the following screenshot that the arrow started at the electron pair. Also notice that the smaller box in the upper left corner reflects the work you have done in the drawing window:

To draw an arrow originating at a bond, follow the same process. Be sure the Electron Flow tool is selected and that you have chosen the appropriate arrow type. Move the cursor over the bond from which you want to start the arrow. It will highlight with a blue circle:

Click and drag to the arrow’s termination point. In this example, the arrow ends at the chlorine atom. Note that in the screenshot below, the chlorine atom is highlighted with a blue circle and the arrow is pale gray because it is in the process of being drawn.

Once the destination is highlighted with a blue circle, release the mouse and the arrow will appear:

Writing a Mechanism
Writing a mechanism in Smartwork involves drawing curved arrows and, frequently, structures. In mechanism problems, the Lone Pair tool will be present in the left toolbar, meaning that you need to draw nonbonding electrons on all atoms that have them. If you’ve overlooked drawing these electrons, Smartwork’s feedback will remind you when you submit the problem.
It’s important to carefully read the specific instructions for each box so that you know what is expected. You should also be attentive to including nonzero formal charges. These oversights will result in incorrect answers. All the structures you draw must be chemically correct, and using the “Copy Previous Box” feature described above will help you to avoid the common errors of drawing too few or too many atoms when you try to reproduce a structure.
Smartwork does allow you to submit one step at a time to check your work as you go. However, you should only do this if your instructor does not penalize or limit attempts, because otherwise you could lose points.
Submit a Support Request
Still need help? Submit a support ticket and a customer support specialist will be happy to assist you.
Opened a request already? Click here for an update.