
Smartwork is an online, self-graded homework system with interactive content designed to engage and challenge your students. Smartwork works on computers and tablets and integrates with the Norton Ebook Reader and other Digital Toolkit products. This page provides details on how to access Smartwork, and how to create student sets.
Logging in
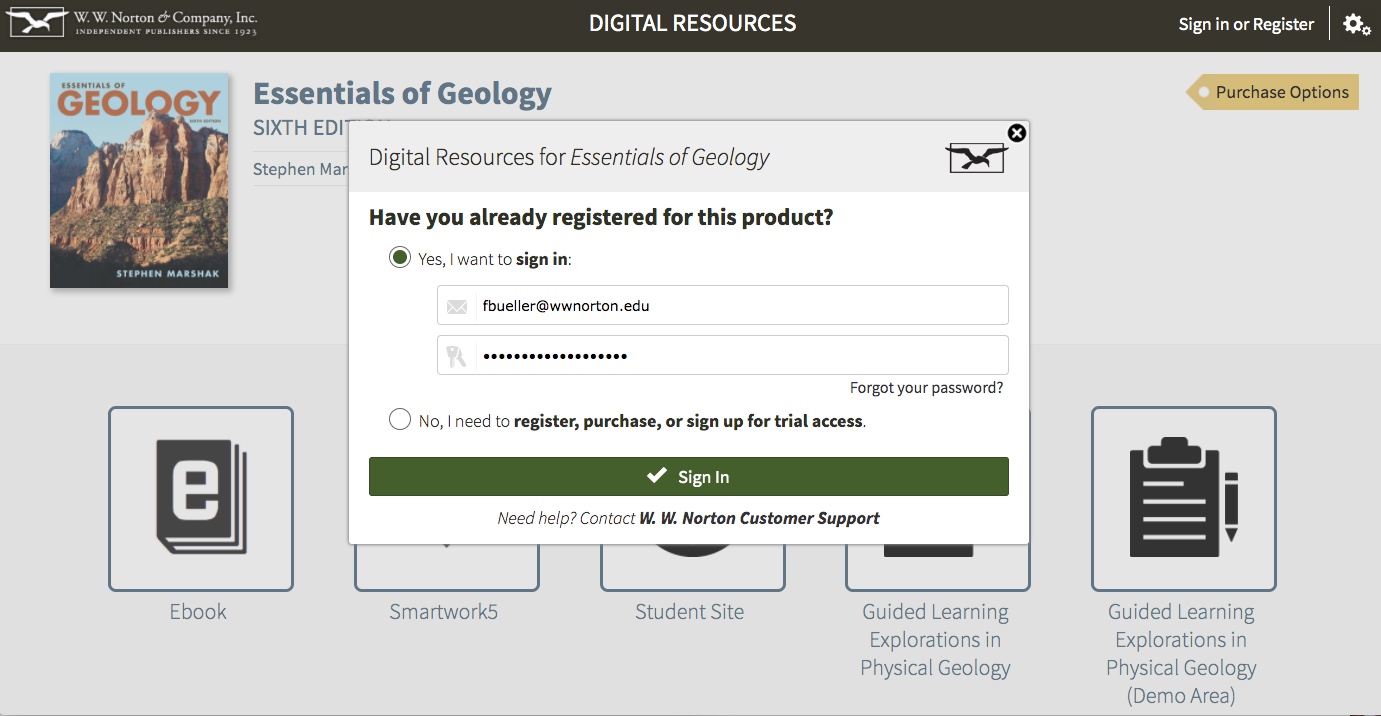
To log in, go to the digital product’s home page and select the Smartwork5 tile. Use your email address and Norton instructor account password.
Creating Student Sets
What are Student Sets?
A Student Set is your class section. Student Sets allow you to view the work and results completed by a particular group of students.
Creating Student Sets
There are two ways for you to create a Student Set: from scratch, or you can create a new Student Set that is based on an existing Student Set.
Basing your new Student Set on an existing one allows you to copy any assignments that you use in one Student Set into another Student Set. You may want to create a Student Set based on an existing Student Set if you are teaching multiple sections of the same course. Furthermore, if you and another instructor are both teaching different sections of the same course, you have the option to base your Student Set off of the other instructor’s Student Set.
Creating a Student Set from Scratch
To create a Student Set from scratch, do the following:
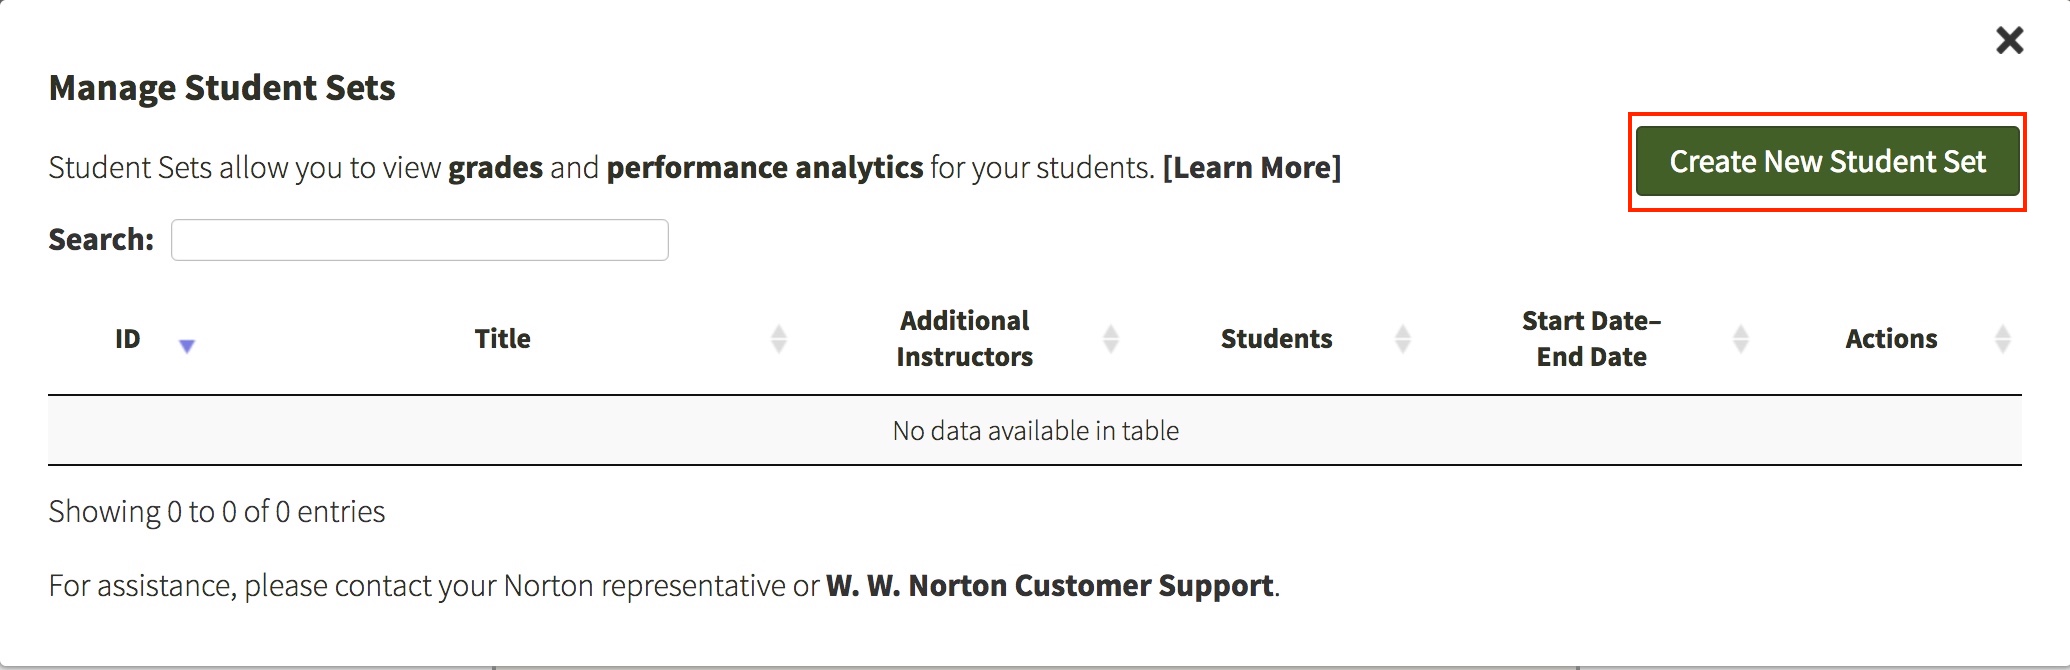
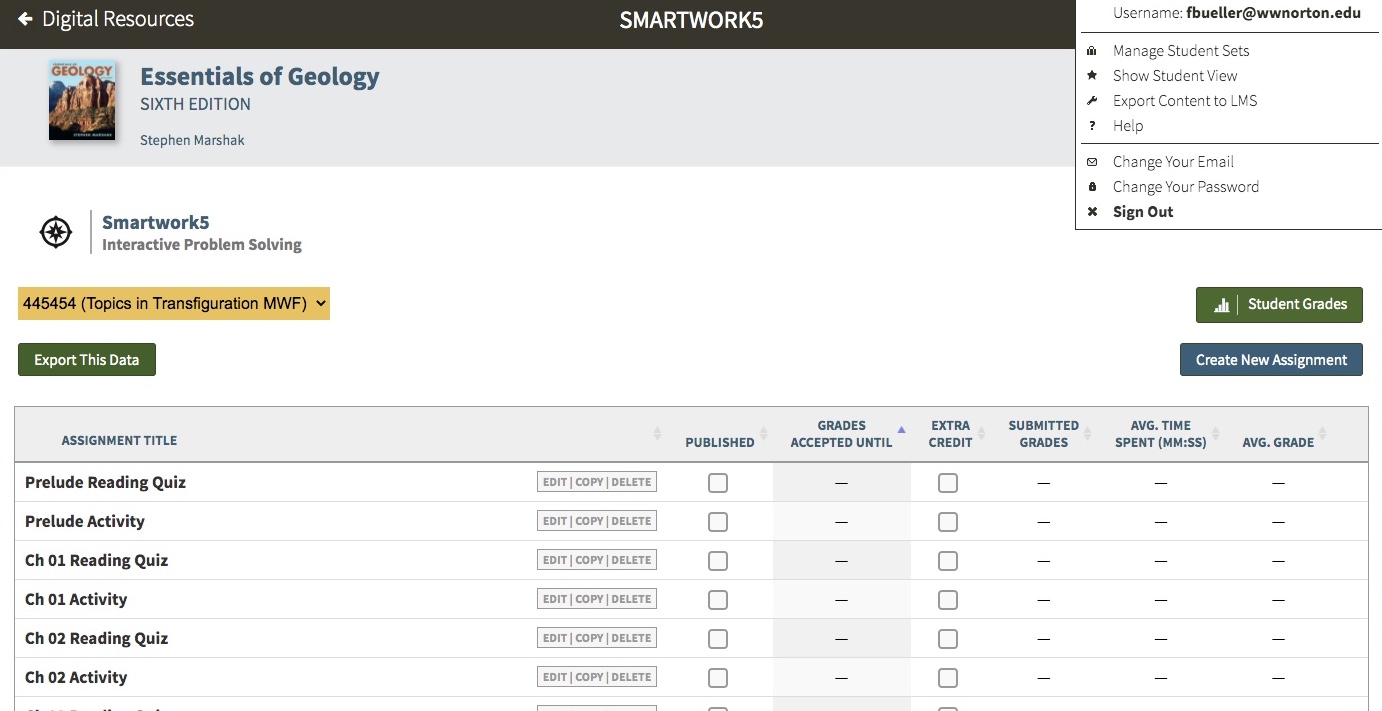
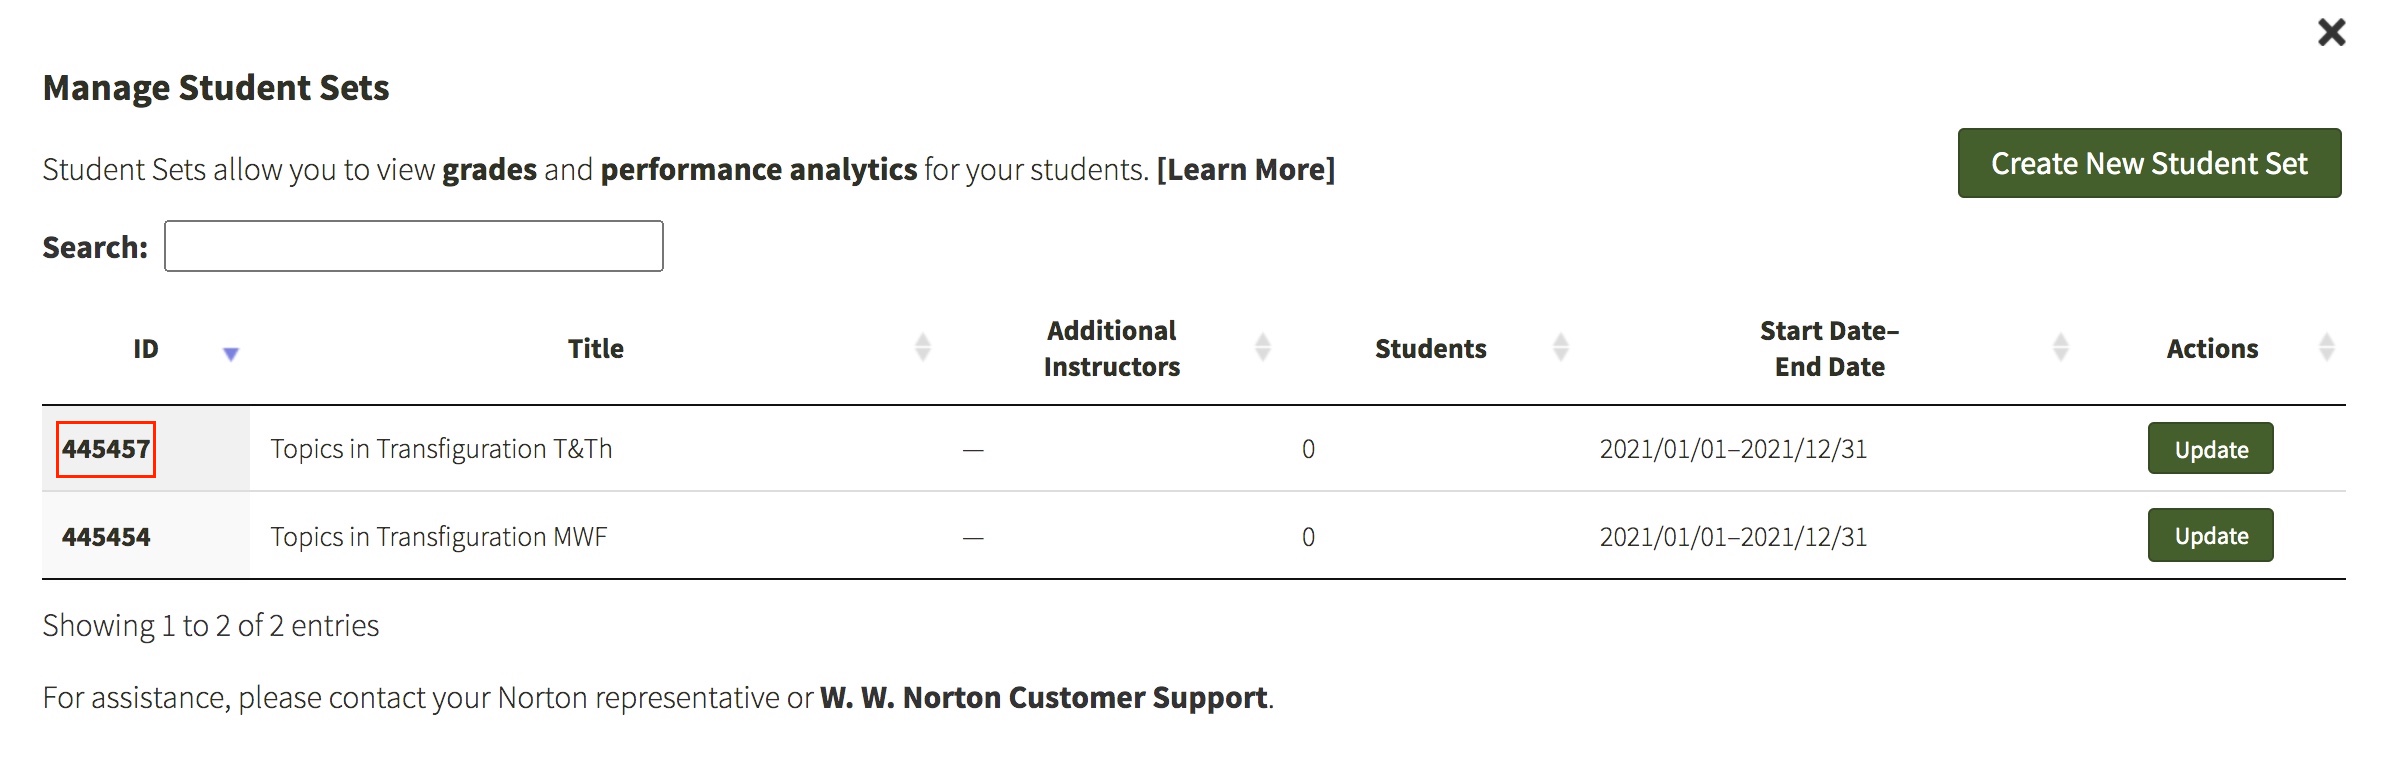
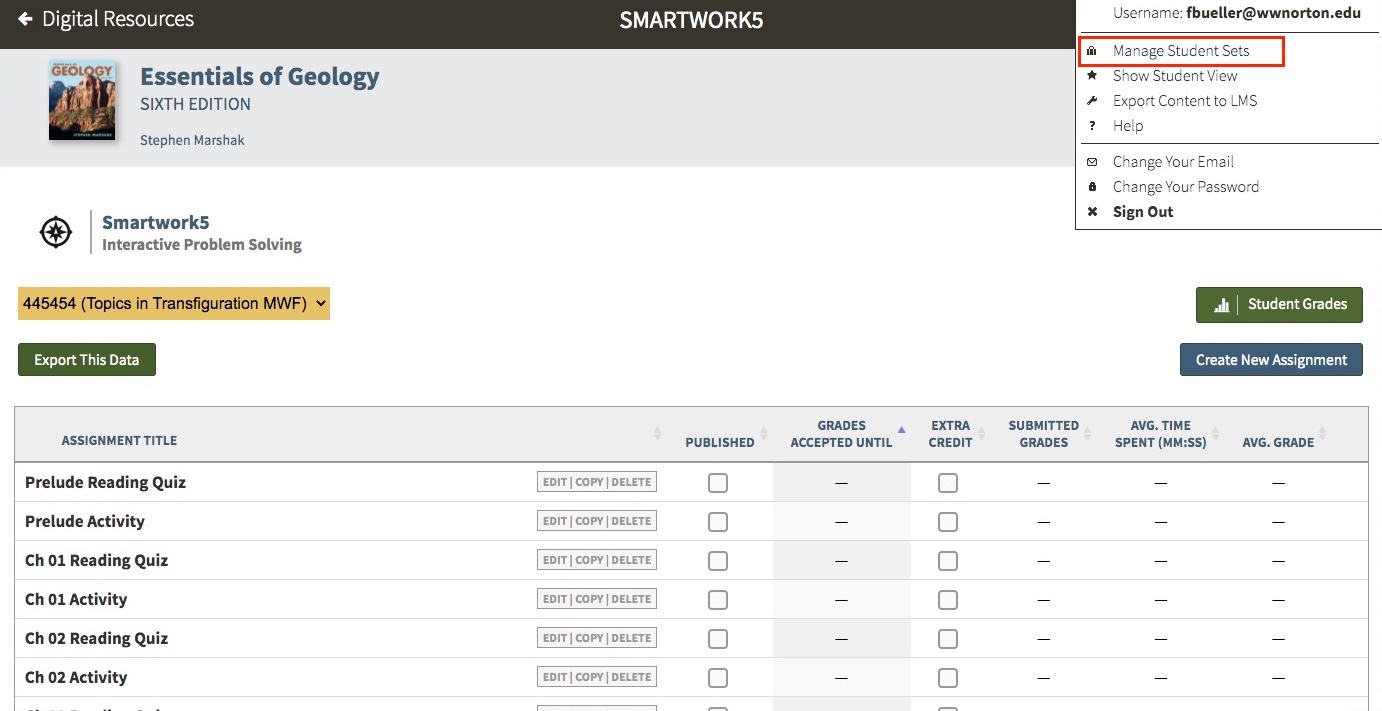
- After you log in, go to the gear menu in the upper right corner of your screen and click “Manage Student Sets.” You may manage Student Sets from the digital landing page or from the Smartwork page (below is an example from a Smartwork page).

- In the window, click the "Create New Student Set" button, located in the top-right corner.
- You will see a window that asks you whether you want to create your Student Set from scratch (option 1), or if you want to base your student set off of an existing student set (option 2). Select “Create a new Student Set from scratch.”
- Enter a title for your Student Set.
- Select your state, province, or country. Then select your school type and school affiliation.
- Select the start and end date for your course.
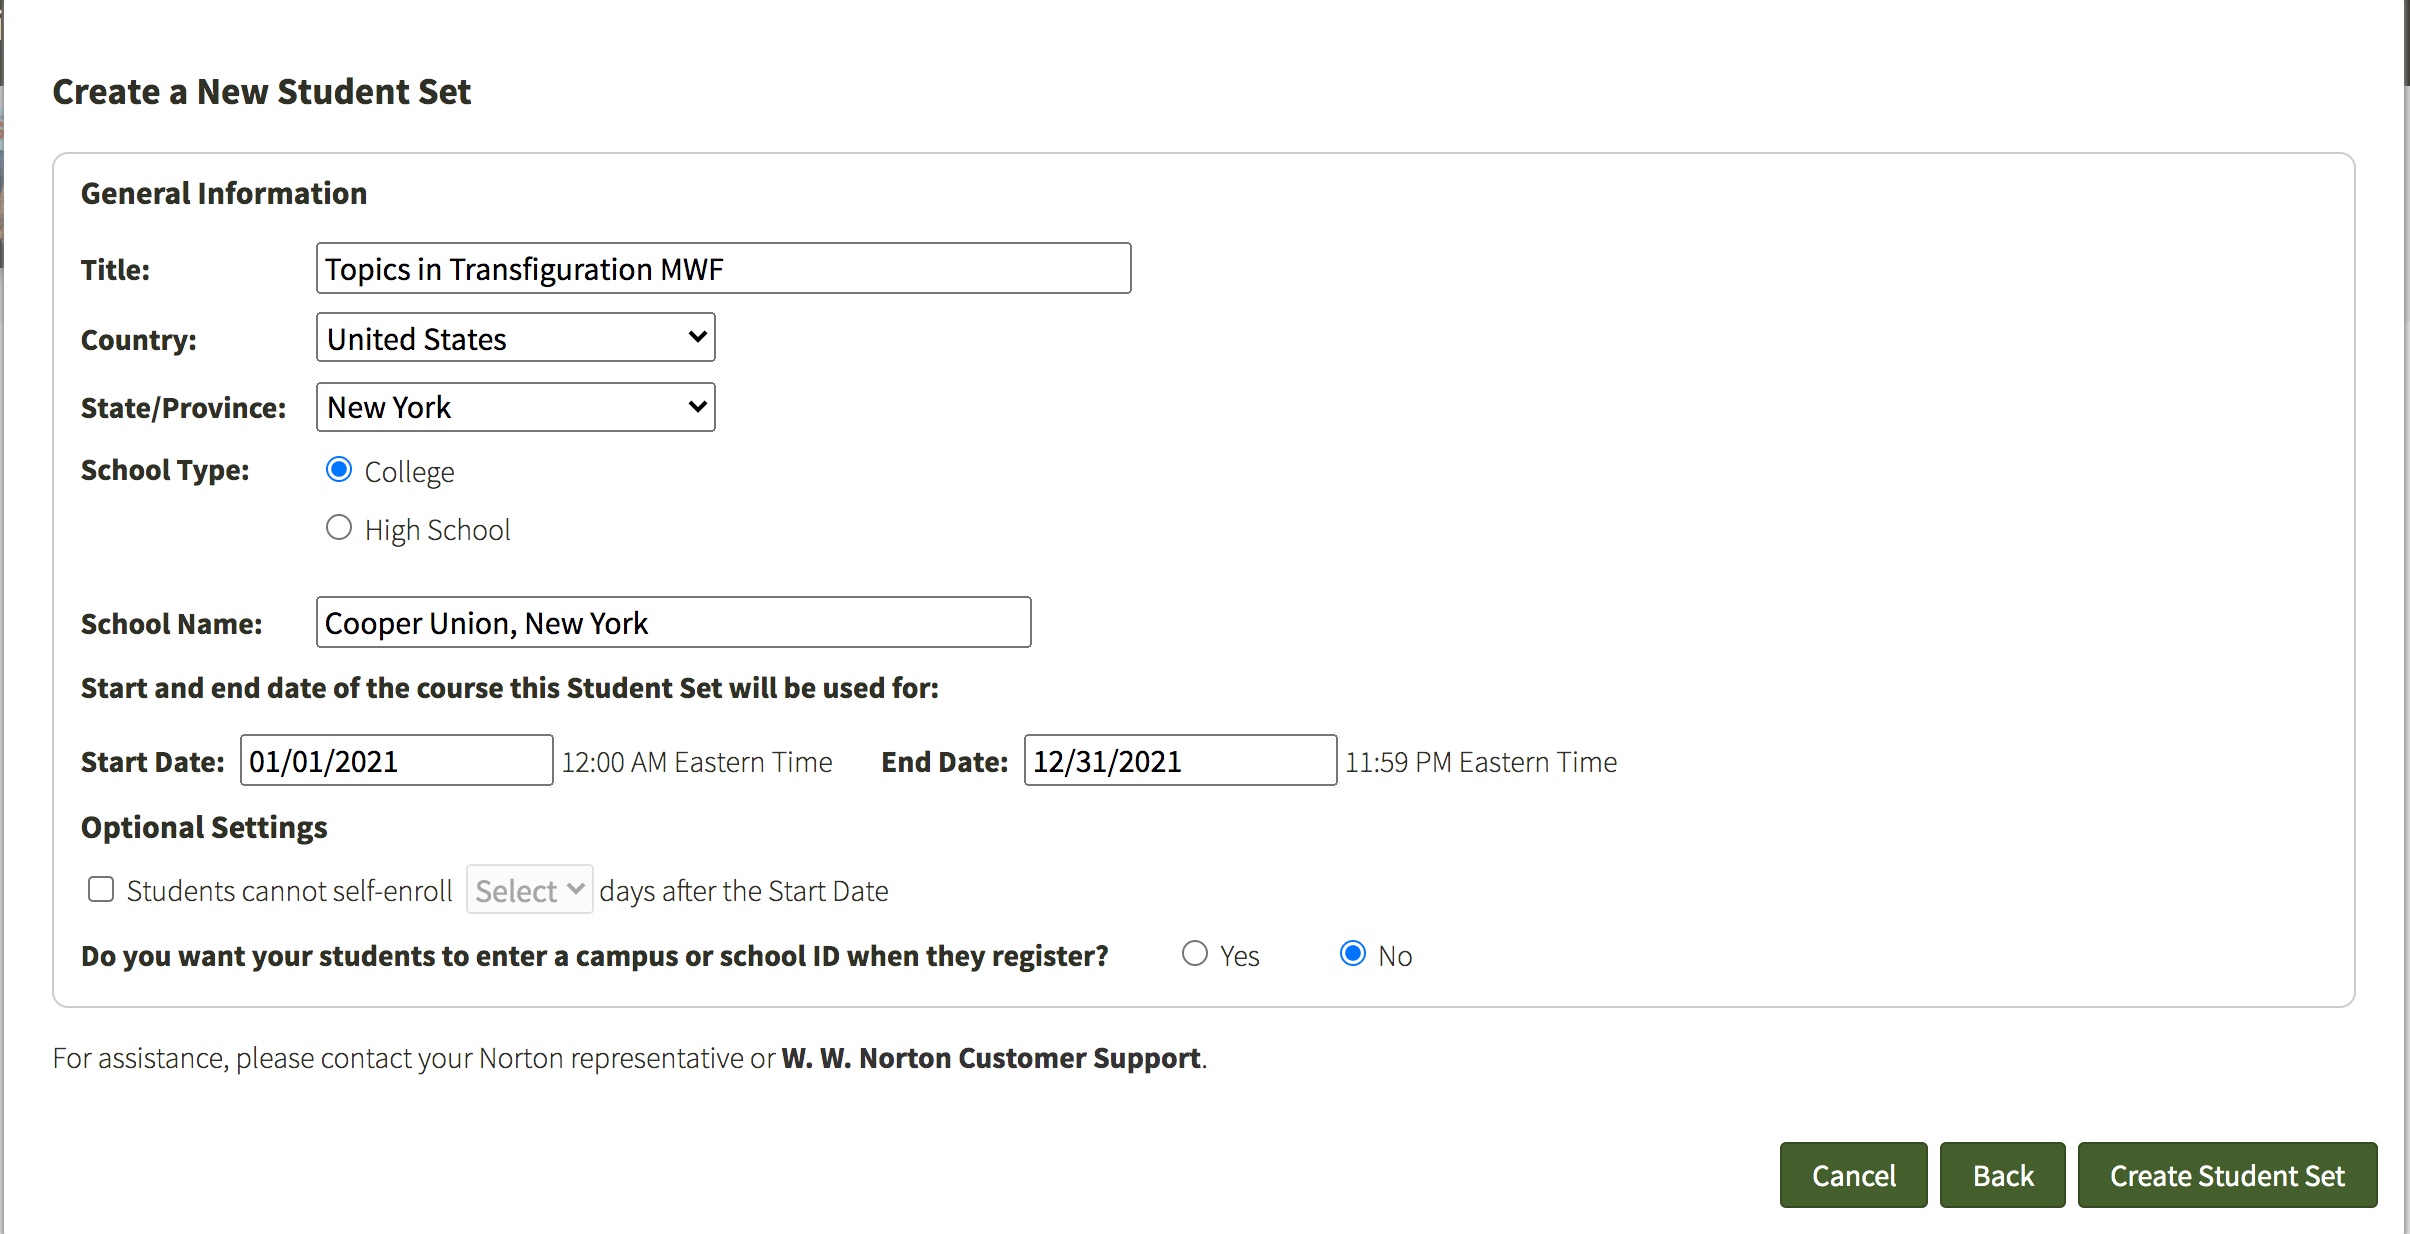
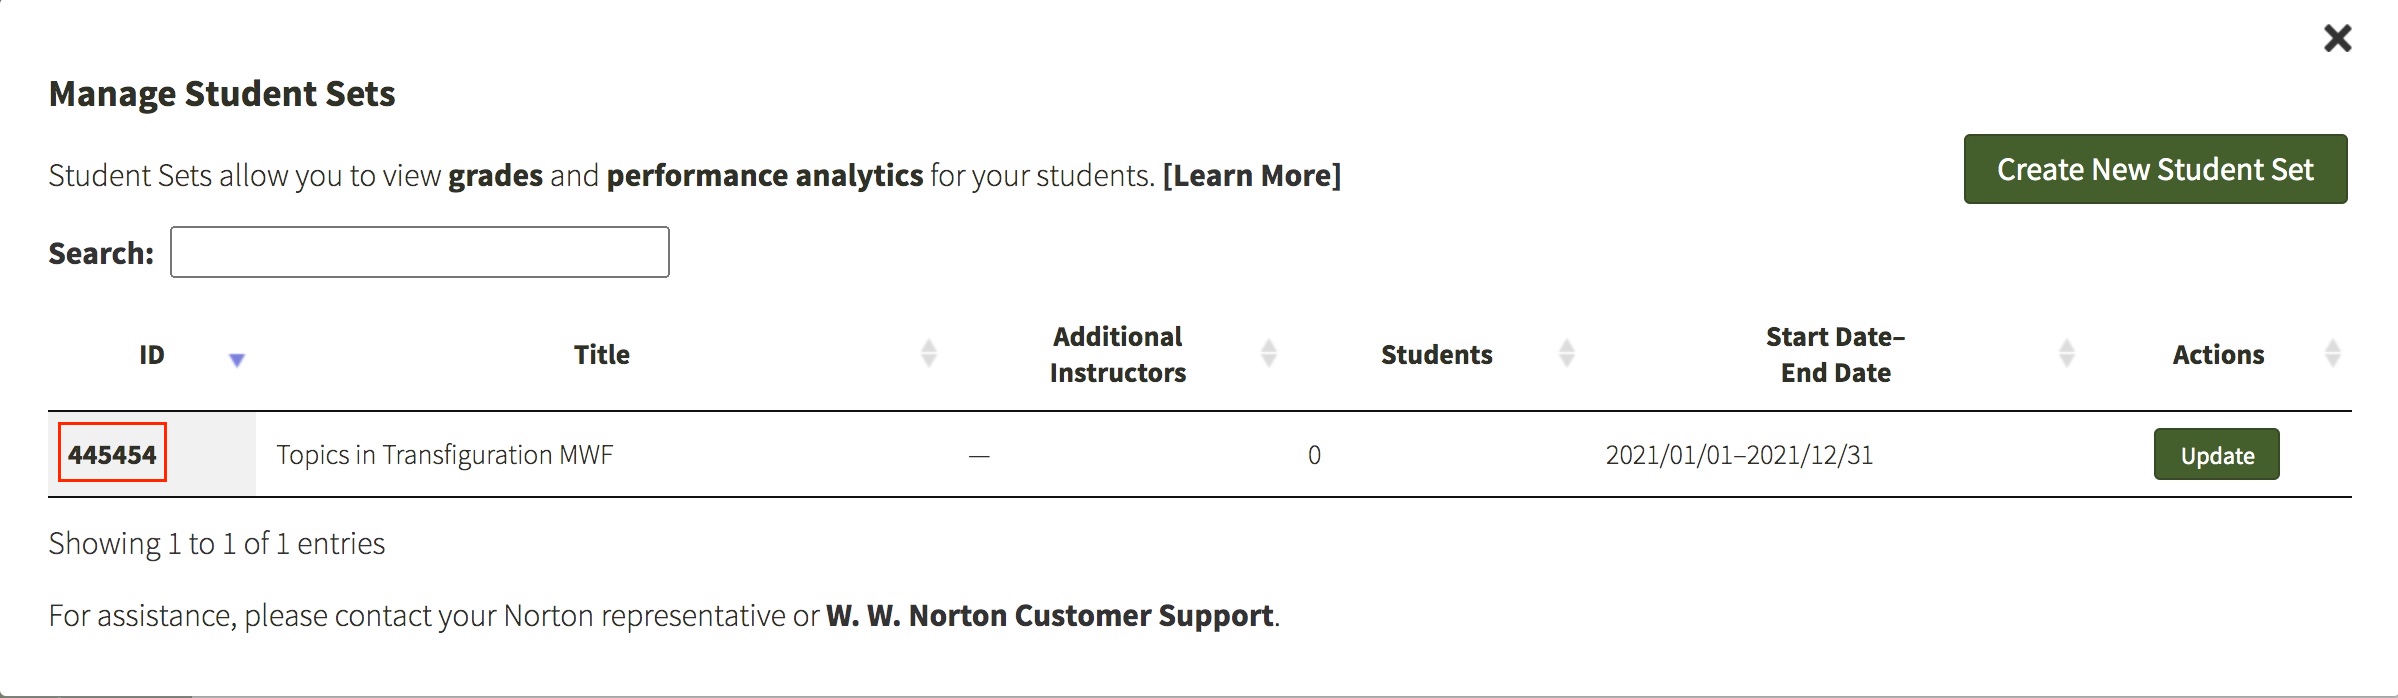
- Click "Create Student Set." Make a note of the Student Set ID number. You should distribute this to students so they can add themselves to your Smartwork course upon registering.
School/Campus ID
You can require your students enter a School/Campus ID, which will then be attached to their grade exports. You'll see students' IDs included in these grade report interfaces in Student Grades, and in the CSV export of grades you can download there.
- Note: If you are integrating Norton products directly with a campus Learning Management System (LMS), this ID field will exist within the Norton product only. It will not be synchronized with the student record in the LMS.
When you create a Student Set, look for the option in the interface that says: "Do you want your students to enter a campus or school ID when they register?" Click "Yes" and a field will appear where you can define what the ID itself is called. When you activate this setting, students will be prompted to enter the ID when they enroll in your Student Set.
The default name is "School ID." You can call this whatever will be clearest to your students; this is sometimes called a Student ID. If a student doesn't enter their School ID right away, they can still access and work on the activities normally. But each time they log in, they'll see another prompt to enter the ID.
- Note: If a student enters an incorrect ID, they won't be able to change it. If this occurs, you or a Teaching Assistant can correct their record in the Manage Student Set interface.
Creating a Student Set Based on an Existing Student Set
To create a Student Set based on an existing Student Set, do the following:
- After you log in, go to the gear menu in the upper right corner of your screen and click “Manage Student Sets.”
- In the window, click the "Create New Student Set" button, located in the top right.

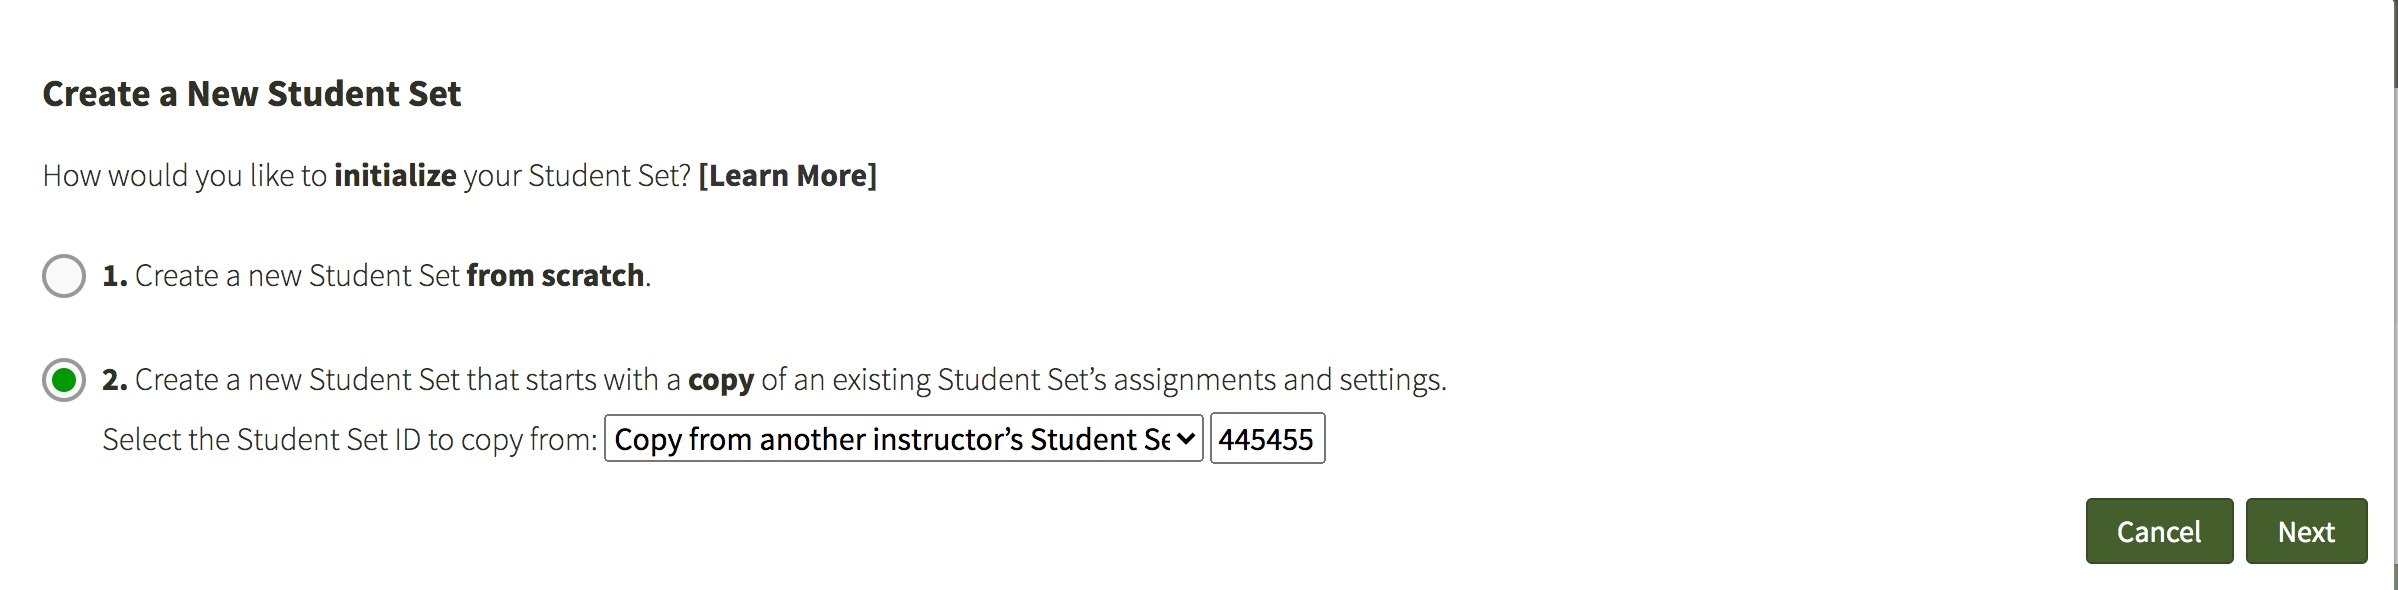
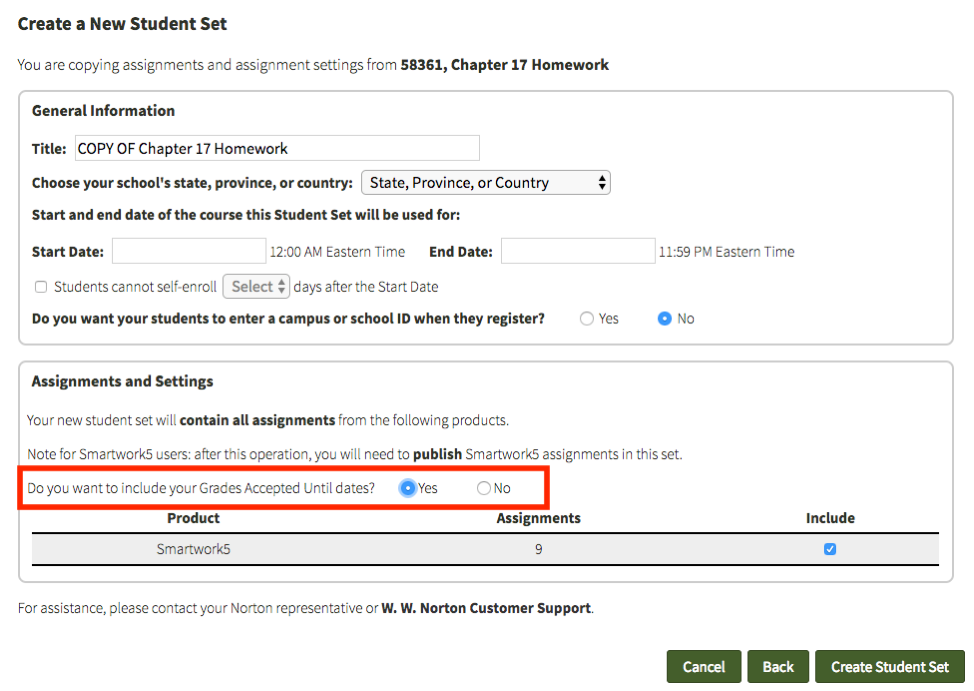
- You will see a window that asks you whether you want to create your Student Set from scratch (option 1), or if you want to base your Student Set off of an existing Student Set (option 2). Select “Create a new Student Set that starts with a copy of assignments and settings from a previous Student Set.”
- Select the Student Set you would like to copy from the dropdown menu. The dropdown menu will pre-populate with the Student Sets you have created.
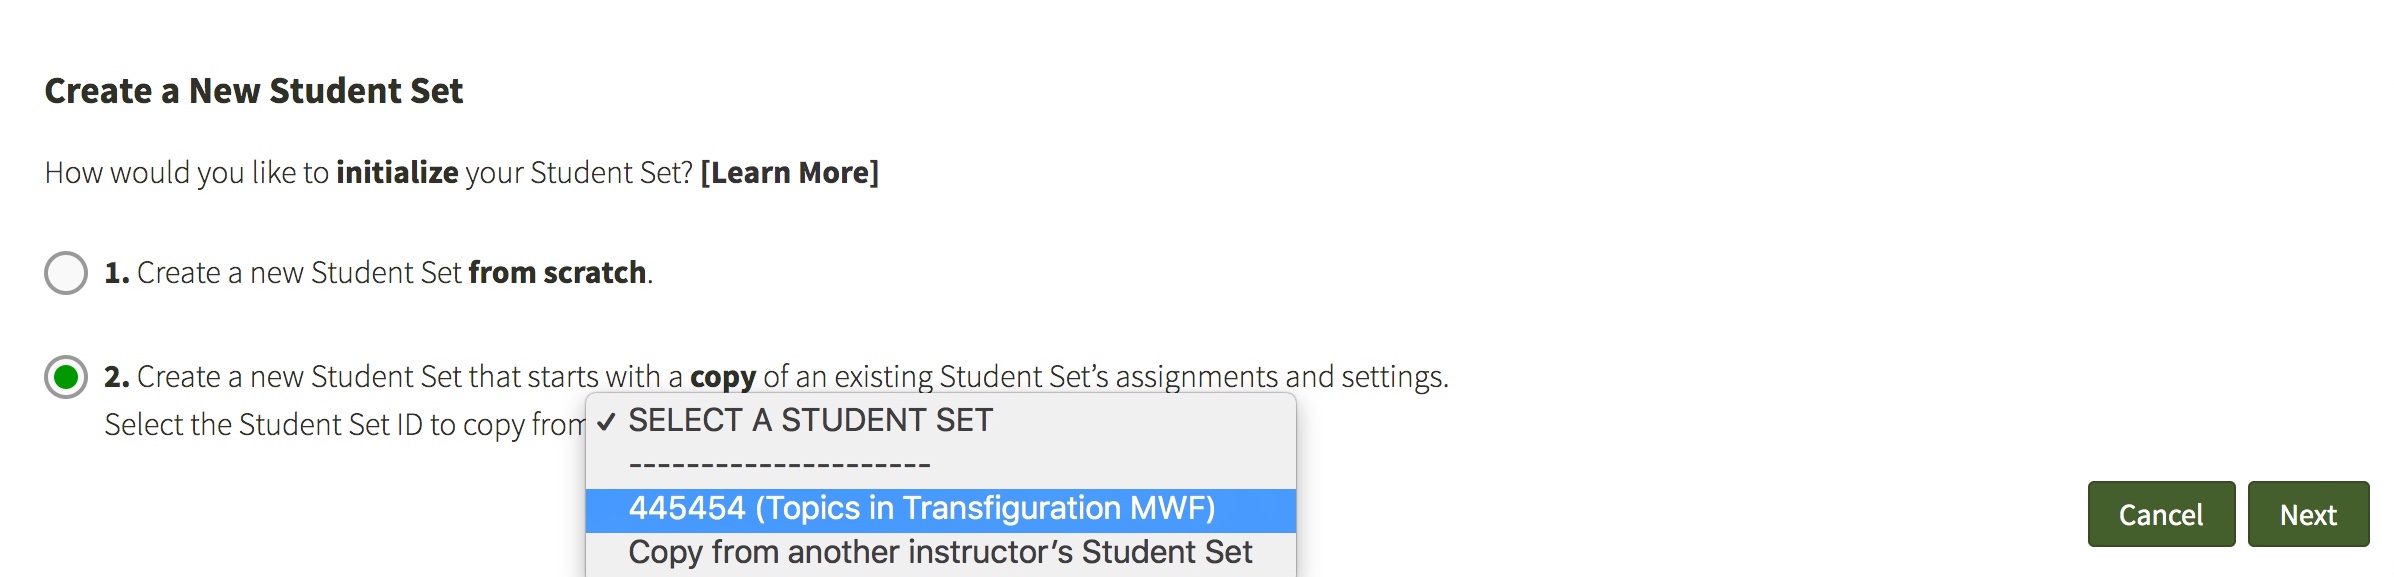
- If you are basing your Student Set off of another instructor’s Student Set, select “Copy from another instructor’s Student Set” from the dropdown menu.
- Then, enter the Student Set ID of the other instructor’s Student Set.
- Edit your new Student Set’s name. By default, it will be titled “COPY OF…” the existing Student Set’s name.
- Select your state. Then, select your school affiliation.
- Select the start and end date for your course.

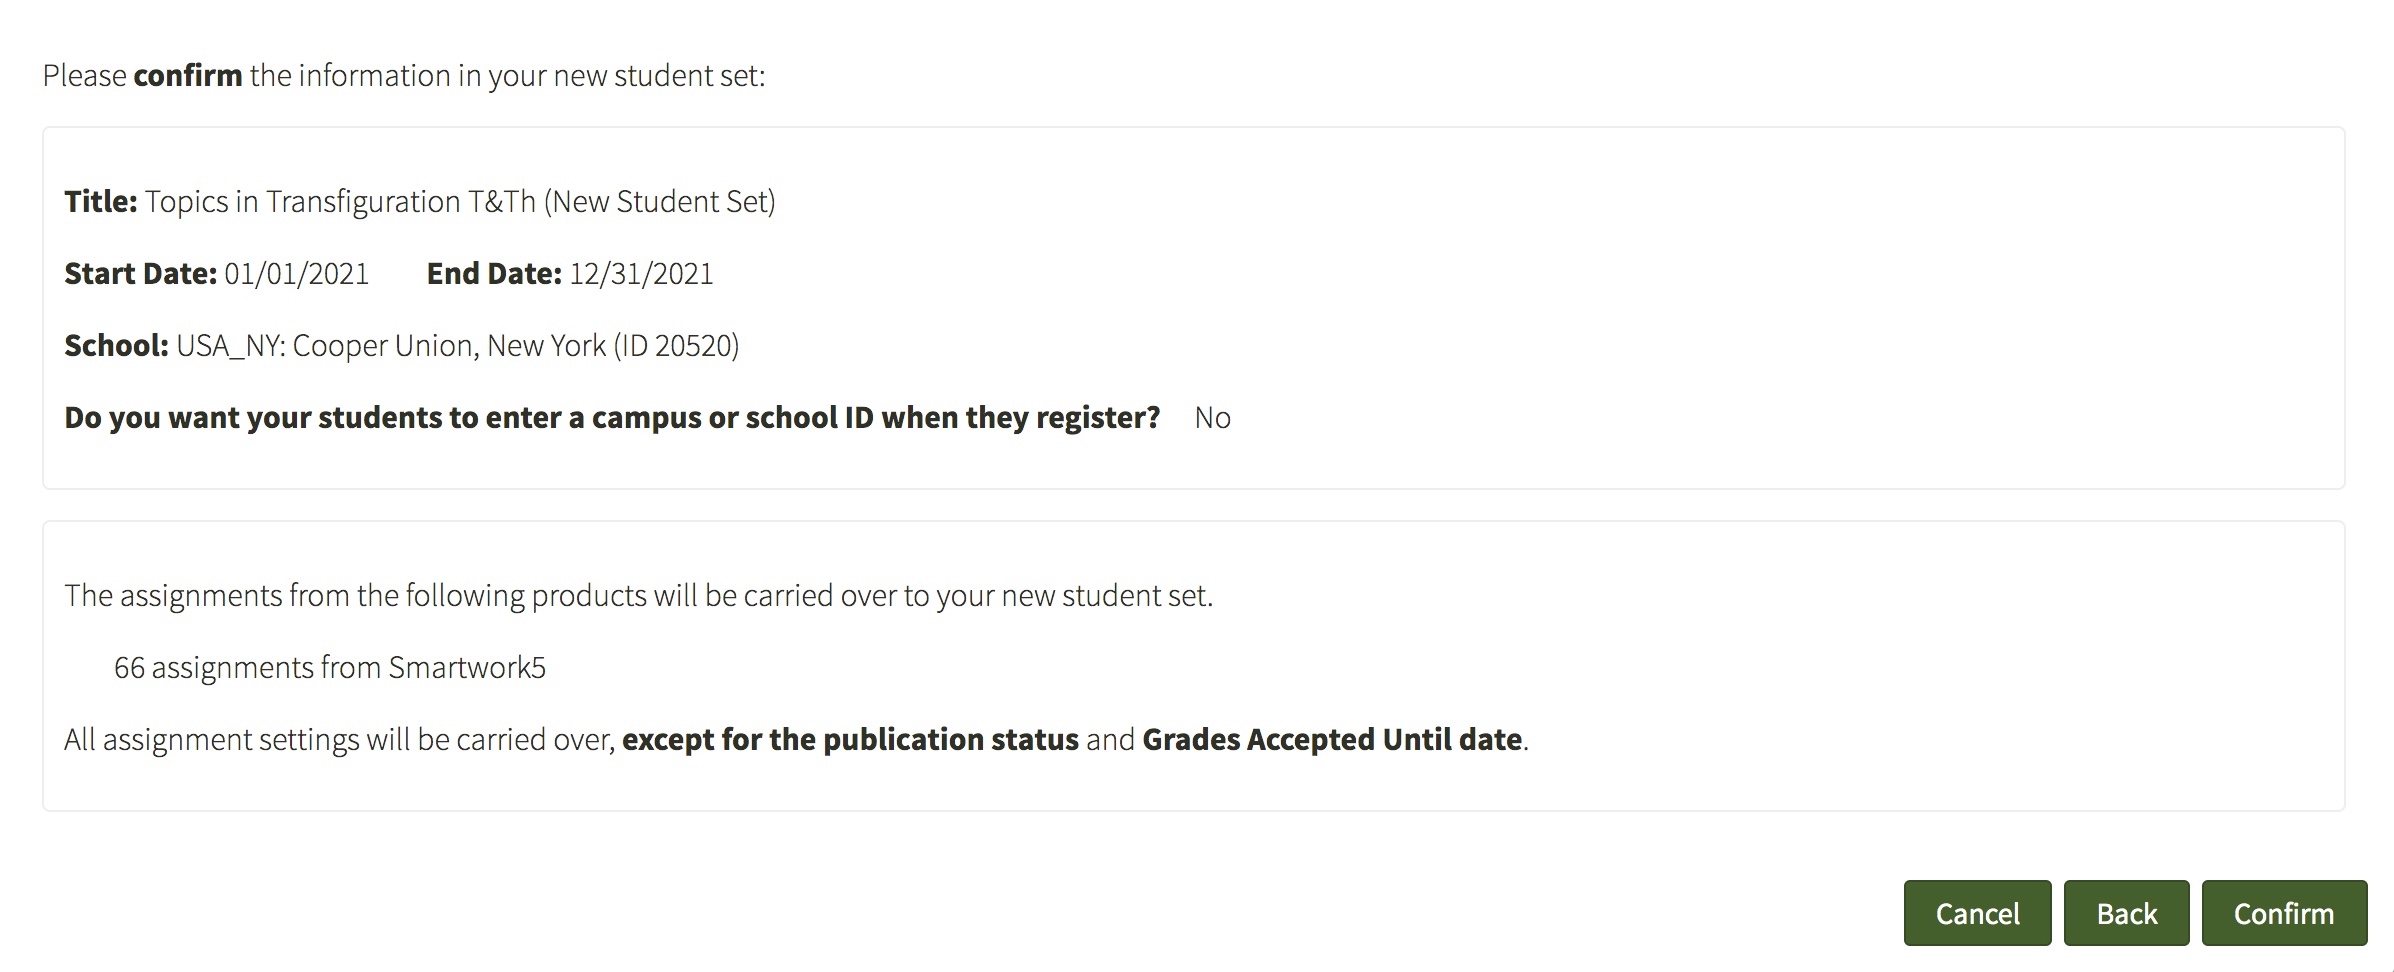
- Click "Create Student Set." A window will pop up asking you to confirm the information that filled out for the new Student Set. Click "Confirm."
- Make a note of the Student Set ID number. You should distribute this to students so they can add themselves to your Smartwork course upon registering.

Note that copying a Student Set does not carry over the student roster or Teaching Assistants. However, you can carry over the Grades Accepted Until dates for each assignment. Simply select Yes next to "Do you want to include your Grades Accepted Until dates?" and the GAUs for each assignment will copy over to your new Student Set. (You will still need to Publish each assignment in the copied Student Set before students can access them.)
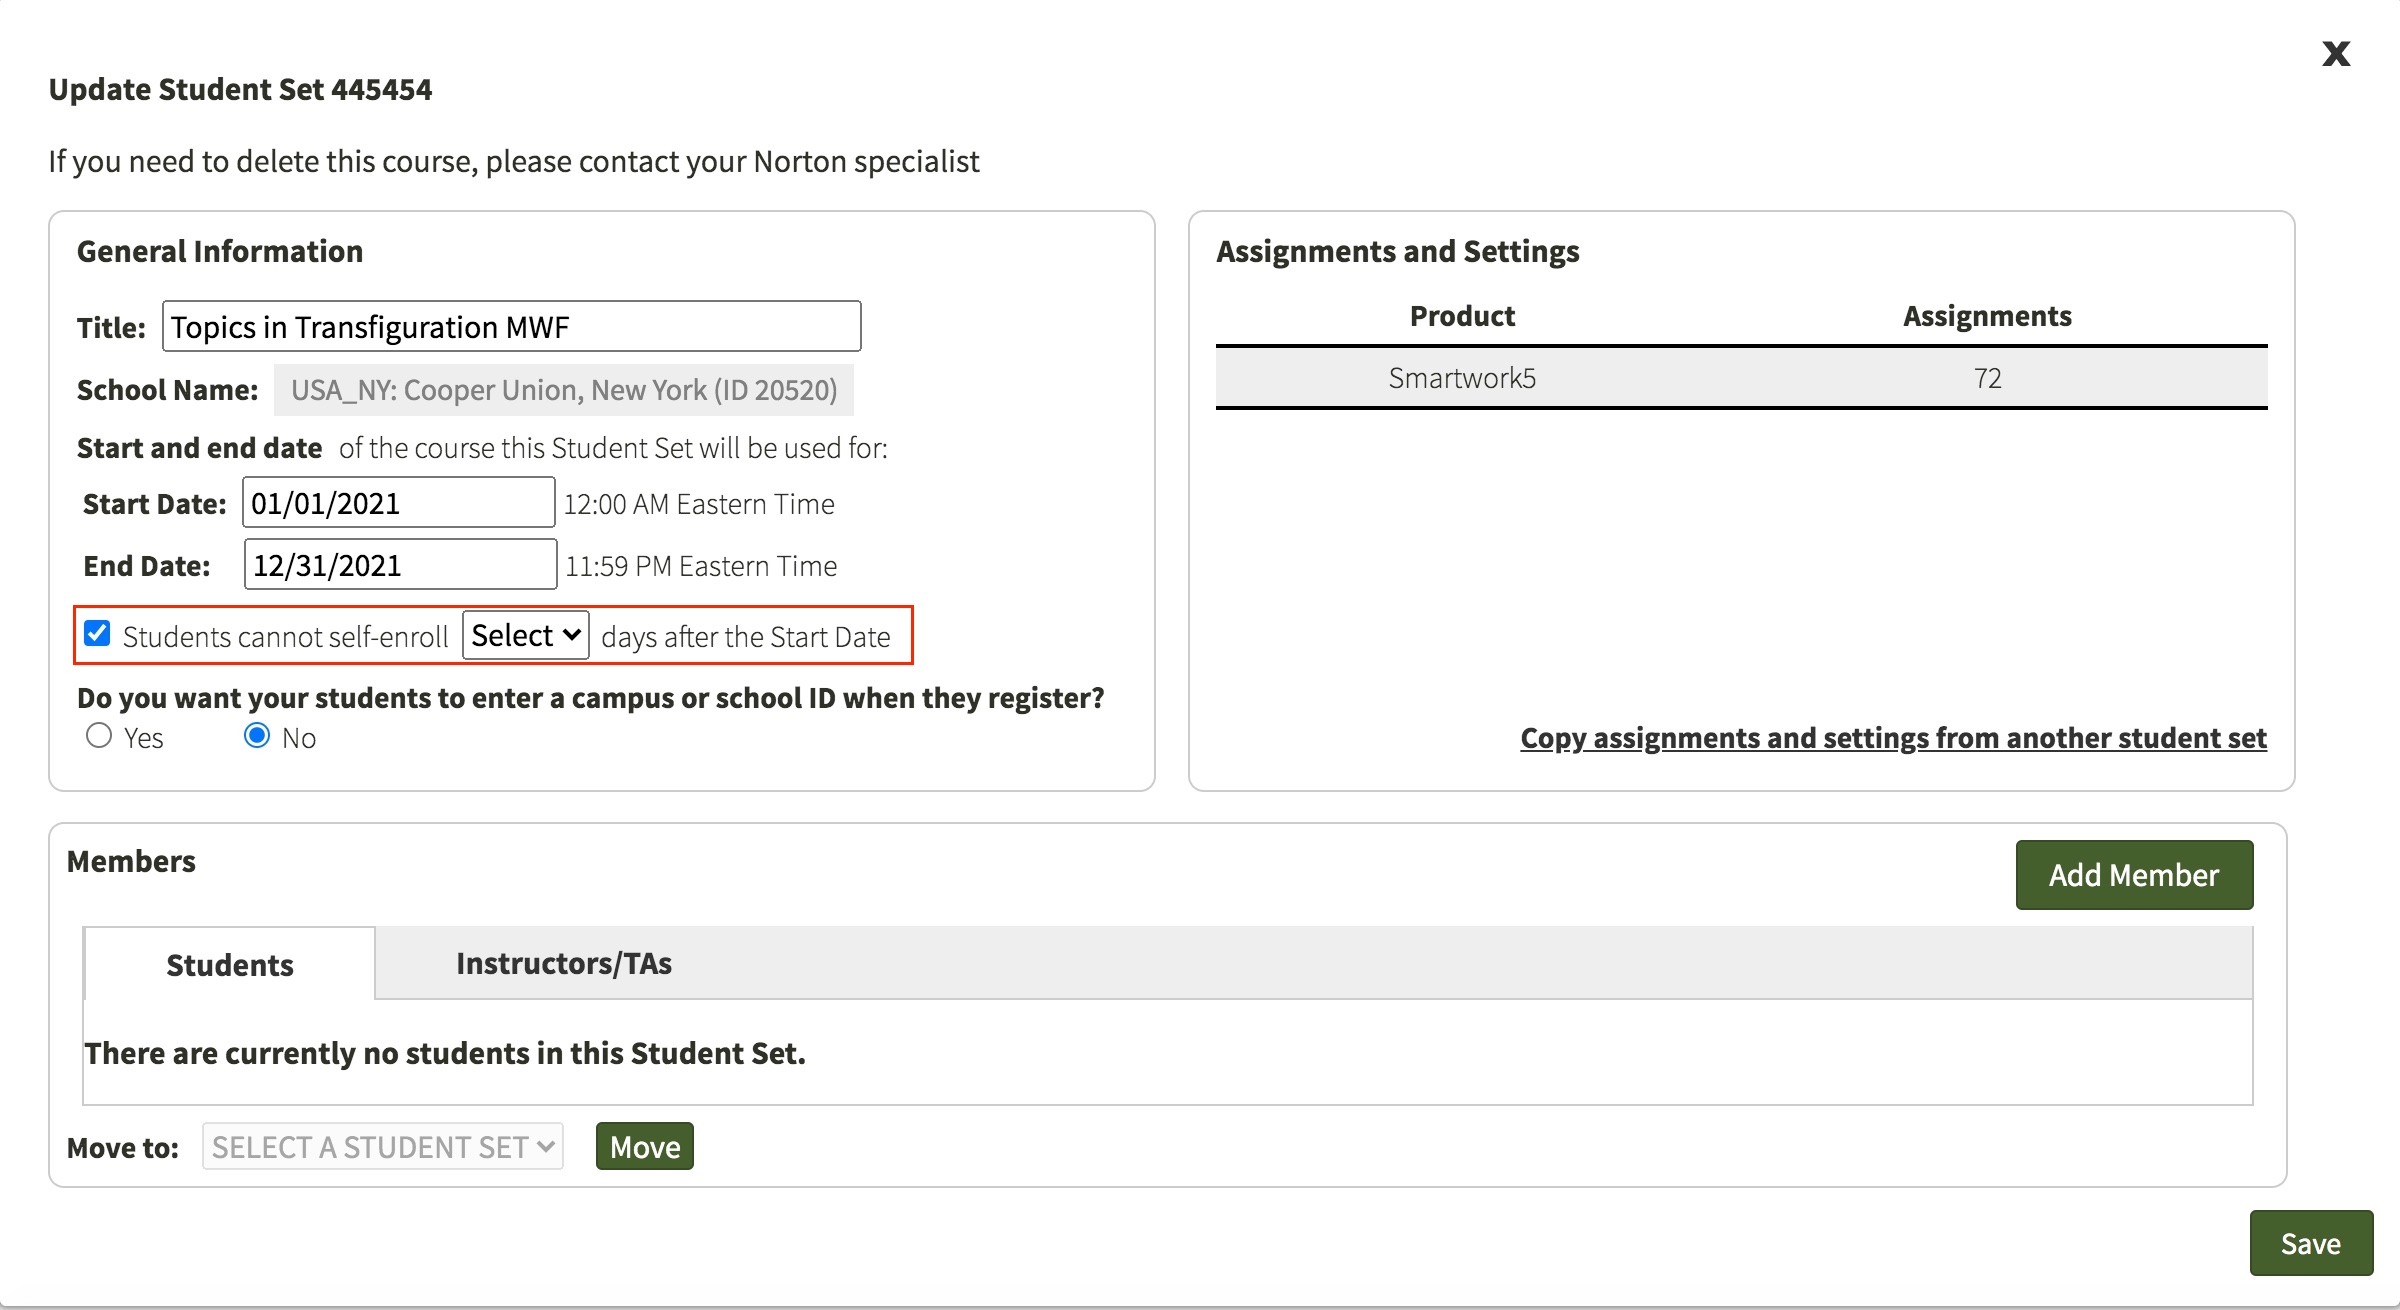
Self-enrollment Periods
Whether you are creating your own Student Set from scratch or copying a Student Set, you can choose to add a self-enrollment period. This is the date after which a student cannot enroll in the Student Set without your help.
- Enter Manage Student Sets through the gear menu in the upper-right corner.
- Look in the General Information box and check the box next to "Students cannot self-enroll /blank/ days after the Start Date."

- In the dropdown, choose the number of days after which you want students to lose the ability to enroll themselves. This can be between 5 and 100 days.
- Click Save at the bottom-right of the window, and exit.

After this self-enrollment period ends, you as the instructor can add the student to your Student Set. (See instructions here.)
Managing Student Sets
Once you have created your Student Sets, you can edit them, add co-instructors, or manually add students.
Deleting a Student Set
If you need to delete a student set you created, please contact your W. W. Norton representative who can assist you in deleting your student set.
Editing a Student Set
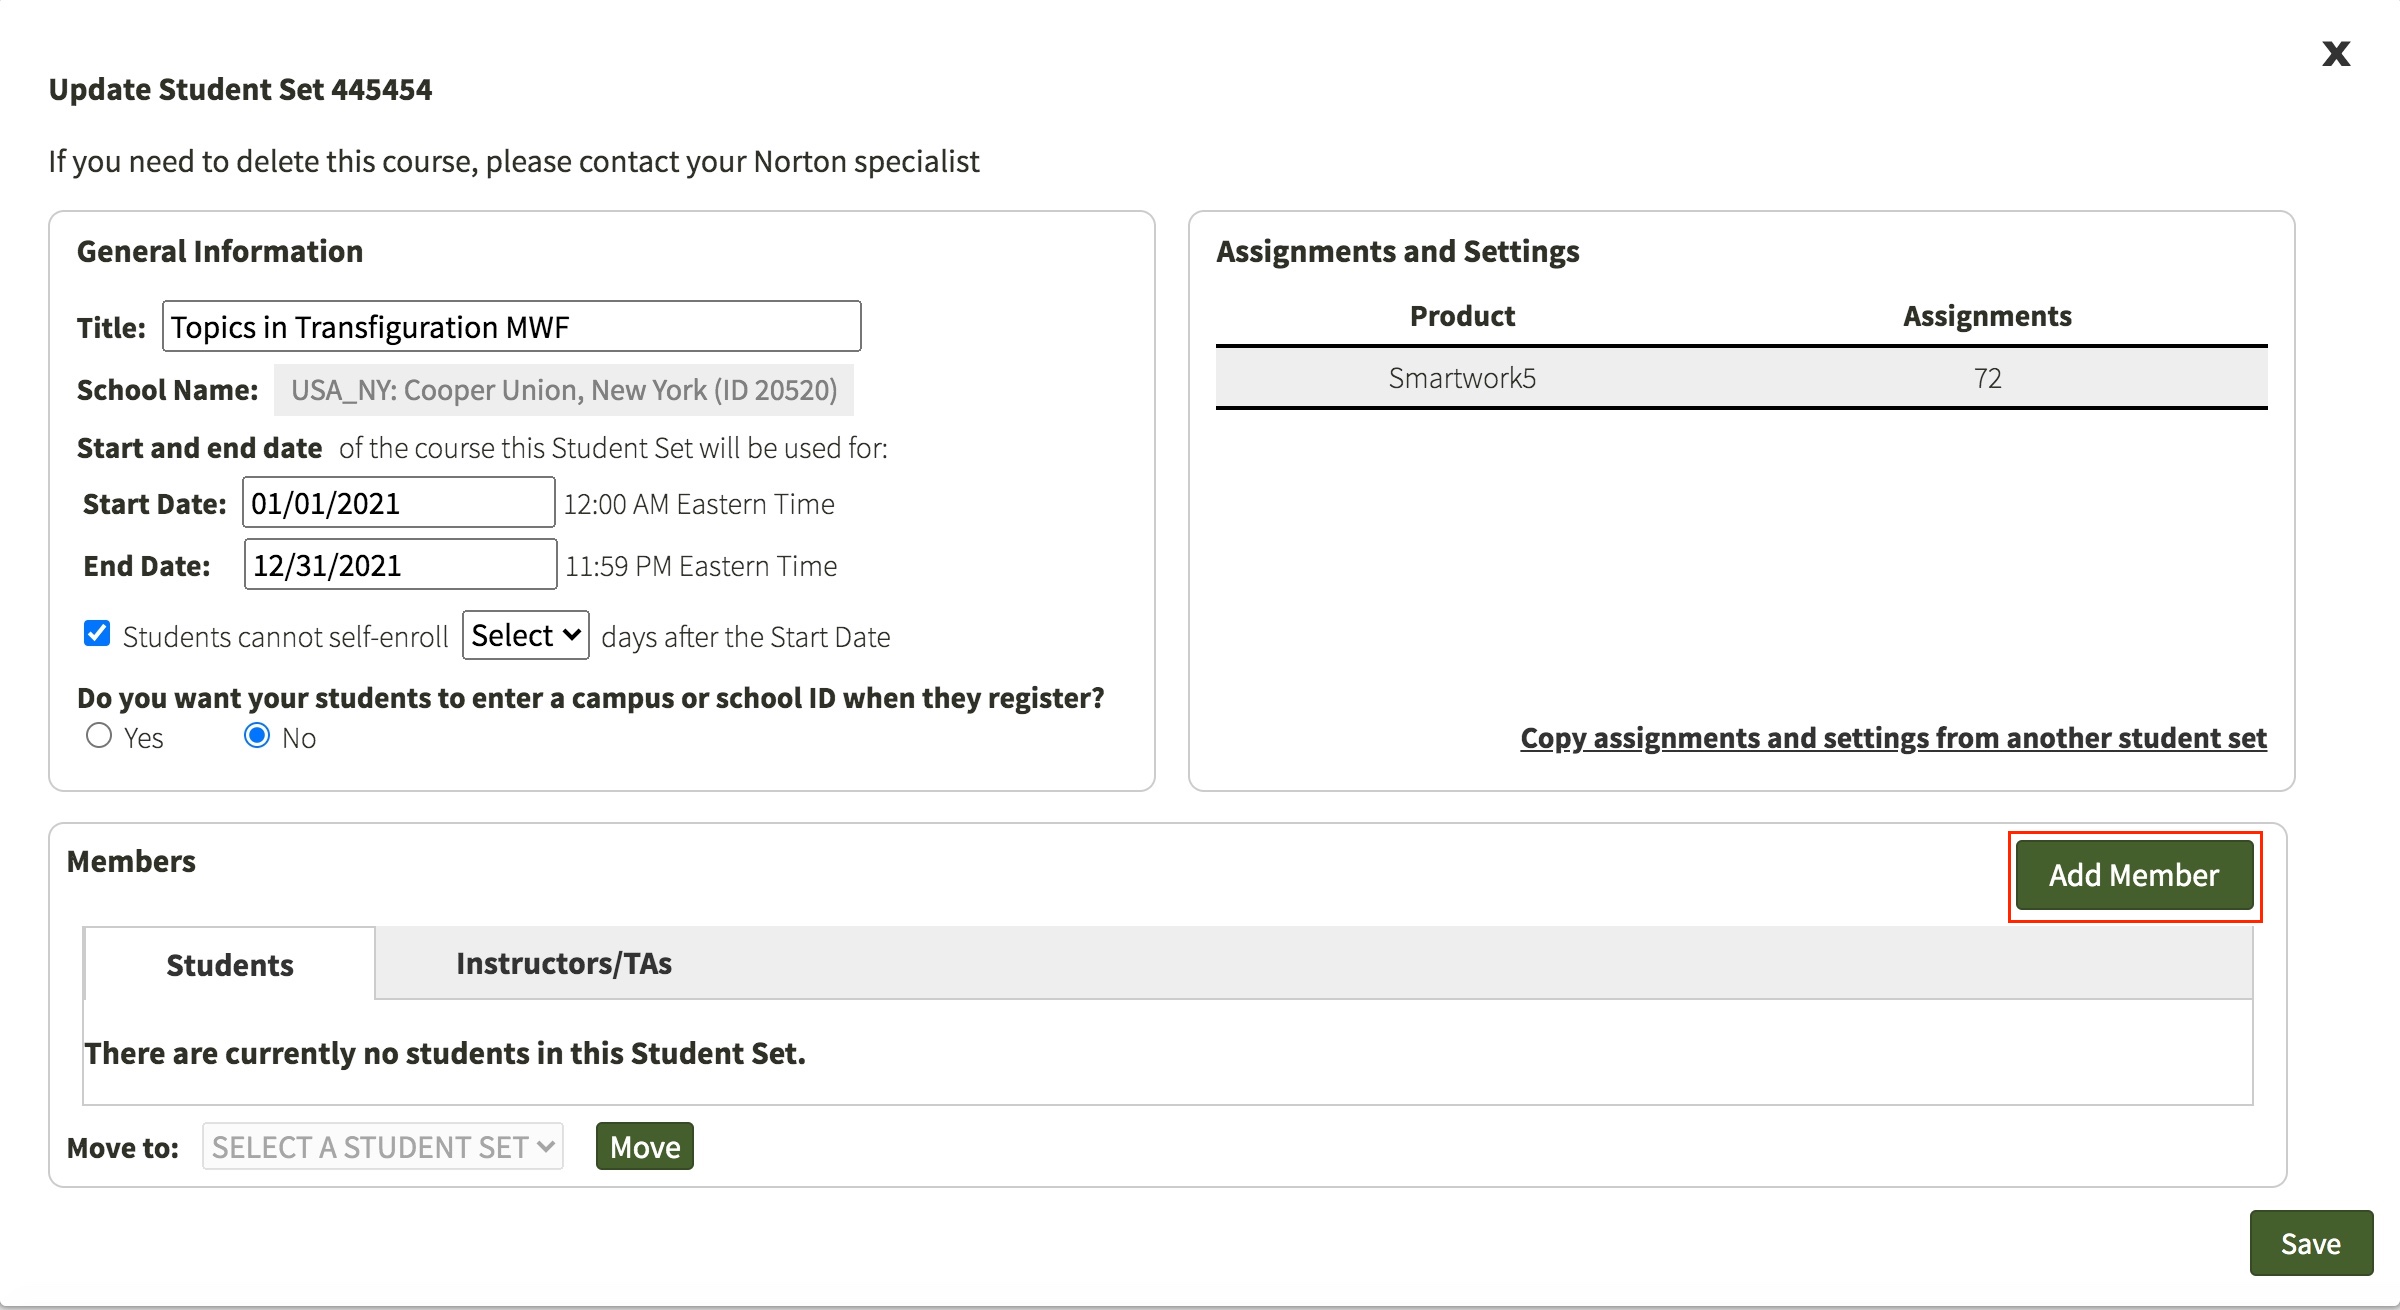
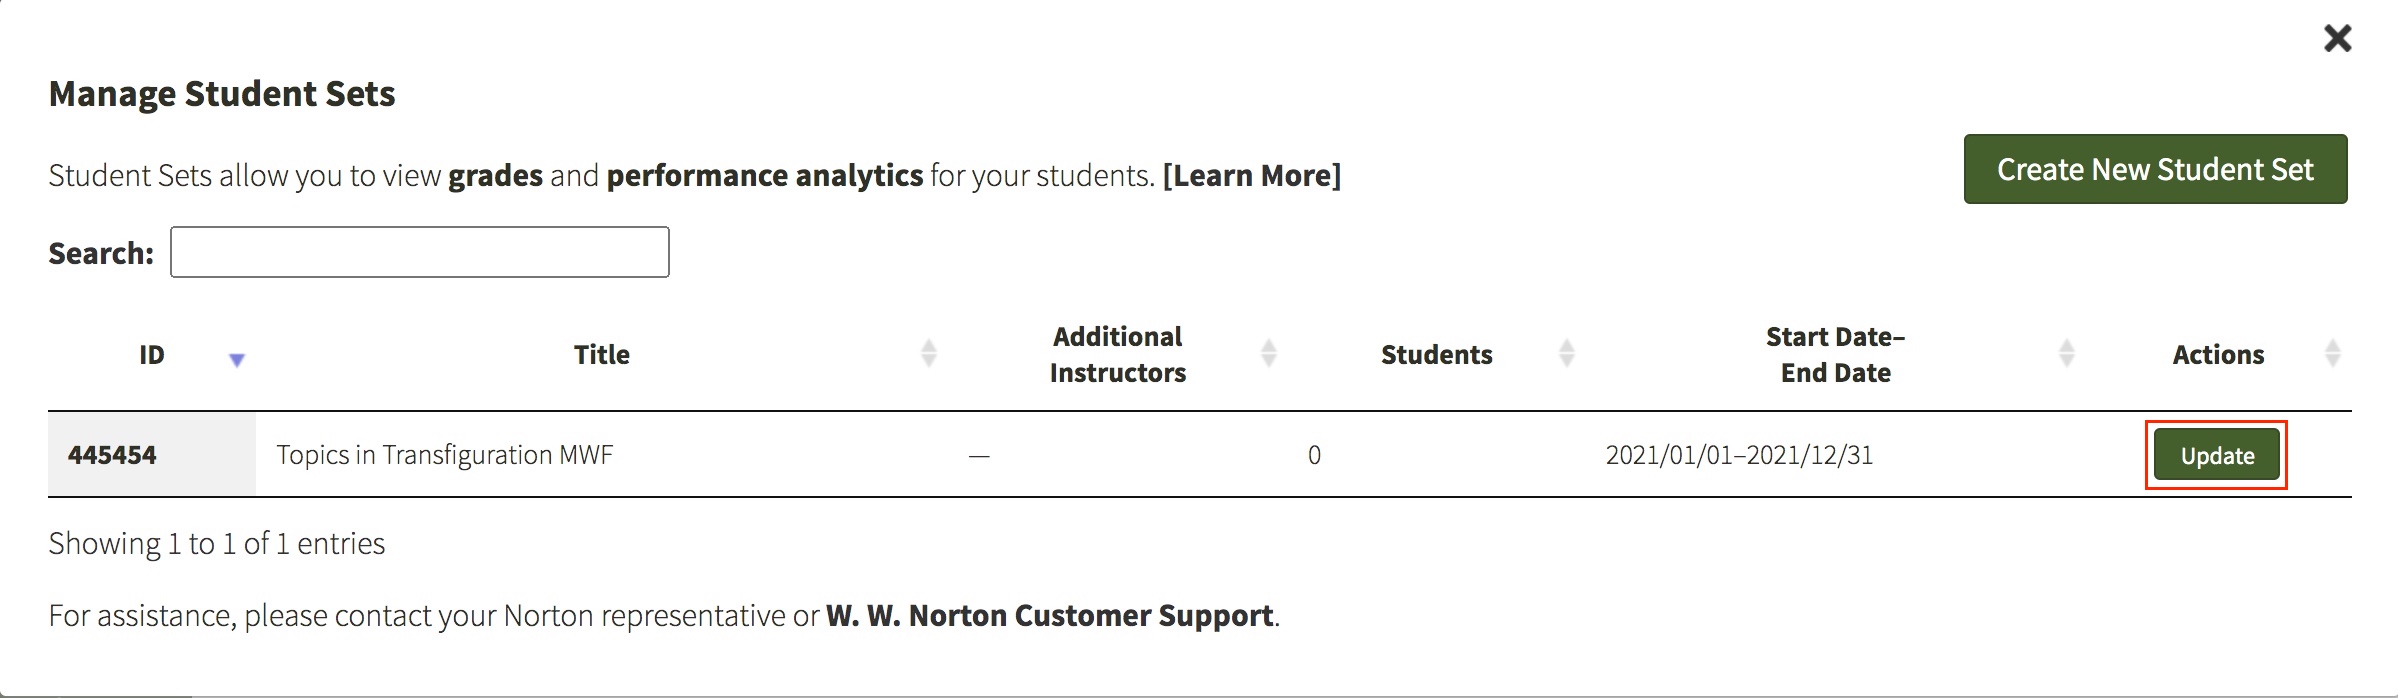
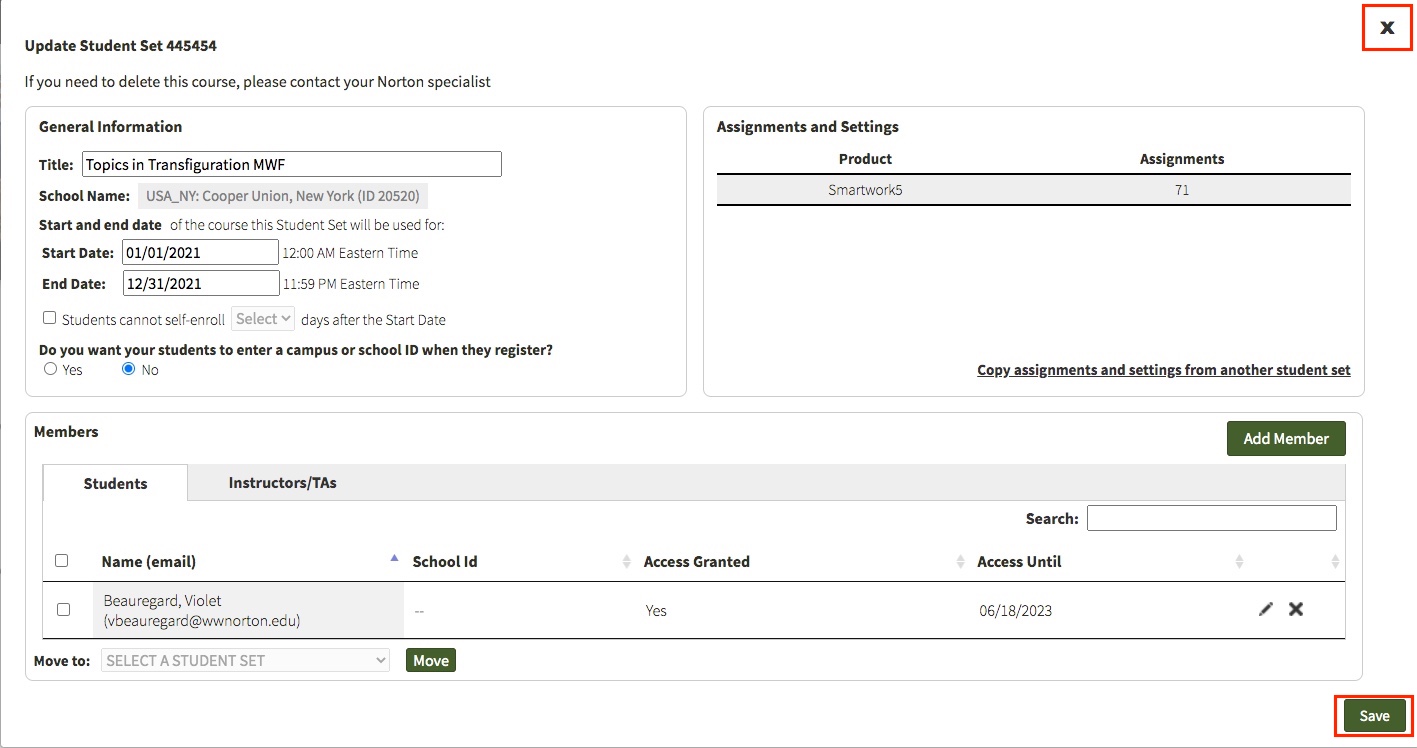
To edit a Student Set, click on the gear in the upper right corner of your screen and select “Manage Student Sets.” In the modal window that pops up, go to the Student Set you would like to edit and click “Update.”

You can edit the Title and the Start and End Dates for this Student Set. Additionally, you can copy assignment settings from existing Student Sets to this Student Set. The Student Set that you copy can either be yours or another instructor’s.
You must click "Save" to update any changes you made.

Adding a Co-Instructor or Teaching Assistant
In all Norton digital products, you can add a Co-instructor, a Scoring Teaching Assistant, or a Teaching Assistant to your Student Set. Each role has a different set of permissions. See a complete breakdown of role permissions here.
Note: Adding a Teaching Assistant or Scoring Teaching Assistant to your Student Set will not grant that account access to the associated product(s); the Teaching Assistant or Scoring Teaching Assistant will still need to register or purchase access to be able to use the Digital Resources for your textbook.
To add a co-instructor or TA to your Student Set, do the following:
1. Enter the gear menu in the upper-right corner of your screen and click “Manage Student Sets.”
2. Click "Update" for the desired Student Set.
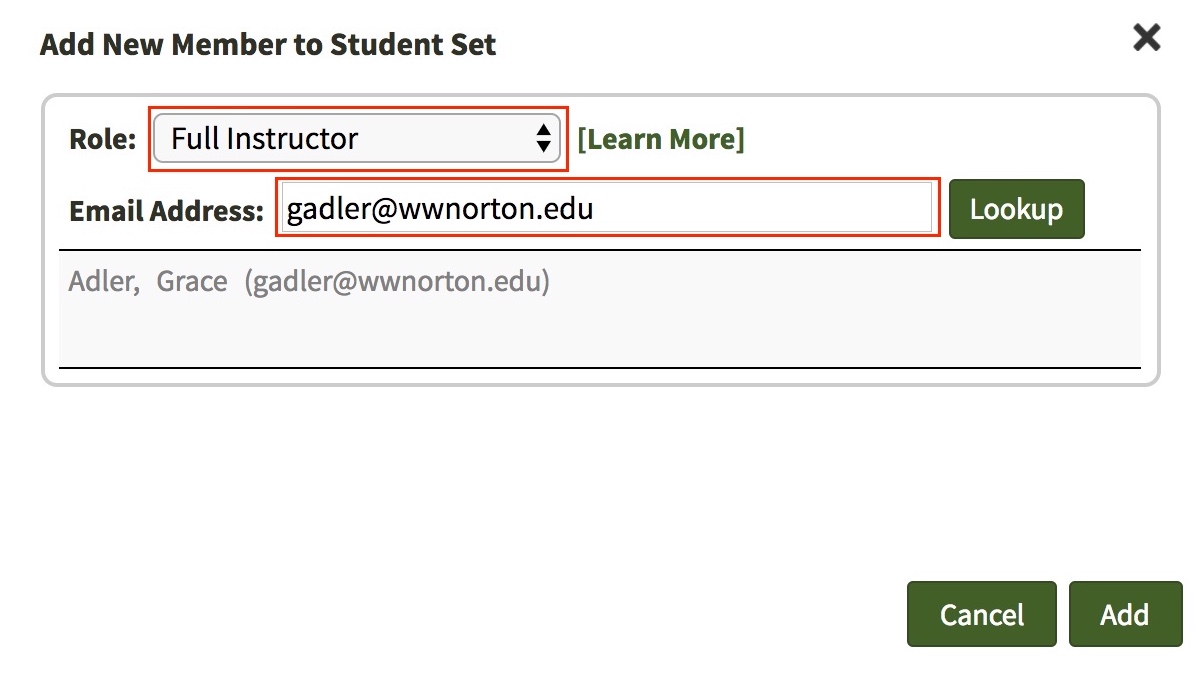
3. Click the "Add Member" button, then the "Instructors/TAs" tab within the Members box.
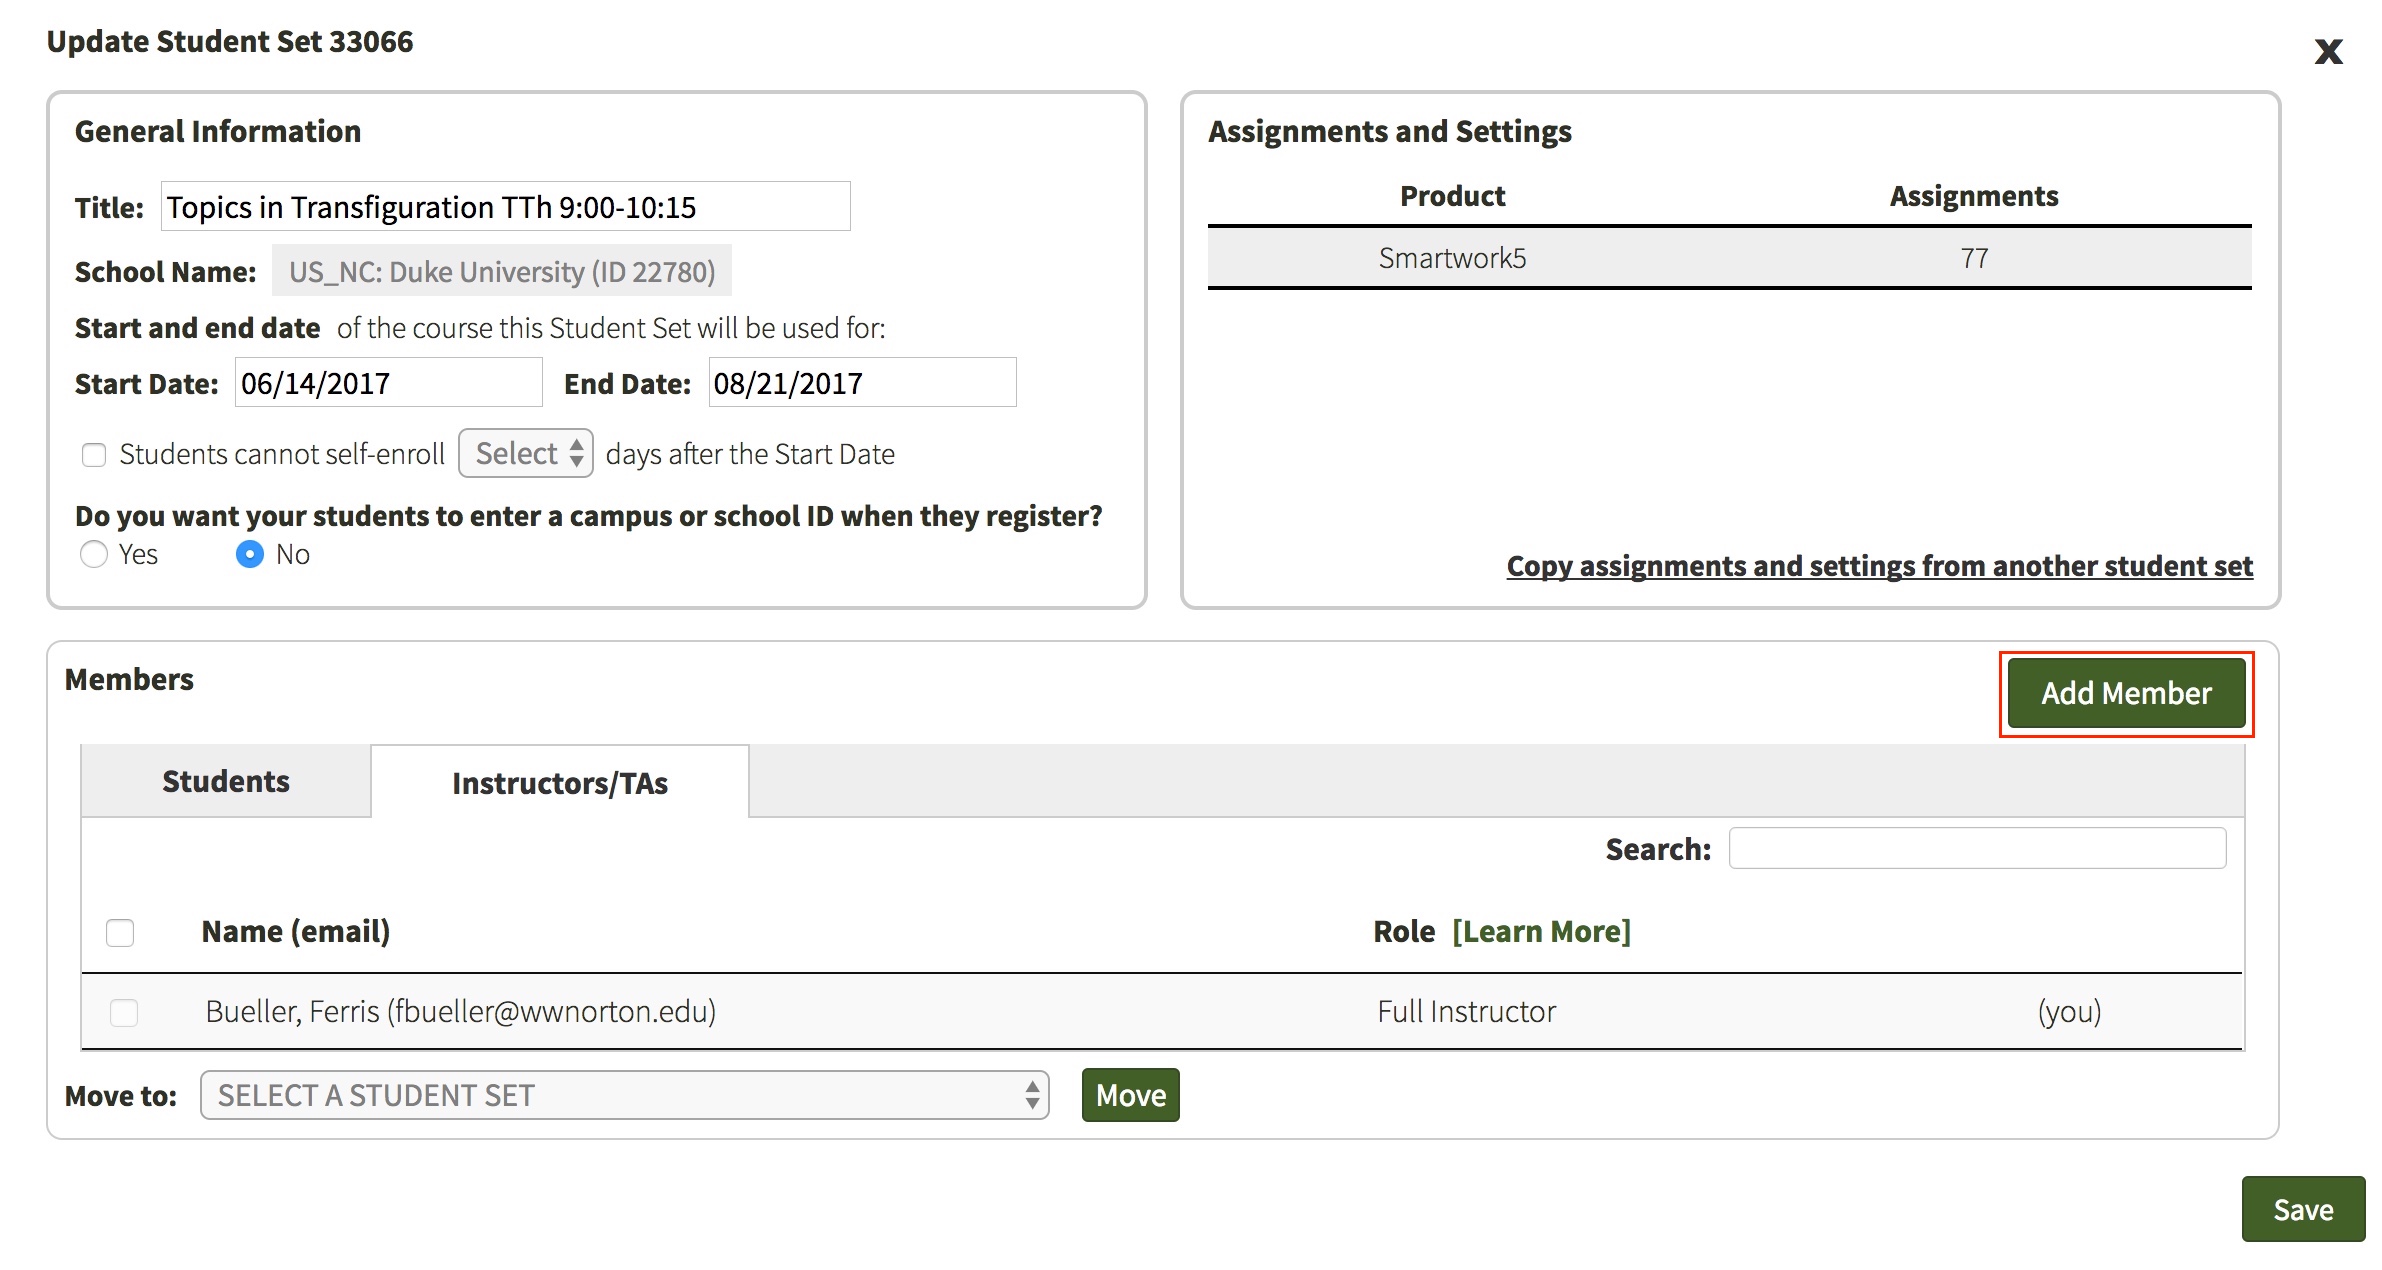
3. Click "Add Member" and a modal window will pop up. Select the desired role: Full Instructor, Teaching Assistant, or Scoring Teaching Assistant.
4. Type in their email address and click "Lookup" to see if they are registered. If they are registered, their name and email address should appear in the space below the email address field. Click "Add" to add the person as a co-instructor.
Your co-instructor must have a Smartwork account to successfully be added to your Student Set. In order for your co-instructor to have full instructor access to your Student Set, he or she must be registered with Norton as an authorized instructor. If you have questions about this, please contact your Norton Representative.
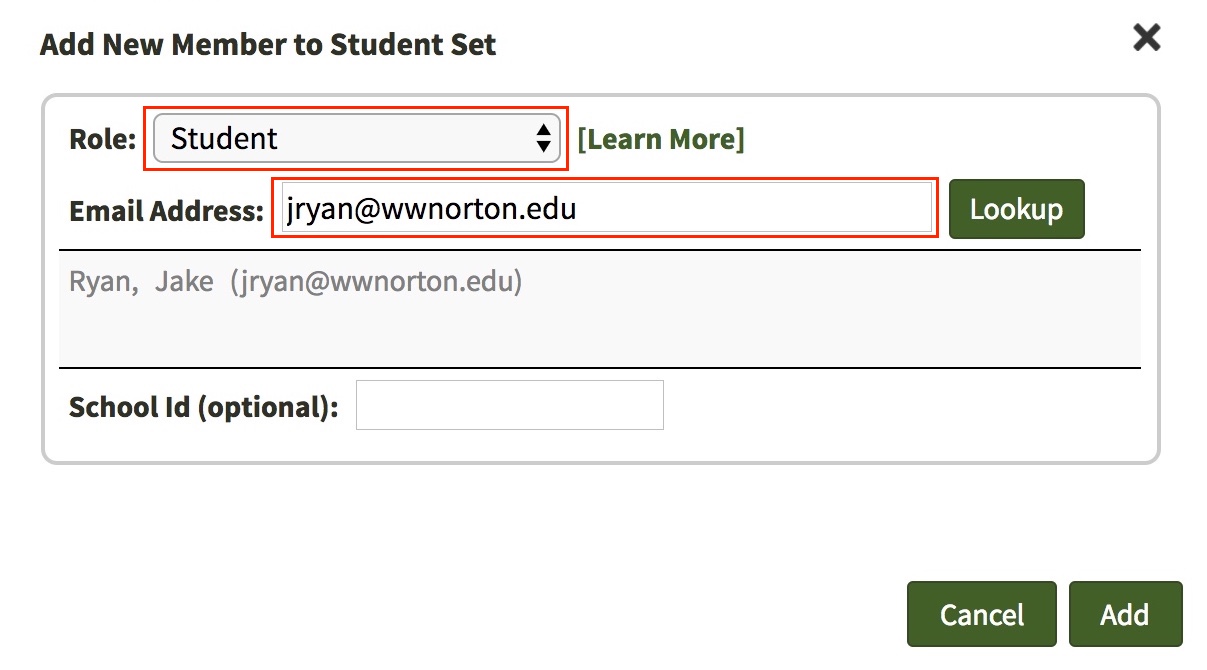
Manually Adding Students to Your Student Set
When registering for Smartwork, your students will be prompted to enter the Student Set ID number to join your Student Set. However, you can also manually add them to your Student Set by clicking "Add Member." A modal window will pop up to add a new member to the Student Set. You can select the role of Student, type in their email address and click "Lookup" to see if they are registered. If they are registered, their name and email address should appear in the space below the email address field. Click "Add" to add the student.
Your student must have a Smartwork account in order for you to add them to your Student Set successfully.
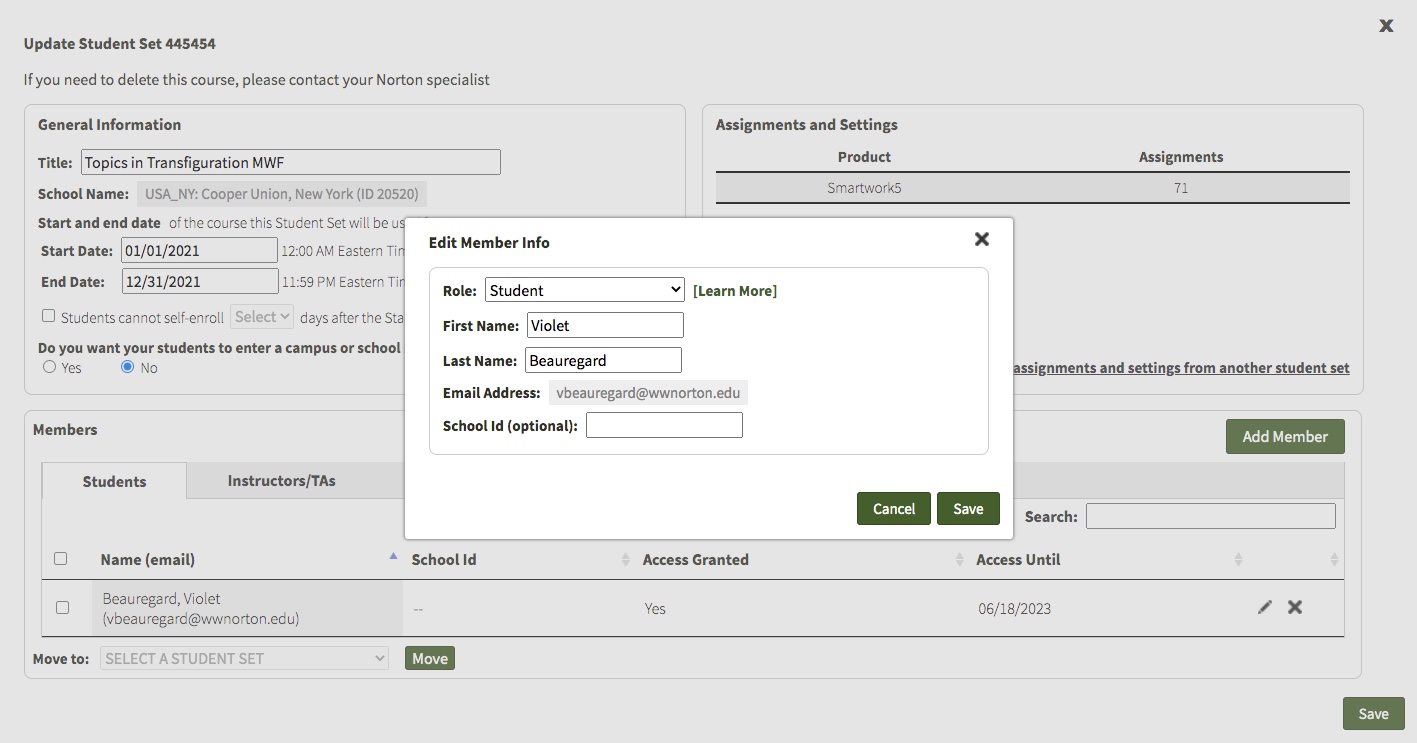
Editing Student Information
If you would like to edit student information, click on the gear in the upper right corner of your screen and select “Manage Student Sets.” In the modal window that pops up, locate the Student Set you would like to edit and click “Update.”

Click on the gear in the upper right corner of your screen and select “Manage Student Sets.” In the modal window that pops up, go to the Student Set you would like to edit and click “Update.”
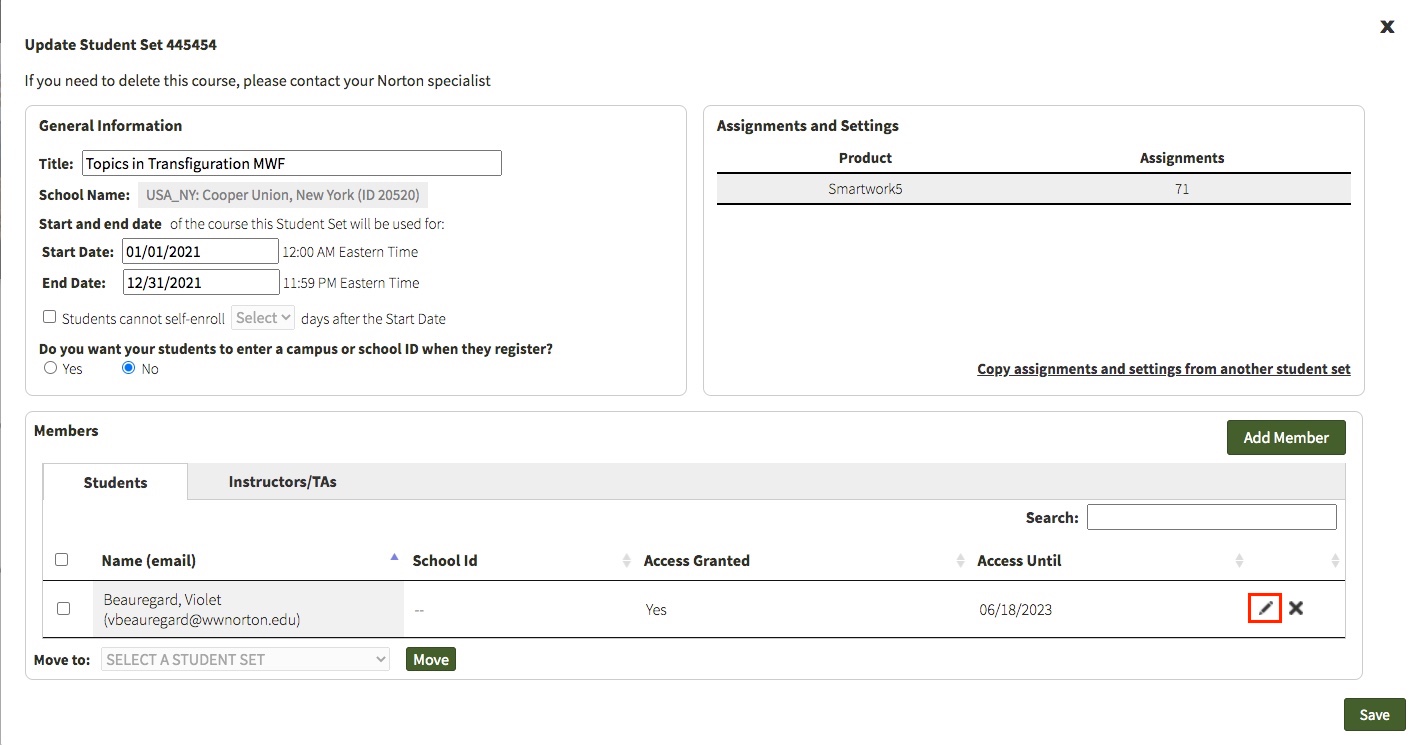
Using this window, you can do the following:
- edit the role
- change the student's first or last name
- add or edit a school ID (sometimes known as a student ID)
There is no option to change a student's email address. Students have up to 14 days to change their e-mail address after creating their account from the gear menu. After 14 days have passed, the student can contact W. W. Norton Customer Support for assistance.
Removing Students from Your Student Set
You may wish to remove students who have dropped the course from their Student Sets so that reports align with your current rosters. Removing a student will also permanently delete that student’s grade record. Note: This action cannot be undone.
To remove a student, start by clicking on the gear in the upper right corner of your screen and selecting “Manage Student Sets.”
In the window that pops up, locate the Student Set you would like to edit and click “Update.”
All of the students of that Student Set are located in the Students tab in the Members area.
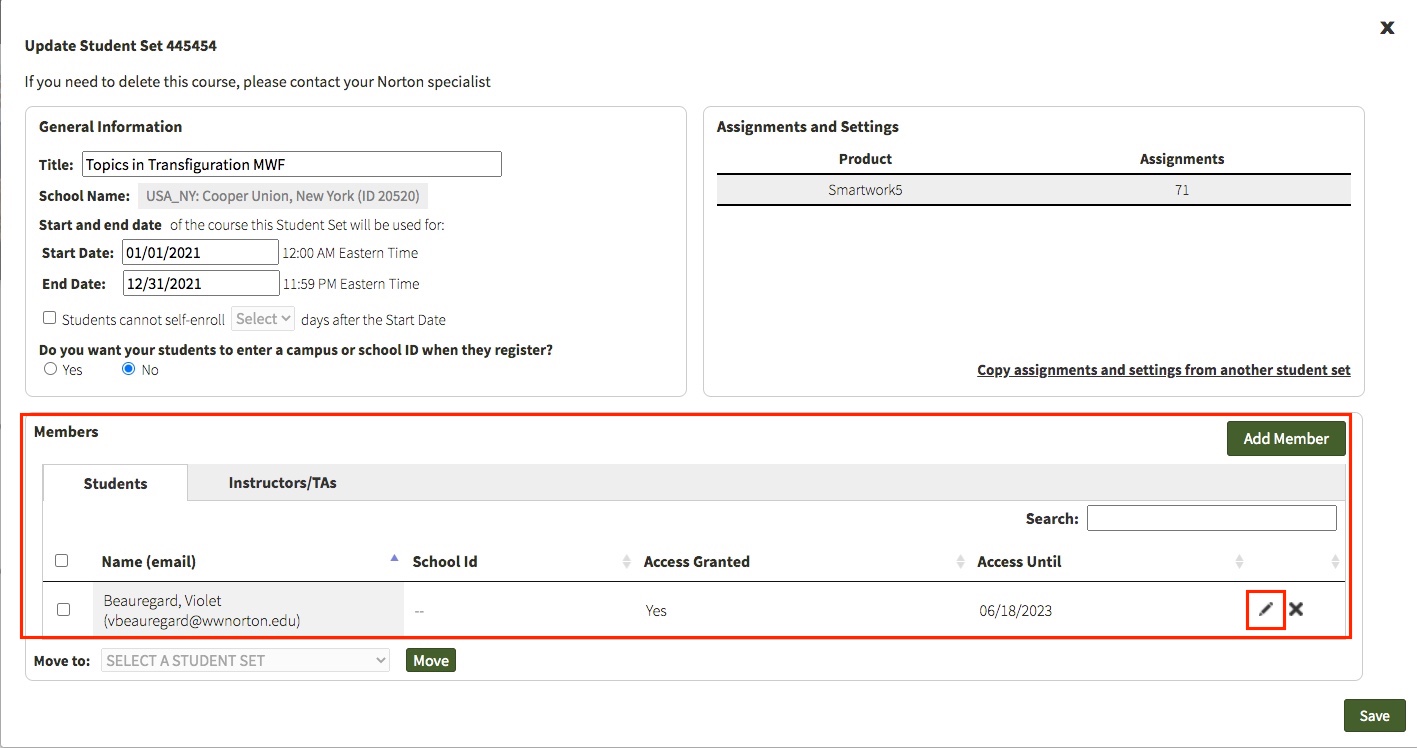
Click the “X” on the far right opposite the student’s name. A popup window will appear, asking if you’re sure you want to remove the student. If you do want to remove them, click Remove. (If you clicked the wrong name or have changed your mind, click Cancel.) Now that the student is removed, click Save. Exit the Manage Student Sets window by clicking the “X” at the top right.
Note for those who integrated Smartwork into your campus Learning Management System: Removing students from your Student Sets will not remove them automatically from any class rosters you have in your LMS. If you want to also remove your student’s access to those course materials, you’ll have to do so within the LMS.
Frequently Asked Questions
How do students register for Smartwork?
Students can access Smartwork by one of three ways:
- A Smartwork registration code comes for free with new copies of select Norton textbooks. Contact your Norton Representative to ensure you've ordered a version of your textbook that comes with Smartwork access.
- Students can purchase access to Smartwork online.
- Students can access Smartwork for three weeks through trial access. At the end of three weeks, students will have to enter a registration code or purchase access online.
Note: Once students have begun work within Smartwork in a registered account, it will not be possible for work to be transferred to another account. Please remind students of the following:
"Please use the email address issued to you by your school, if you have one. Once you have set up your account, you will not be able to transfer any of your work or grades to an account set up with a different email address."
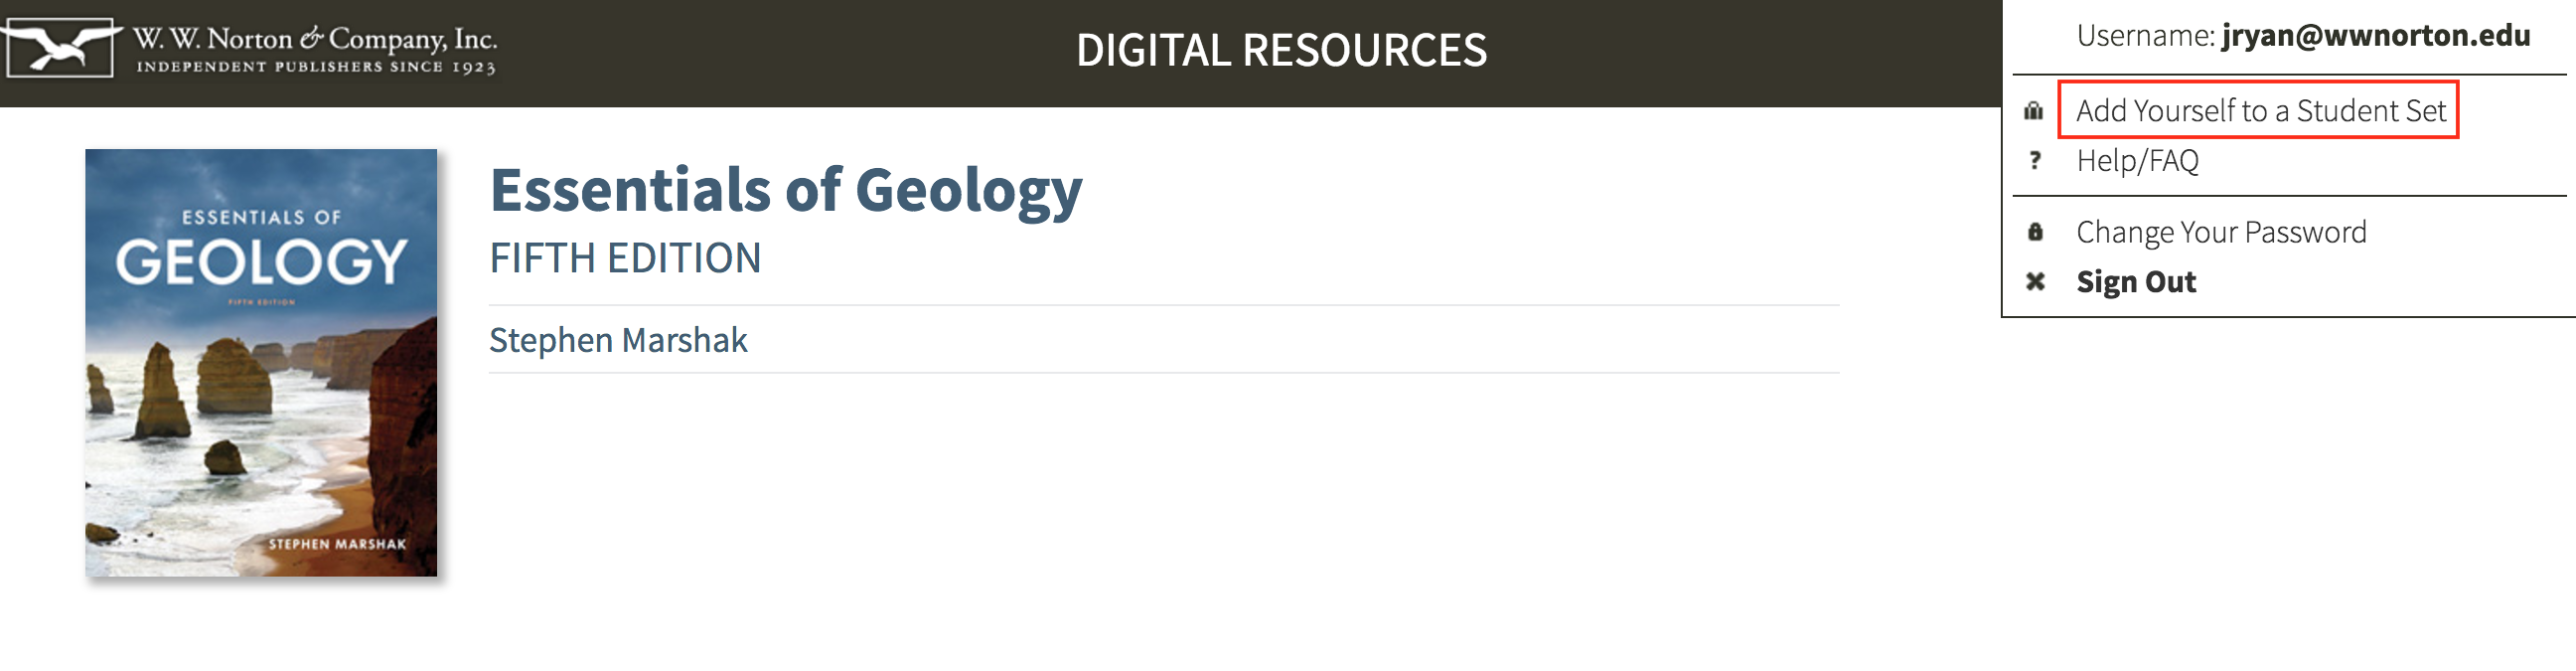
How do students join my Smartwork Student Set?
After registering for Smartwork, students can add themselves to your Student Set by doing the following:
- After logging in to their Smartwork account, students should go to the gear menu located in the top right corner of their screen.
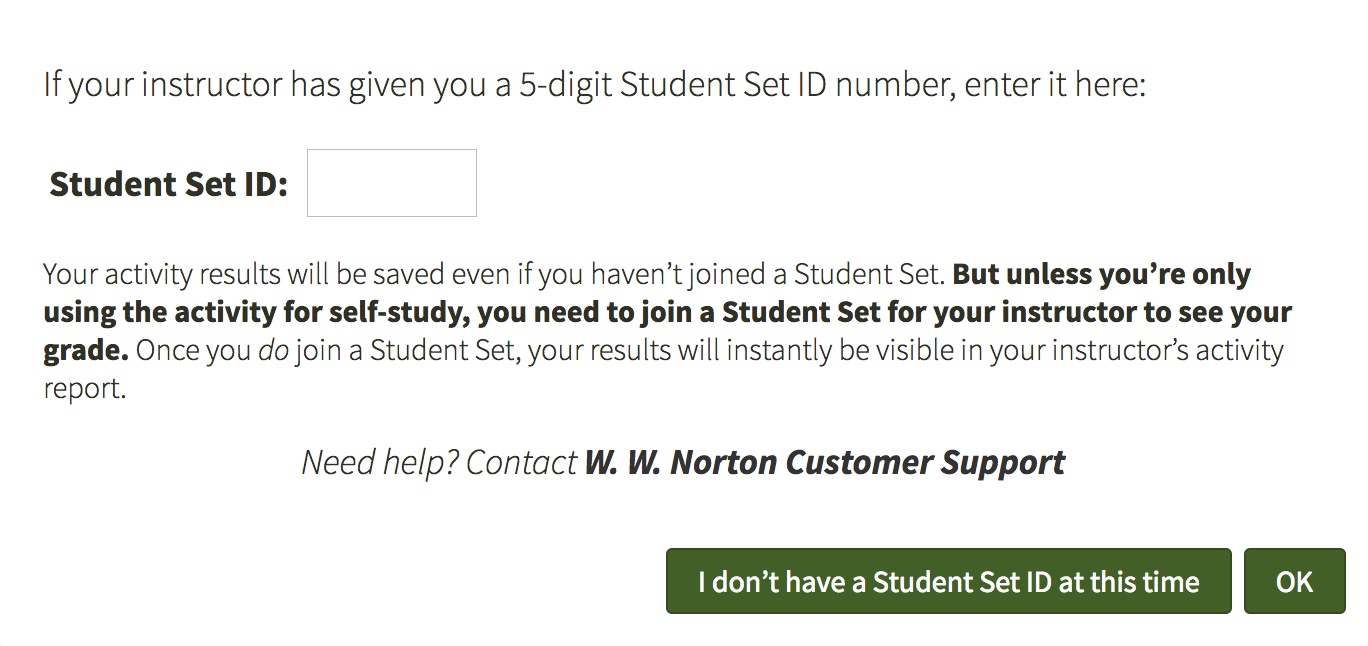
- Students should click on “Add yourself to a Student Set.”
- Students will be prompted to enter in the ID number of the Student Set they would like to join in a separate window. Once they enter the Student Set ID and click OK, they will have access to all of the assignments created by their instructor.
What happens to student grades when they complete work after the due date?
If you have set a Late Work Period for an assignment, you can set the exact percentage they will lose for every day after the Grades Accepted Until date. During this period, they can continue working to raise their grades, but for that smaller percentage of the original possible score.
Late work in an Adaptive assignment does NOT contribute to the points a student earns. This is different from the way that non-Adaptive assignments work: non-Adaptive assignments do not allow students to submit work after the final due date (without a Late Work Period set), but Adaptive assignments do. While students may see their Mastery level go up in those cases, their point score will not change.
Which devices and browsers are best for accessing Smartwork?
Smartwork works on desktop and laptop computers and tablets. Smartwork is not supported on smartphones. If you are an instructor who is editing and authoring questions for use in your Smartwork assignments, we recommend doing so on a desktop or laptop computer.
Smartwork is compatible with the following browsers:
- Chrome version 116 or higher
- Firefox version 116 or higher
- Safari version 16.6 or higher
- Edge version 115 or higher
- Opera 102 or higher
Tablet Android:
- Mozilla Firefox (116 or newer)
- Google Chrome (116 or newer)
Don't know your Operating system version? Here's how to find it: Mac /Windows
Submit a Support Request
Still need help? Submit a support ticket and a customer support specialist will be happy to assist you.
Opened a request already? Click here for an update.