
How to Add a Norton Digital Learning Tool to a Schoology Course
This article describes how to add Norton digital learning tool links with Learning Tools Interoperability (LTI) integration that provides single sign in for students and automatic grade reporting to your Schoology Learning Management System (LMS) course. Please note that the directions below may vary slightly depending on your school’s instance of Schoology.
Prerequisites: In order to add a Norton digital learning tool you will need a Norton instructor account. If you do not have a Norton instructor account, please visit our Instructor Resources page or contact your Norton representative to request one.
a) Setting up integration
Your Norton representative will provide you with a consumer key and shared secret that will be unique to your institution, as well as book-specific integrated links.
- Select your course from the Courses drop-down menu.
- Select Course Options below the course profile photo.
- Select External Tool Providers.
- Select Add External Tool Provider.
- Fill out the required information in the pop-up window:
- Tool name: W. W. Norton
- Consumer key: copy and paste the Consumer Key provided by your Norton representative, which will look like yourschooledu.
- Shared secret: copy and paste the Secret provided by your Norton representative, which will be a random 10 character code.
- Privacy: from the drop-down menu select send Name and Email/Username of the user who launches.
- Configuration Type: Manual
- Match by:Domain
- Domain/URL: ncia.wwnorton.com
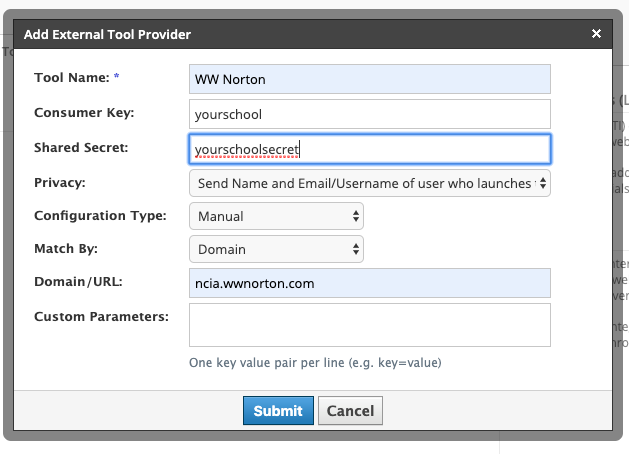
- Click Submit.
- Navigate back to the main course page.

NOTE: You can now add integrated links to this course without needing to add the external tool provider details each time.
- To add an integrated link to a course after Norton has been enabled as a Tool Provider at the course level, please see Add a Norton external link, below.
- If you are adding integrated links to a course and cannot add an external tool provider at the course level, please see The other method to add a Norton external tool, below or Click Here
b) Add a Norton external tool link
- Select Add Materials.
- Select Add File/Link/External Tool.
- Select External Tool.
- Enter the required information in the pop-up window.
- Tool Provider: choose the tool you named in step 5a from the drop-down menu.
- Title: copy from spreadsheet or name the activity as you prefer.
- URL: this is where you paste a book specific integrated link provided by your Norton representative.
- Consumer Key and Shared Secret should be already filled in.
- Select Enable Grading to add the tool to the gradebook. Add Points, such as 100 and other other grading information as needed (only for activities that generate a grade).
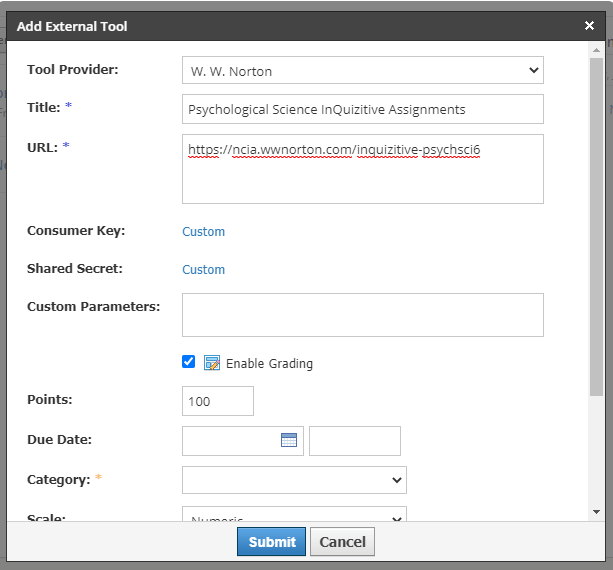
- Select Submit.
- To add additional integrated links to this course, repeat steps 8 through 12.
- Click on the external tool link to set up a student set and follow the prompts. You only need to do this ONCE for each course.
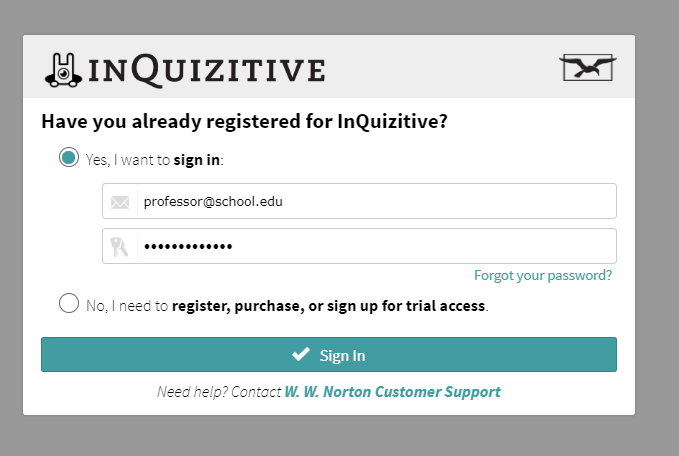
- You will be prompted to sign in. If you have a Norton account, please use the associated email address and password to sign in.
- If you do not have a Norton instructor account, please visit our Instructor Resources page or contact your Norton representative to request one. You’ll need to have an instructor account before continuing.
NOTE: The first time you access a Norton digital learning tool from your course, you will be prompted to create a new student set, or to copy an existing student set. For instructions on creating and managing student sets, please see our articles about Creating New Student Sets, https://wwnorton.knowledgeowl.com/help/inquizitive-instructors-lms-integration or https://wwnorton.knowledgeowl.com/help/smartwork5-instructors-getting-started.
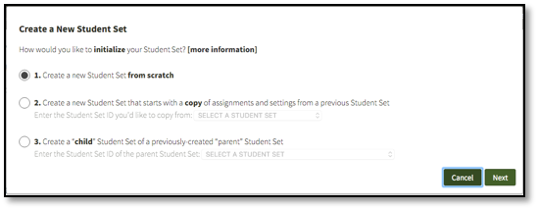
- To Create a New Student Set.
- Select Create a new Student Set from scratch or Select Create a new Student Set that starts with a copy of an existing Student Set’s assignments and settings.
- Click Next.
- Enter a title for your Student Set or accept the default Title, which is the name of your Schoology course or section taken from the integrated link.
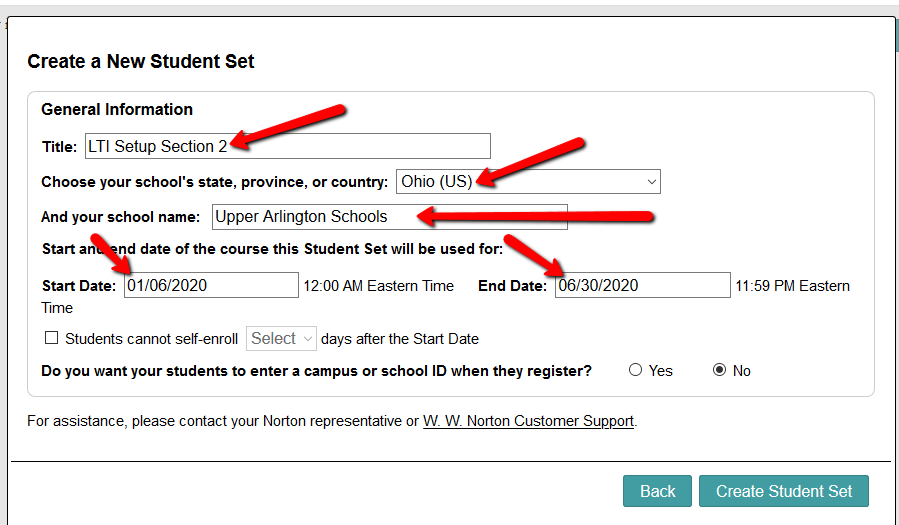
- Choose your school’s state from the drop-down menu.
- Begin typing your school name into the text box that appears and select the proper school from the list.
- Select start and end dates for your Student Set.
- Finally, click the Create Student Set button.
- Navigate back to the main course page.
NOTE: In the future, to access any Norton digital learning tool, always use the link from your course, and you will be automatically signed in. You can confirm this by looking for your school email address in the upper right of the Norton tool page.

c) The other method to add a Norton external tool
Follow these instructions if you are adding integrated links to a course and cannot add an external tool provider at the course level.
- Select your course from the Courses drop-down.
- Click Add Materials.
- Select Add File/Link/External Tool.
- Select External Tool.
- Enter the required information in the pop-up window.
- Title: copy from spreadsheet or name the activity as you prefer.
- URL: this is where you paste a book-specific integrated link provided by your Norton representative
- Consumer Key (provided by Norton)
- Shared Secret (provided by Norton)
- Enable Grading to add a due date, points and other grading information to add the tool to the gradebook. (only for activities that generate a grade)
- Click Submit.
- To add additional integrated links to this course, repeat steps 2 through 6, above.
- Click on the external tool link to set up a student set and follow the prompts.
- To test integration and grade passback, proceed to Test tool integration, below.
- For instructions on how to setup a student set, please see steps 14 through 21 in Add a Norton external tool link, above or Click Here
d) Test tool integration
- In Schoology, switch to a student account.
- Navigate to the course with the integrated Norton links, choose a link with gradable content (e.g., InQuizitive), and click it.
- You will be prompted to sign in because you’ll be opening the tool as a student.
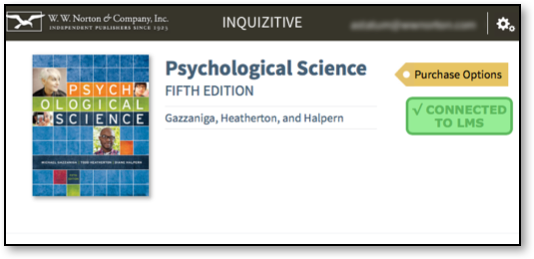
- The Norton product home page or specific activity for the book you’re using will open.
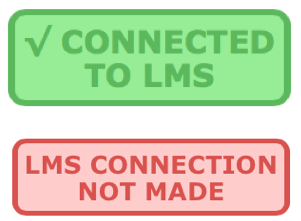
- Confirm that you see a green badge labeled Connected to LMS. If instead you see a red LMS Connection Not Made badge, skip to Reporting error messages, below or Click Here.
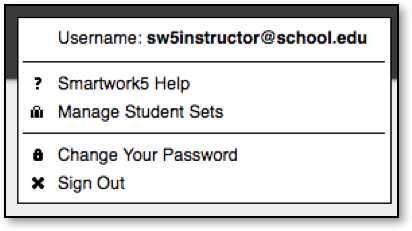
- If using Smartwork or ZAPS individual activity links, the Connected to LMS notification appears in the user options menu, which you will see by clicking your username in the upper right of the activity page.

- If you do not see Connected to LMS in the user options menu, skip to Reporting error messages, below or Click Here.
- If you have added a gradable activity (such as InQuizitive, Smartwork, or ZAPS), click anywhere in the Connected to LMS badge (or the Connected to LMS user options menu entry for a Smartwork or ZAPS activity page) and an explanatory box will appear.
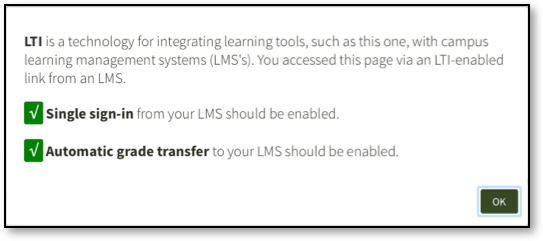
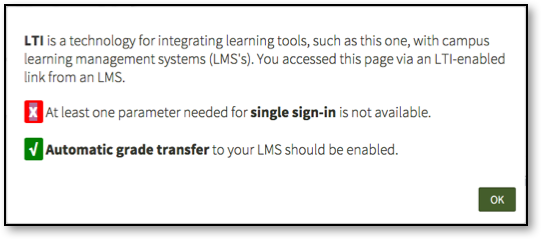
- If you see a red X next to single sign-in or Automatic grade transfer, skip to Reporting error messages, below or Click Here.
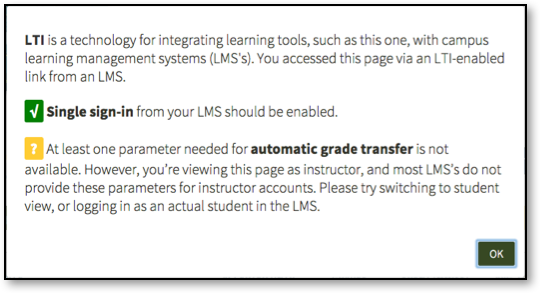
- If you see a yellow ? next to Automatic grade transfer, navigate back to your course from where you launched the link from and reconfirm you are launching the link as a student.
- If you did not add a gradable activity (e.g., if you added an eBook), continue to Next steps, below or Click Here.
- If you see a green checkmark icon next to Automatic grade transfer, click on it, then click OK in the confirmation message pop-up window to send a grade.
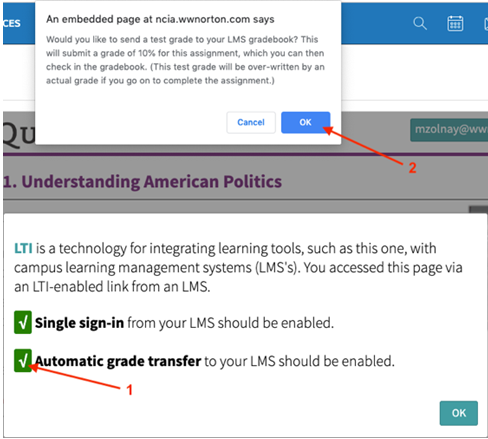
- Confirm that a Test successful! message appeared below the Automatic grade transfer. Click OK in the box to continue.
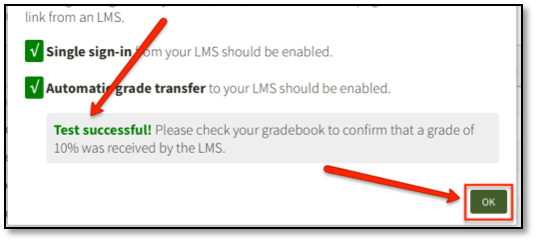
- Select Gradebook from your course and confirm a grade appears for the Norton activity.
- If you did not see a Test successful! message, or the grade did not appear in the Gradebook, Click Here or go to Reporting error messages, below.
IMPORTANT: In the future, to access any Norton digital learning tool, always use the link from your course and you will be automatically signed in. You can confirm this by looking for your school email address in the upper right of the Norton tool page.

e) Next Steps
- If you haven’t done so already and need to add additional links to a course or create links in multiple courses, repeat the steps above as needed for each specific activity URL, Click Here to return. It’s not necessary to perform the grade transfer test for each additional link you create.
- If you’re copying this course over to other courses, you will need to click through one link in each course to create a student set for each copied course.
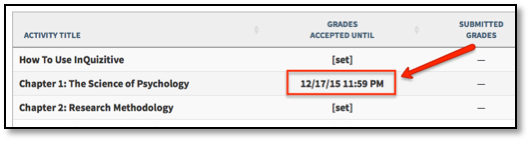
Set GAUs (Grades Accepted Until)
- If you would like to set GAUs for your Norton activities, click the Norton tool link in your course.
- If you have linked to a Norton product home page, click [set] next to the activity.

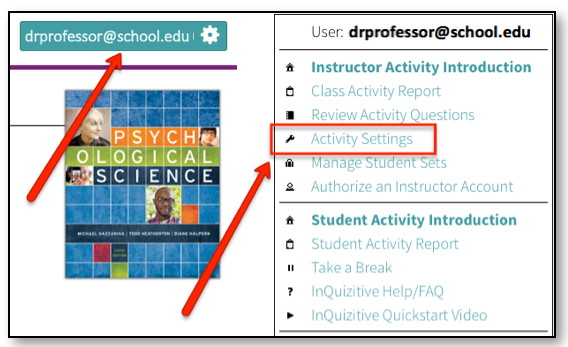
- If you have linked to an individual activity, click your Norton username in the upper right of the page, then click Activity Settings from the menu.
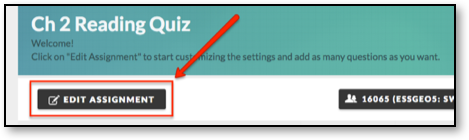
- If you have linked to an individual Smartwork activity, click the Edit Assignment button located below the activity title.
- Click the empty field next to Grades Accepted Until and select the desired date from the calendar.
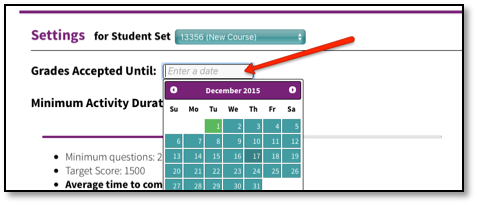
- By default, the GAU time is set to 11:59 PM of the date you selected. To change the GAU time, click the drop-down menu containing the time and select a new time. Be sure to choose your time zone in the next drop-down menu as well!

- Click Save Settings at the bottom of the page when done.
- The GAU for this activity is now set and you will receive notifications should a student attempt to submit a grade for this activity after the GAU has lapsed.
f) Reporting error messages
Copy the text from any error message box or take a screenshot and send it to LTI Support at LTIsupport@wwnorton.com. A specialist will contact you to assist with further troubleshooting.
Alternatively, you can open a Service Desk Support ticket
Submit a Support Request
Still need help? Submit a support ticket and a customer support specialist will be happy to assist you.
Opened a request already? Click here for an update.