
Integrating Links into your Moodle Course
This article describes how to add Norton digital learning tool links with Learning Tools Interoperability (LTI) integration that provide single sign in for students and automatic grade reporting to your Moodle Learning Management System (LMS) course.
Prerequisites: In order to add a Norton digital learning tool link that provides single sign in for students and automatic grade reporting, you will need a Norton instructor account. If you do not have a Norton instructor account, please visit our Instructor Resources page, or contact your Norton representative to request one.
Step 1: Add integrated links
Option A: Individual Activity Link Integration
- Export a Common Cartridge file with your W. W. Norton Links.
- While you're logged into your Norton instructor account on your textbook's Digital Landing Page, open the account menu in the upper right-hand corner and select "Export Content to LMS."
- If you don't see this menu option, it may mean that you don't have instructor credentials on your account yet. Please contact your Norton representative for help.
- Follow the steps provided onscreen to select your course materials.
- On the final screen, click the "Generate Common Cartridge" button to save it to your computer.
- While you're logged into your Norton instructor account on your textbook's Digital Landing Page, open the account menu in the upper right-hand corner and select "Export Content to LMS."
- Import the Common Cartridge into your Moodle course.
- Log in to your Moodle account and navigate to your course.
- In the main course view page, open the Actions menu (with the gear icon) and select Restore.
- On the Import a Backup File section, click "Choose a File."
- On the File Picker page, click "Upload a File."
- Click Browse to locate the Common Cartridge file you exported. Click "Upload This File."
- Check that the file name appears correctly in the "Import a Backup File" section, and then click "Restore."
- Make appropriate content selections and settings on the following restoration pages, clicking Continue at the bottom of each one.
- On the Course Settings page, ensure "Overwrite course configuration" is set to No.
- Ensure the Overwrite checkbox next to "Course name" is unchecked.
- Ensure the Overwrite checkbox next to "Course short name" is unchecked.
- At the end of the process, click "Perform restore."
- The Restore process may take some time. At the bottom of the Review page, click Perform Restore. (This may take a while.)
- On the Complete page, click Continue to access the imported content.
- Check that your links appear correctly in Moodle.
- Your links should be ready once Moodle finishes importing the Common Cartridge file, but double-check that everything looks good.
- In the main course view, in the Actions menu, make sure you've turned editing on.
- For at least one link, click "Edit" next to its name and then "Edit Settings."
- In the General section, under "Tool URL," make sure that a checkmark appears with a "tool configuration" name for the W. W. Norton LTI tool.
- If you don't see this, more setup may be required before the LTI integration works. Please contact your W. W. Norton representative for help.
- Change the Launch Container to New Window (you may need to click "Show More" to see this option).
- In the Grades section, change the Grade Type to None for ungraded activities (e.g. the ebook, playlists, etc.)
- Save your changes.
If you imported any graded items, like InQuizitive activities, you'll need to set the gradebook value for every link.
- Click "Edit" next to the graded activity link, and then "Edit Settings."
- Check that the Tool configuration appears correctly, as described in step 3 above.
- In the Grade section, set the gradebook value that you want.
- Save the changes, and repeat for each graded activity link.
4. Next Steps
- If you haven’t already created a Student Set in your W. W. Norton product, you must do that to complete your course set up. Follow the steps below under "Creating a Student Set."
- If this is the first time you're using LTI integration with W. W. Norton, you should test your tool integration too. Follow the steps below under "Test Integration."
Option B: Product Home Page Integration
- Log in to your LMS with your instructor account and enter your course.
- Select the Gear icon and select Turn editing on.

- In the topic of your choice, click on Add an activity or resource.

- Select External Tool and click Add. If you are given a choice between general and commercial content, choose general tool.

- Give the activity a descriptive name (e.g. Ebook, InQuizitive, Smartwork, etc.).
- In the Tool URL field, enter the URL provided by your Norton representative.
- Leave Preconfigured tool set to Automatic, based on tool URL.
- If using a product home page link, the URL will look like: https://ncia.wwnorton.com/productname-BOOKCODE, where productname is replaced with the name of the Norton tool and BOOKCODE is replaced with the code for the book you are using.
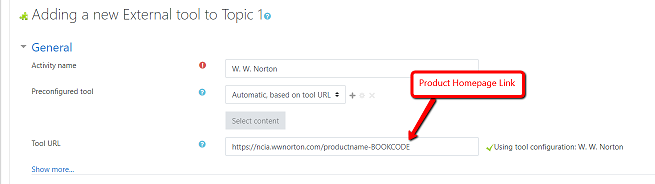
Note: Ignore the Tool configuration not found for this URL message if shown.
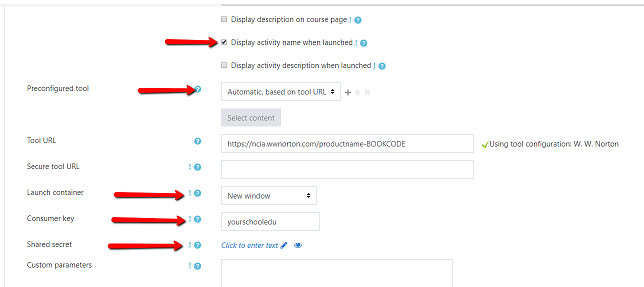
- If your Norton representative contact has told you that we've worked with your campus IT department to enable integration campus-wide, select Default for the Launch container setting. Click the Gear and select Turn editing off. Go to Step 15 below. Otherwise, continue on to step 9.
- Ensure Display activity name when launched is checked.
- Ensure the Preconfigured tool is set to Automatic, based on tool URL.
- Ensure Launch container is set to New Window.
- Enter the Consumer Key: copy and paste the Consumer Key provided by your Norton representative, which will look like yourschooledu.
- Enter the Shared Secret: copy and paste the Secret provided by your Norton representative, which will be a random 10 character code.
- Expand the Privacy section and make sure the Accept grades from the tool checkbox is checked. The other boxes do not need to be checked.
- Expand the Grade section and select Points from the drop-down menu and set the Maximum grade to some nonzero value, such as 10. If you do not want this link to report to the Moodle gradebook (e.g. the ebook, playlists, etc.), change Grade Type to None.
- Expand the Common module settings and make sure the Availability drop-down menu is set to Show on course page.
- Scroll down and Click Save and return to course.
Step 2: Create a student set
- Click the Gear and select Turn editing off.
- Click the link you just created, which will launch the Norton digital learning tool in a new browser tab.
3. You will be prompted to sign in or register. If you have a Norton account, please use the associated email address and password to sign in. Otherwise, use the No, I need to register… option and register using your school email address. If you have a Norton account and you're unsure of your Norton password, use the "Forgot Your Password?" function below the password field.

4. The first time you access a Norton digital learning tool from your course, you will be prompted to create a new student set, or copy an existing student set. For instructions on creating and managing student sets, please see our article about Creating New Student Sets, https://wwnorton.knowledgeowl.com/help/inquizitive-instructors-lms-integration or https://wwnorton.knowledgeowl.com/help/smartwork5-instructors-getting-started.
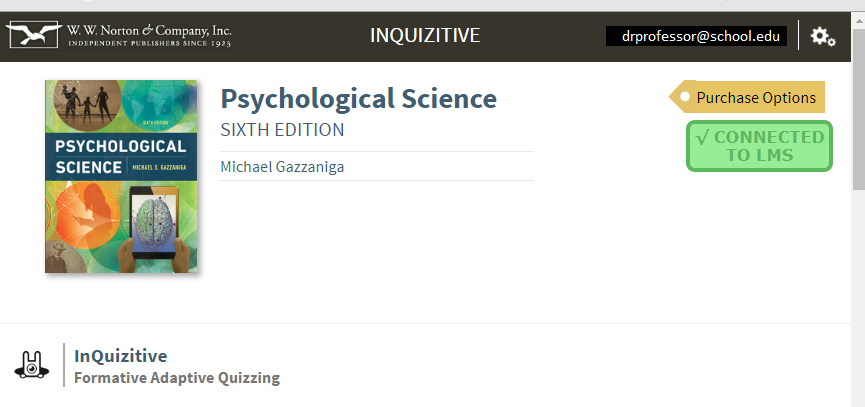
5. Once signed in with your Norton account, and created the Student Set, you will land on the Norton product home page or the specific activity for the book you are using (product home page pictured below). You should see a green Connected to LMS badge and the new Student Set ID associated with your course in the drop-down menu.

6. if you’re using Smartwork or ZAPS individual activity links, the Connected to LMS notification appears in the user options menu which, you will see by clicking your username in the upper right of the activity page.

7. After signing in, close the tab with the Norton digital learning tool page.
IMPORTANT: In the future, to access any Norton digital learning tool, always use the link from your course and you will be automatically signed in. You can confirm this by looking for your school email address in the upper right of the Norton tool page.

Step 3: Test integration
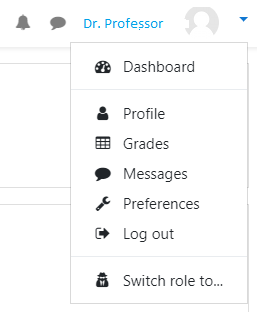
- From your Moodle course, switch to student view by clicking your name in the top-right corner of the course, and select Switch role then select Student.
- Alternatively, you can access Student View by logging in with a test student account.

3. Locate the link to the Norton tool (e.g., Ebook, Smartwork, InQuizitive, etc.) and click it.
4. The Norton product launch page or specific activity for the book you are using will open in a new browser tab. You will be prompted to sign in as a student, however, you can still use your Norton instructor account to do so.
5. On the Norton product page, confirm that you see a green badge labeled Connected to LMS. If instead you see a red LMS Connection Not Made badge, skip to Reporting error messages, below or Click Here.
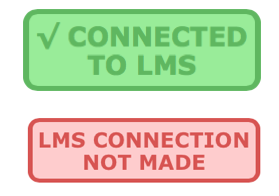
- If you’re using Smartwork or ZAPS individual activity links, the Connected to LMS notification appears in the user options menu, which you will see by clicking your username in the upper-right corner of the activity page.

- If you do not see Connected to LMS in the user options menu, skip to Reporting error messages, below or Click Here.

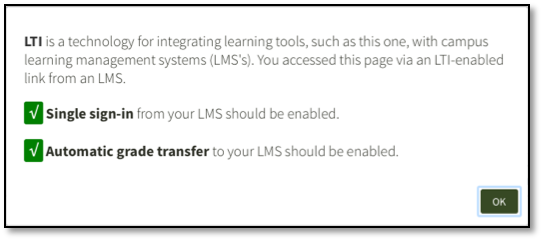
6. If you added a gradable activity (such as InQuizitive, Smartwork, or ZAPS), click anywhere in the Connected to LMS badge (or the Connected to LMS user options menu entry for a Smartwork or ZAPS activity page) and an explanatory box will appear over the page.
- If you see a red X next to Single sign-in or Automatic grade transfer, skip to Reporting error messages, below or Click Here.
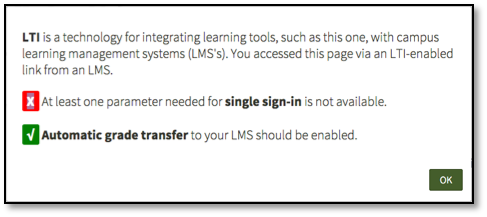
- If you see a yellow ? and the message, At least one parameter needed for…, close the Norton product tab in your browser and reconfirm that you launched the link from your LMS in Student View or are using a student account.

7. Click on the green checkmark icon next to Automatic grade transfer, then click OK in the confirmation message pop-up window to send a grade.
![]()
8. Confirm that a Test successful! message appeared below Automatic grade transfer.
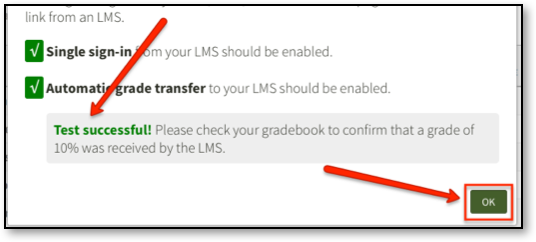
9. Switch back to the browser tab with your course and verify a grade of 10% appears for the Norton activity Grades in your Moodle course.
- If you did not see a Test successful! message, or the grade did not appear in Grades, skip to Reporting error messages, below or Click Here.

10. Close the browser tab with the Norton product page.
11. You should now exit student view. Select the Dashboard Menu and click Return to my normal role or log out of the student account. The link is ready for use by your students. See, Next steps, below or Click Here, for additional instructor suggestions.
12. If you added an eBook link or if you added a link that is not a gradable activity, go to Next steps, below, for additional instructor suggestions.
Step 4: Grading and due dates
Review Settings
1. By default, Moodle creates a column in your course grade book for any gradable Norton tool whenever you create an external tool assignment.- If you are not using the Norton product home page, but rather adding individual activity links in your course, return to Step 1; Option A, above and repeat Step 3, as needed, for each individual activity link or URL, you are adding to the course.

NOTE: Versions of Moodle before v2.8.2 do not allow you to change the point value for an external tool link's corresponding grade in the grade book; its value is fixed at 100 points. As a workaround, we suggest you adjust the weighting of the grade in the Moodle grade book configurations. Please visit https://docs.moodle.org/27/en/Using_'Weighted_mean_of_grades' or contact your campus's IT administrator for details on how to do this.
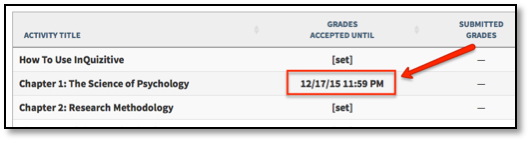
Set GAUs (Grades Accepted Until)
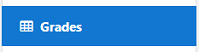
2. If you would like to set GAUs for your Norton activities, click the Norton tool link in your course.- If you have linked to a Norton product home page, click [set] next to the activity.
- If you have linked to an individual activity, click your Norton username in the upper right of the page, and select Activity Settings from the menu.

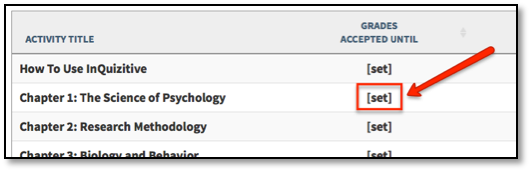
- If you have linked to an individual Smartwork activity, click the Edit Assignment button located below the activity title.
- Click the empty field next to Grades Accepted Until and select the desired date from the calendar.

3. By default, the GAU time is set to 11:59 PM of the date you selected. To change the GAU time, click the drop-down menu containing the time and select a new time. Be sure to choose your time zone in the next drop-down menu as well!
4. Select Save Settings at the bottom of the page when done.

5. The GAU for this activity is now set and you will receive notifications should a student attempt to submit a grade for this activity after the GAU has lapsed.
For even more tips on configuring Norton digital learning tool links in your course, check out our Instructor Help Notes.
Reporting error messages
Copy the text from any error message box and/or take a screenshot and send it to LTIsupport@wwnorton.com. You will then be contacted by a support specialist who will assist you with further troubleshooting.
Alternatively, you can open a Service Desk Support ticket
Submit a Support Request
Still need help? Submit a support ticket and a customer support specialist will be happy to assist you.
Opened a request already? Click here for an update.