
Test banks accompany our college texts and are provided in several formats, including Word Documents, ExamView files, and ZIP files formatted for various course management systems. ExamView is test generator software that often your school will already have copies of for your use.
Test banks accompany our college texts and are provided in several formats, including Word Documents, ExamView files, and files formatted for various course management systems.
ExamView is test generator software that may be available with your text; your school may already have copies of this software available for your use.
In what formats are Norton test banks available?
Test banks are provided in several formats, including Word Documents, ExamView files, and files formatted for various course management systems. ExamView is test generator software that may be available with your text; your school may already have copies of this software available for your use. W. W. Norton and company participates in the Respondus test bank network.
When requested, we may also be able to produce test banks for other course management systems.
How do I import a Norton test bank into Moodle?
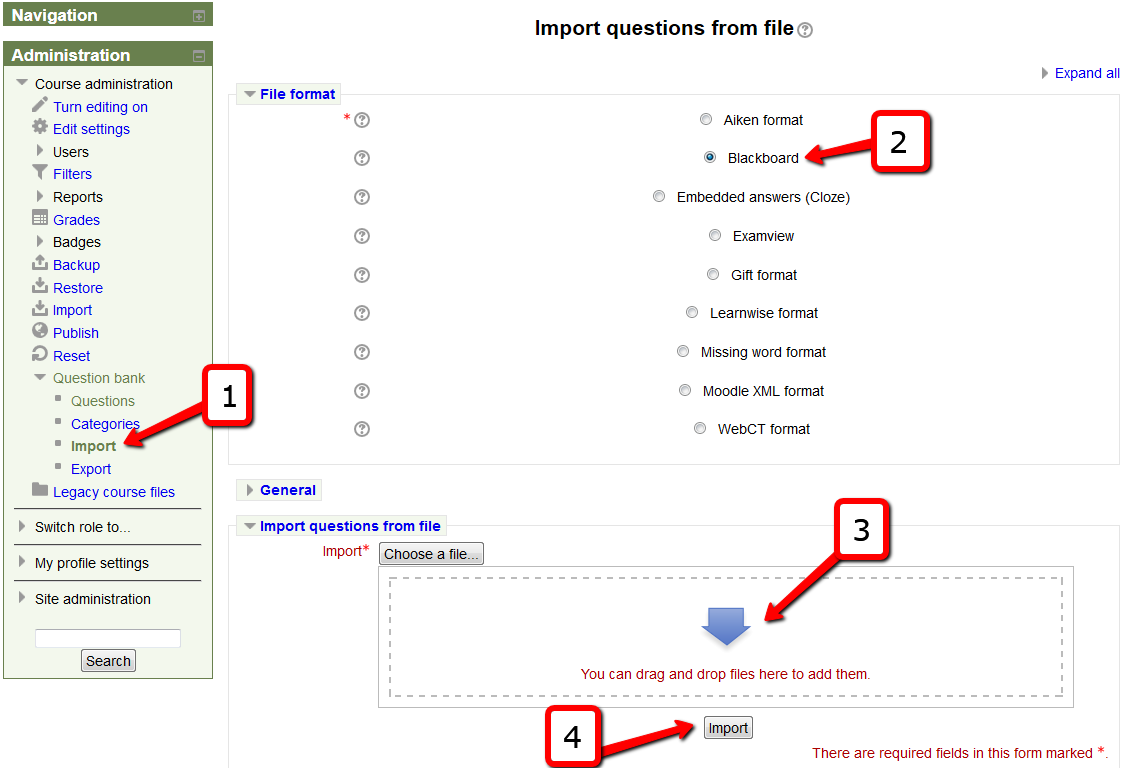
How do I import a test bank into Moodle v2.1+ ?
- In most cases the Moodle coursepack file includes the test banks along with the other chapter-by-chapter learning activities and quizzes. No additional test bank file is needed.
- If you want only the test banks, and none of the chapter content, use this process:
- Download the Blackboard 7.1-9 test bank file listed on the instructor resource page for your text.
- Import to Moodle using the IMPORT tool located in the Administration Block > Question Bank > Import.
- Click on "Import"
- Select "Blackboard"
- Choose the test bank file
- Click "Import" button

How to Create a Test in Moodle
Go to https://wwnorton.knowledgeowl.com/help/how-to-create-a-test-in-moodle
How do I use Norton test banks in D2L/Brightspace?
If you are using the coursepack, the test banks may already be available in your Question Library.
If you are not using the coursepack, you may still upload the D2L/Brightspace coursepack file and select just the Question Library during the installation process.
To use just the test bank in D2L/Brightspace:
- Navigate to your instructor resource page and download the zip file: Test Bank, D2L/Brightspace.
- Leave the test bank file zipped.
- Import to your course using the coursepack installation instructions.
- The test banks will populate your Question Library in D2L/Brightspace.
For coursepack installation instructions, see: How do I install a D2L/Brightspace coursepack?
How to Create a Test in D2L
Go to https://wwnorton.knowledgeowl.com/help/how-to-create-a-test-in-d2l
How do I use Norton test banks in Canvas?
If you are not using the Canvas, IMS file (the full coursepack) in your course shell, you may still upload the Canvas, IMS file. When prompted to select which content to import, check the quizzes and testbanks. Press submit.
To use just the test bank in Canvas:
- Navigate to your instructor resource page and download the zip file: Test Bank, Canvas, IMS.
- Leave the file zipped in its imscc format.
- Import to your course using the coursepack installation instructions.
- The test banks will populate your Question Banks in Canvas.
See How do I install a Canvas coursepack?
How to Create a Test in Canvas
Go to https://wwnorton.knowledgeowl.com/help/how-to-create-a-test-in-canvas
How do I use Norton test banks in Blackboard?
Download a testbank to your computer from the instructor resource page for your text.
- Do not unzip the archive on your local disk.
- Log into your CMS and then go to your course.
- Go to Control Panel.
- Go to Pool Manager.
- Choose Import.
- Use Browse to select the downloaded testbank zip archive.
- Press Submit and allow the import procedure to complete.
- Once the testbank files have imported into the Pool Manager, they can be used to create quizzes and exams in the Test Manager function.
How to Create a Test in Blackboard
Go to https://wwnorton.knowledgeowl.com/help/how-to-create-a-test-in-blackboard
Need help installing ExamView software with Norton test banks?
INSTALL EXAMVIEW
Once you've downloaded the ExamView package or you have the ExamView installer CD-ROM, you'll need to install the software. Do this by clicking on the SETUP ICON in the software folder.
Please see the short video: http://screencast.com/t/ERKD1VbO1fF
Once you have installed it on your computer, you should then see in your PROGRAMS queue, three new icons, for the Import Utility, Test Generator, and Test Manager (Windows platform) or on in your Applications directory Macintosh HD\Applications\eInstruction\ExamView (Mac platform).
FIND YOUR TEST BANKS
The newer ExamView software installs to a new directory, and the test banks may not appear in your default location if you have a previous version installed.
How to find your new test banks:
- Once you have downloaded the software, unzip the parent folder. Then, click on the SETUP icon, and the software will install.
- On a PC, the new path will be C:\Program Files (x86)\eInstruction\ExamView . Test banks for your current text will be found in a folder in this location.
- On a MAC, the new path will be Macintosh HD\Applications\eInstruction\ExamView . Test banks for your current text will be found in a folder in this location.
SET DEFAULT LOCATION
If you have a previously installed an earlier version of EXAMVIEW you will need to change the default test banks directory in the ExamView software Preferences.
To change these settings; start the ExamView Test Generator.
- Then go to Edit → Preferences, and choose the Files TAB.
- Update the default question banks directory to reflect the new install directory.
- Do the same for Tests directory and Online (LAN) Tests directory if you need.
- Remember to click SAVE AS DEFAULT before closing the application window.
Windows locations: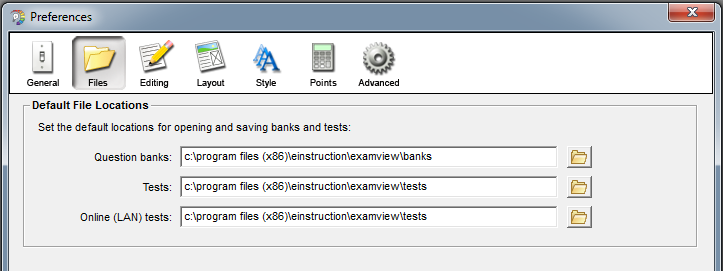
Mac locations: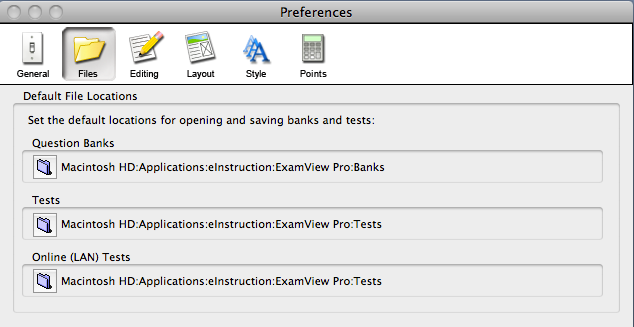
I've updated to ExamView 8.1 and higher; where are the test bank files?
Previous versions of the ExamView Assessment Suite software installed in the root of your hard drive. ExamView version 8.1 and higher has been updated to install into a new standard location;
PC: C:\Program Files (x86)\eInstruction\ExamView
MAC: Macintosh HD\Applications\eInstruction\ExamView
Thus, if you have an earlier version of ExamView on your computer and you install ExamView version 8.1-and higher, the ExamView application and test bank files will install to a different location than your previous titles. The following instructions will guide you on how to move your old files to the new location.
MOVING DATA FILES FROM PREVIOUS VERSIONS OF EXAMVIEW INTO EXAMVIEW VERSION 8.1 and higher
Step 1. Locate your bank files in the earlier version of ExamView on your hard drive.
PC: C:\ExamView\Banks
MAC: Macintosh HD\ExamView Pro\Banks
Note that the path could be different than above if the default install path was not used.
Step 2. Move your banks from the earlier version of ExamView to ExamView version 8.1 and higher.
Highlight the folders containing the banks you want to move and cut them. Go to the Banks folder in ExamView 8.1 and higher.
PC: C:\Program Files (x86)\eInstruction\ExamView\Banks
MAC: Macintosh HD\Applications\eInstruction\ExamView\Banks
Paste the folders with the banks into the Banks folder.
Step 3. Move your tests and classes from the earlier version of ExamView to ExamView version 8.1 and higher.
If your title includes tests as well as banks, return to the location of the earlier version of ExamView on your hard drive.
Open the Tests folder, highlight the files you want to move, and cut them.
Go to the Tests folder in ExamView 8.1 and higher.
PC: C:\Program Files (x86)\eInstruction ExamView\Tests
MAC: Macintosh HD\Applications\eInstruction\ExamView\Tests
Paste the files into the Tests folder.
If class rosters have been created, repeat this process for the Classes folder.
Step 4. Reset the default locations for opening and saving banks and tests.
Open the ExamView Test Generator, go to the Edit menu, and choose Preferences.
Choose the Files tab and use the folder icons on the right to set your defaults to the proper locations.
Windows locations:
Mac locations:
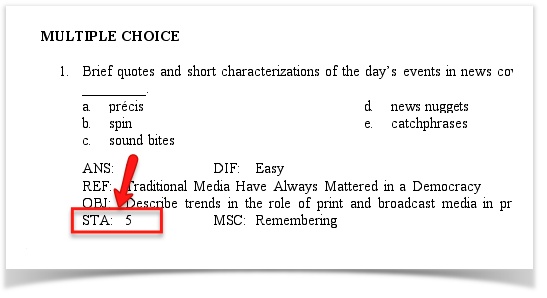
ExamView Texas SLO Test Bank and STA Field
In order to view the Texas Student Learning Outcome for each question, your copy of ExamView software must be registered in Texas.
To check or change the registration state, go to Edit > Preferences > General > then make sure the State/Region is set to TX.
- Edit → Preferences
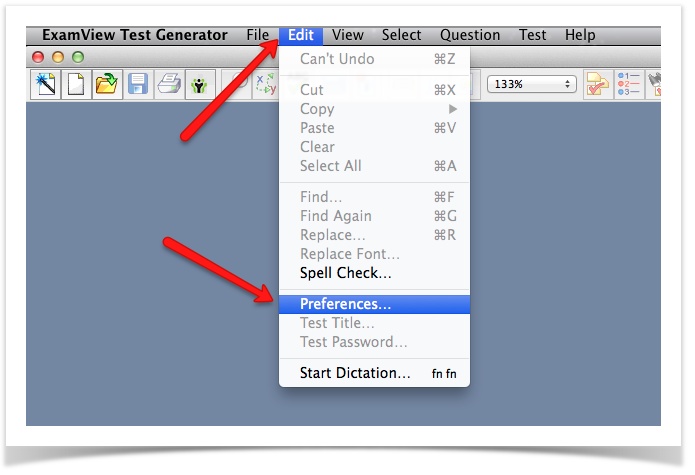
- General → Change State/Region to TX.

- Click on "OK"
- You should now see the STA: field in the test bank


How do I request a Norton test bank for Respondus?
Do a search for test banks by Publisher (WW Norton) on this webpage:
http://www.respondus.com/products/testbank/search.php
If the test bank you need is not listed, click on the Suggest a test bank link. Fill out and submit the form. Be sure to identify the full title and edition of the text.
You will be notified when the test bank is ready to download.
If you have any questions, please submit a helpdesk ticket.