
The Question Editor interface allows you to build questions. As an author, you can access it by clicking on the Create button in the AMS home screen.
{snippet.TocArticleSW5}}Getting Started—Inserting Metadata
- To access the Question Editor as an author, click on the Create button in the AMS home screen.

- Fill out the Question Metadata. The Metadata tells the system how to categorize the question. You must fill out this section in order to proceed to the Question Editor.
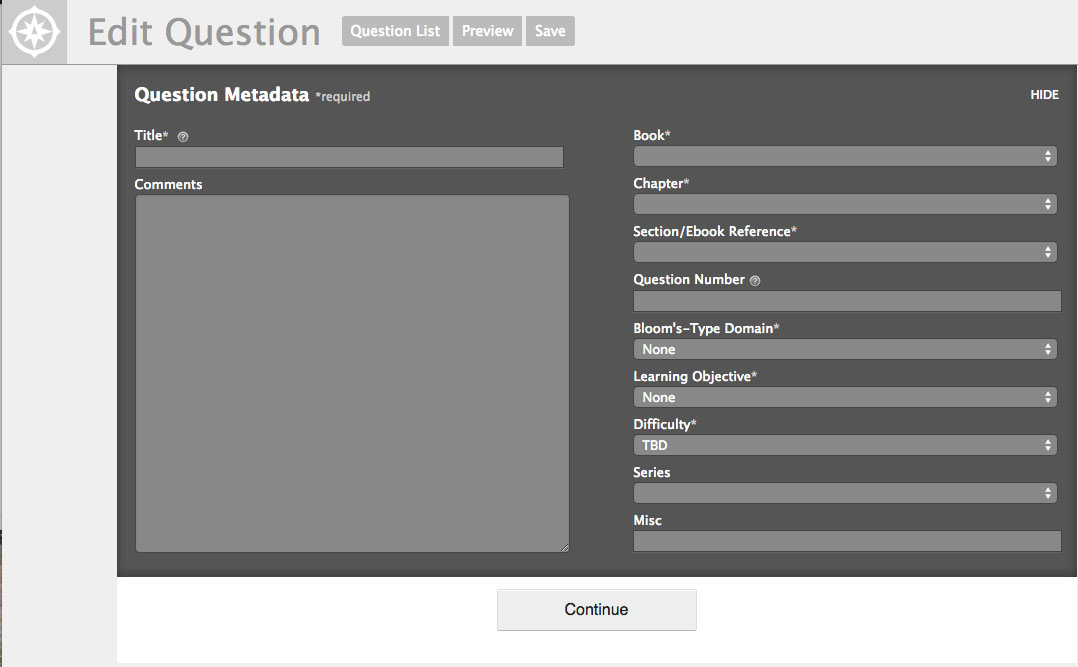
- Give the question a title. There is no character limit to the title you can give your question; however, check with your editor for best practices. This is a required field.
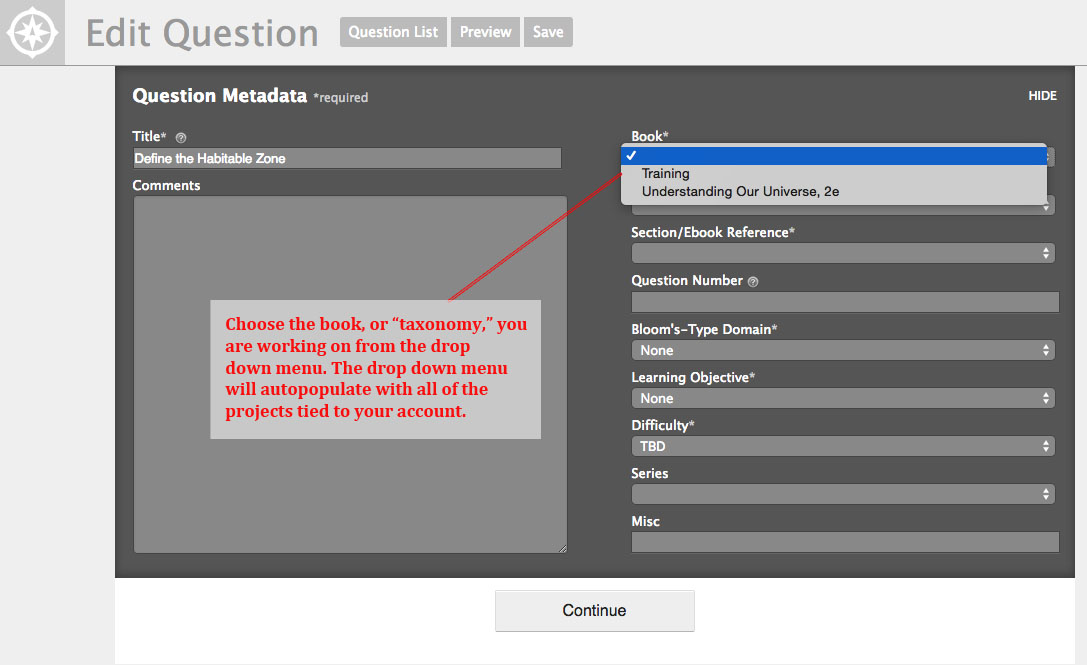
- Under “Book,” choose the book or “taxonomy” associated with your question from the drop down menu. The drop down menu will auto-populate with all of the projects tied to your account. This is a required field.
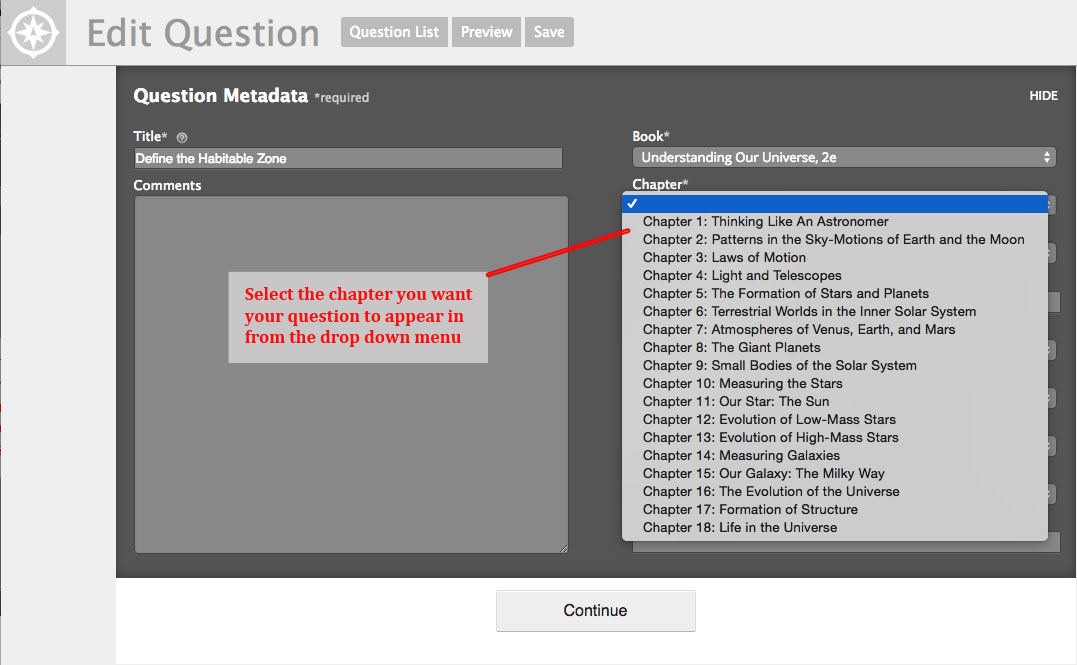
- Under “Chapter” select the book chapter associated with the question you are creating from the drop down menu. This is a required field.
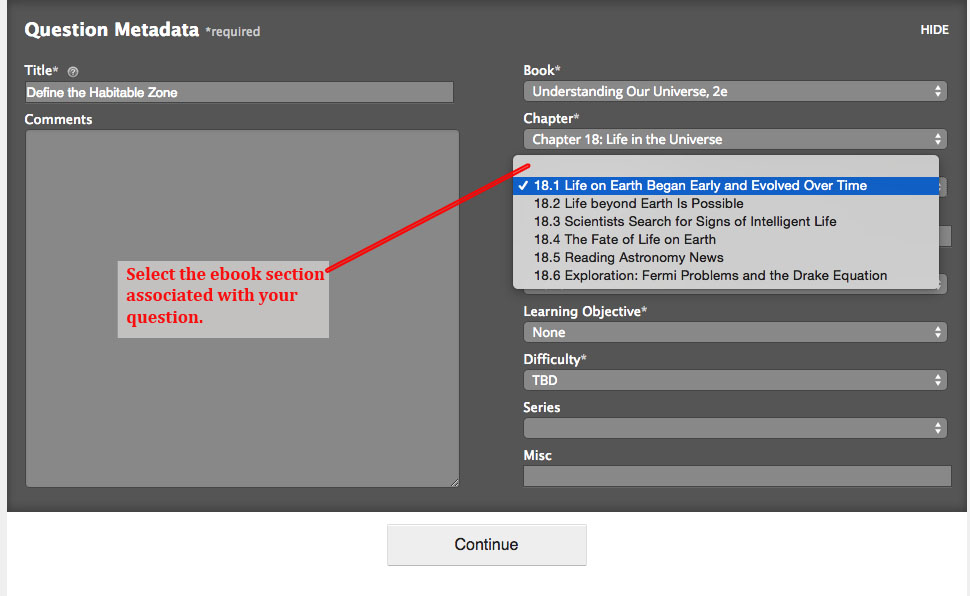
- Select the chapter section associated with your question from the drop down menu. The system will use this data to link your question to the appropriate section in the ebook, so that students can re-read the text if they have trouble answering the question. This is a required field.
- Under “Question Number,” type in the question number associated with your question. This is not a required field; however, please check with your editor for best practices.
- Under “Bloom’s Type Domain,” select the appropriate Bloom’s Taxonomy from the drop down menu. If you have questions about this, please check with your editor. This is a required field.
- Under “Learning Objective,” select the appropriate learning objective for your question from the drop down menu. This is a required field. If you have questions about this, please check with your editor.
- Under “Difficulty,” please select the appropriate difficulty level for your question from the drop down menu. If you have questions about this, please check with your editor. This is a required field.
- Under “Series,” please select the appropriate series tag for your question. Not all questions have series tags. If you have questions about this, please talk to your editor. This is not a required field.

- Under “Misc,” type any other metadata your editor would like you to include in your question. This is not a required field; check with your editor for best practices.
- In the “Comments” section, you may leave any internal comments about the question for your editor. Students and professors will not be able to see any comments you leave here.
- Click on the Continue Button to proceed to the Question Editor. While in the Question Editor, you may edit all of the metadata with the exception of the “Book” field.
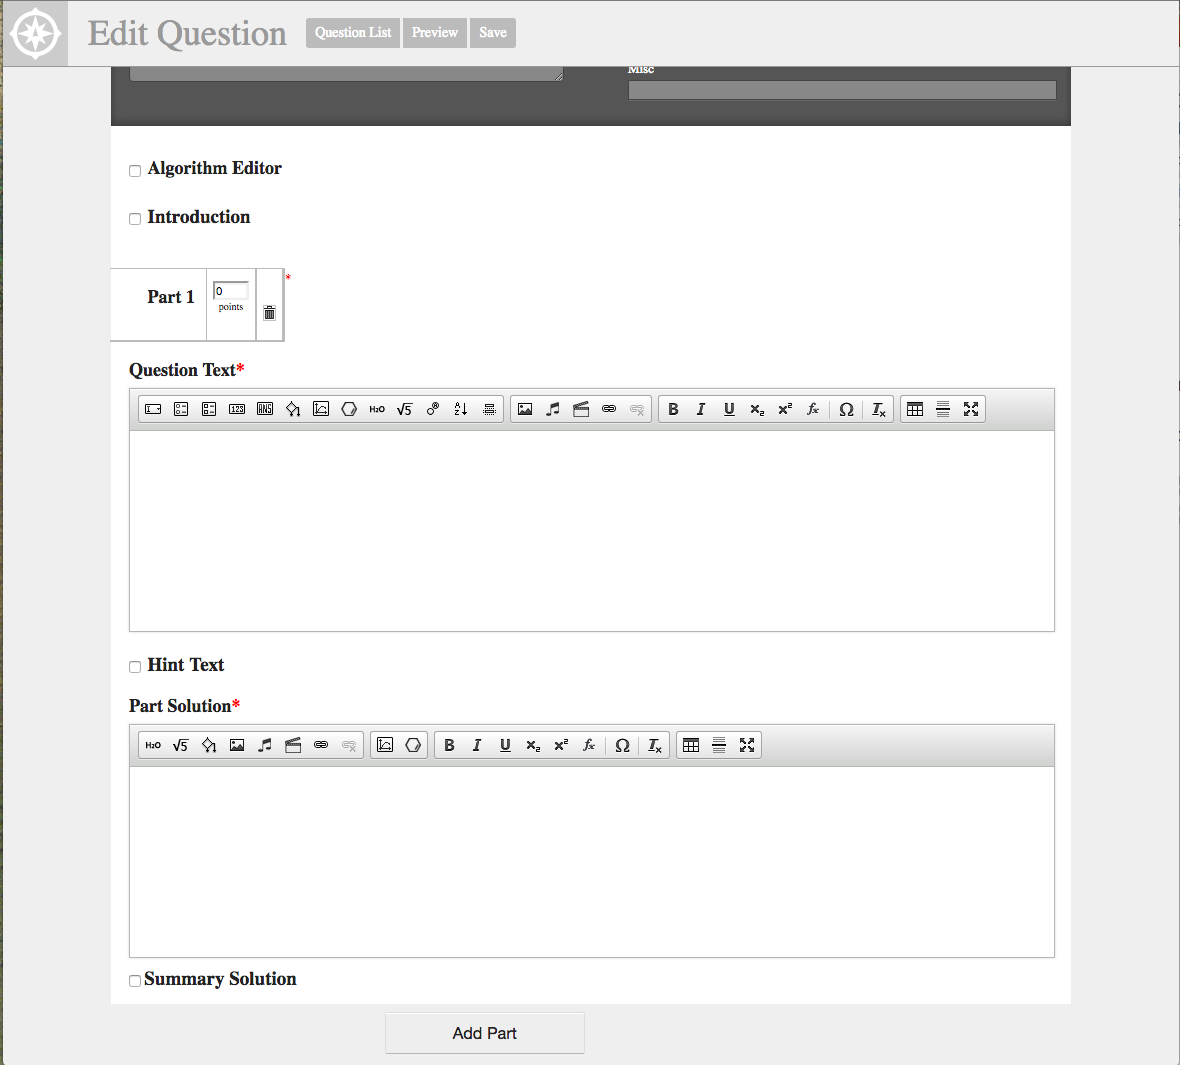
In addition to the Metadata field, the Question Editor consists of the Algorithm Editor, an Introduction section, a Points section, a Question Text section, a Hint Text section, a Part Solution section, and a Summary Solution section. It also contains an Add Part button that allows you to add another Question Text, Hint Text, and Part Solution section to your question. You would use this if you were creating a multi-part question.
Furthermore, the Question Editor also contains an Question List button which allows you to exit the Question Editor and return to the AMS home screen; a Preview button, which allows you to preview your question as a student; and a Save button, which allows you to save your question.
Overview of the Sections in the Question Editor
The Question Editor contains various sections that you can use to create a question. These questions can consist of one or more parts. These sections are:
- The Algorithm Editor, which you can use to create algorithmic variables to use in your question.
- The Introduction section, which you can use to introduce your question with text or multimedia. If your question contains multiple parts, the Introduction section is a useful place to put information that students will use when solving each of the question’s parts.
- The Points section, which allows you to define the number of points each part of your question is worth.
- The Question Text section, in which you write the question stem and insert question modules.
- The Hint Text section, in which you can write the hint students will see in your question.
- The Part Solution section, in which you can write the solution students will see if they exhaust their attempts on the question, or give up.
- The Summary Solution section, which is intended for multiple-part questions. You can use this field to write one solution that explains the entire question.
Furthermore, the Question Editor also contains an Add Part button, which you can use if you are creating a question with multiple parts (ex. Part a, part b, part c, etc.). The Add Part button adds additional sections for Points, Question Text, Hint Text, and Part Solution.
Algorithm Editor
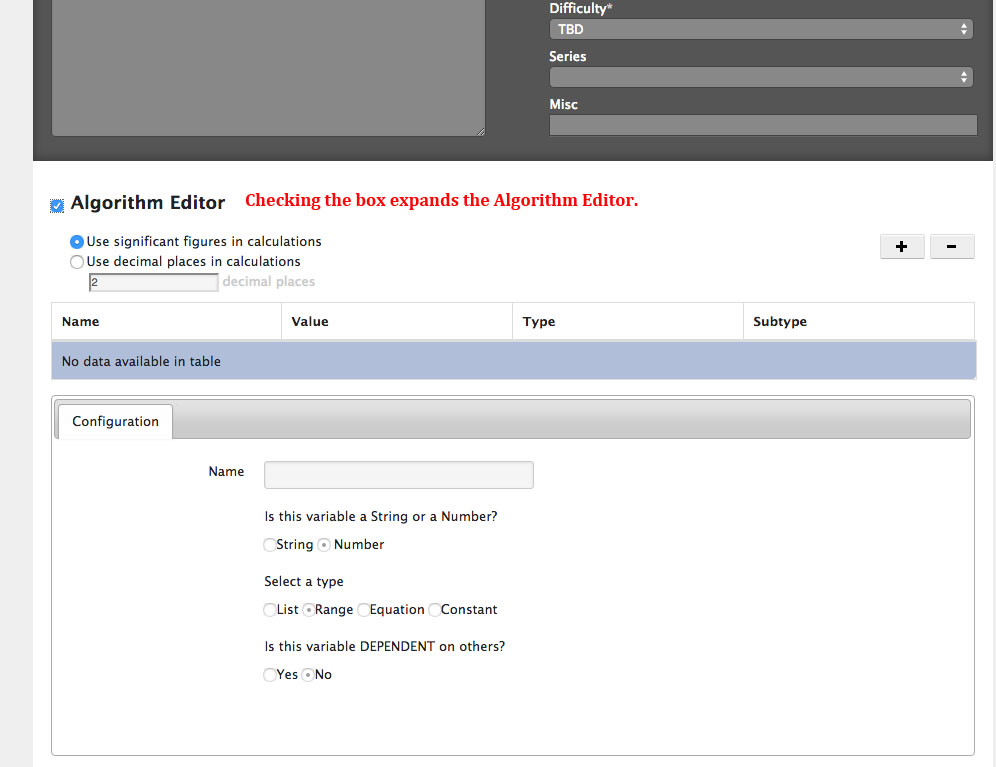
The Algorithm Editor, or the Algorithmic Variable tool, allows authors to create, edit, and insert algorithmic variables (“algos”) into Smartwork5 questions in order to create dynamically generated content. In Smartwork5, an algorithmic variable is a set of values where one value from the variable is randomly selected for each view of the problem. Because Algos give students a slightly different problem based on the values loaded for their view, this tool is often used to minimize student cheating.
The Algorithm Editor is located just under the Question Metadata field, and can be expanded by checking the box next to the words “Algorithm Editor.” Please note that unchecking the box does not delete the algorithms you created—it only collapses the Algorithm Editor.
For an in-depth look at how to use this editor, as well as for a comparison of the various types of Algorithmic Variables and how to use them in questions, please refer to the Algorithmic Variable documentation.
You may or may not be required to insert algorithmic variables into questions. Please check with your editor for best practices.
Introduction
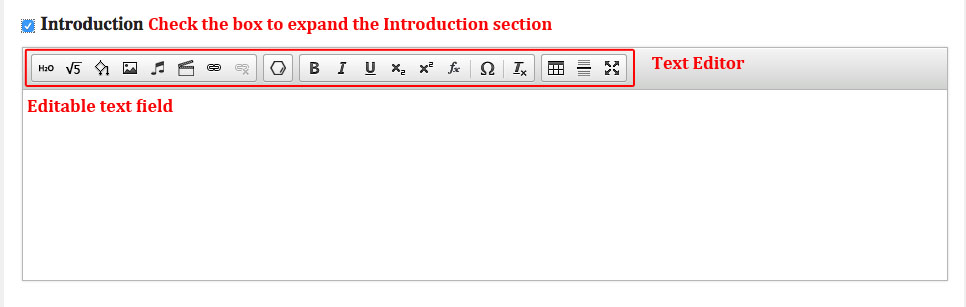
The Introduction section is located just underneath the Algorithm Editor. Similar to the Algorithm Editor, you can expand the Introduction section by checking the box next to the word “Introduction.” Please note that unchecking the box does not delete the Introduction you created—it only collapses the Introduction section.
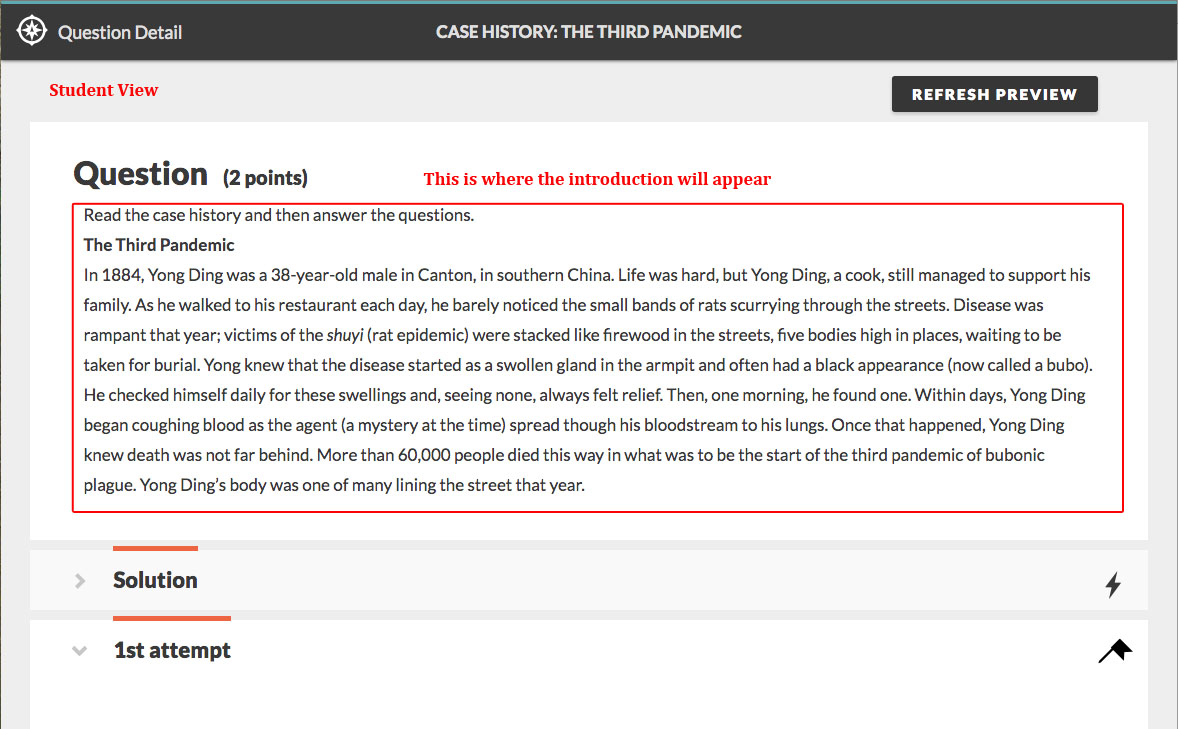
In the student player, students will see the introduction just above the question. Editors may ask you to write an introduction if your question contains multiple modules, or if your question is based on a piece of multimedia that students must evaluate, such as a video or art. If your question contains multiple parts, the Introduction section is also a useful place to put information that students will use when solving each of the question’s parts.
Text Editor
The Introduction section contains an editable text field, in which you write your introduction, as well as a Text Editor, which you use can use to format your introduction and insert multimedia.
The Media Palette allows you to insert multimedia as into your introduction.

From left to right, the Media Palette allows you to do the following:
- Insert static chemical equations
- Insert static symbolic (math) equations
- Insert algorithmic variables
- Insert image files
- Insert music files
- Insert video files
- Insert hyperlinks
- Remove the hyperlinks
The Chem Pad Button allows you to insert a static molecular drawing into your introduction.

The Text Formatting Palette allows you to format text, as well as add special characters.

From left to right, the Text Formatting Palette allows you to do the following:
- Bold text
- Italicize text
- Underline text
- Insert subscripts
- Insert superscripts
- Insert math expressions **This tool is being phased out. Please use the Symbolic Equation tool to create math equations.
- Insert special characters
- Remove any formatting applied to the text
Furthermore, the Feedback Formatting Palette allows you to do the following:

- Insert tables
- Insert line breaks
- Edit text in full screen mode
Question Text Section
The Question Text section is located underneath the Introduction section. When composing a question, the Question Text section is where you write the question stem, as well as the interactive module students will use to solve the question.
Unlike the Introduction section, it is a required field.
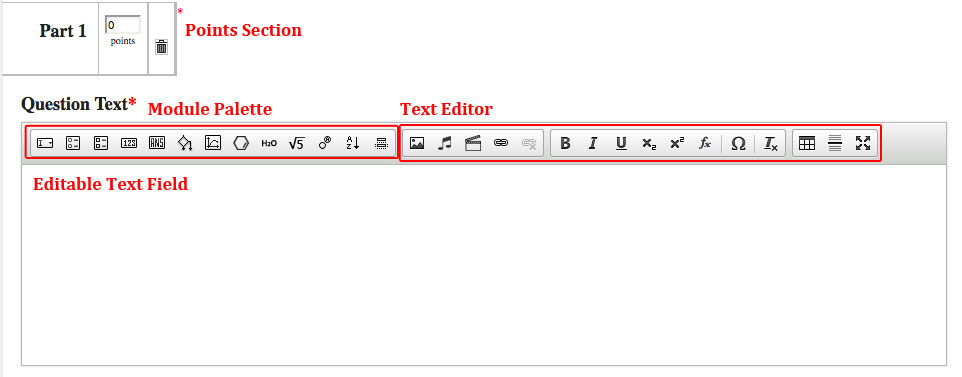
The Question Text section contains an editable text field, and a Text Editor that has a modified Media Palette, sans the Static Chemical Equation button and the Algorithmic Variable button. Instead, the Chemical Equation button and the Algorithmic Variable button appear in the Module Palette, which we will talk about in-depth below.
Modules
The Module Palette allows you to insert various gradable modules into the question. Students will use these modules to answer the question in the question stem.
You may include any number or combination of modules within a single Question field. In this case, students are able to earn partial credit if they answer some but not all of the modules correctly. Check with your editor for best practices.

From left to right, the Module Palette allows you to insert the following modules into the Question Text section:
- Drop Down Module
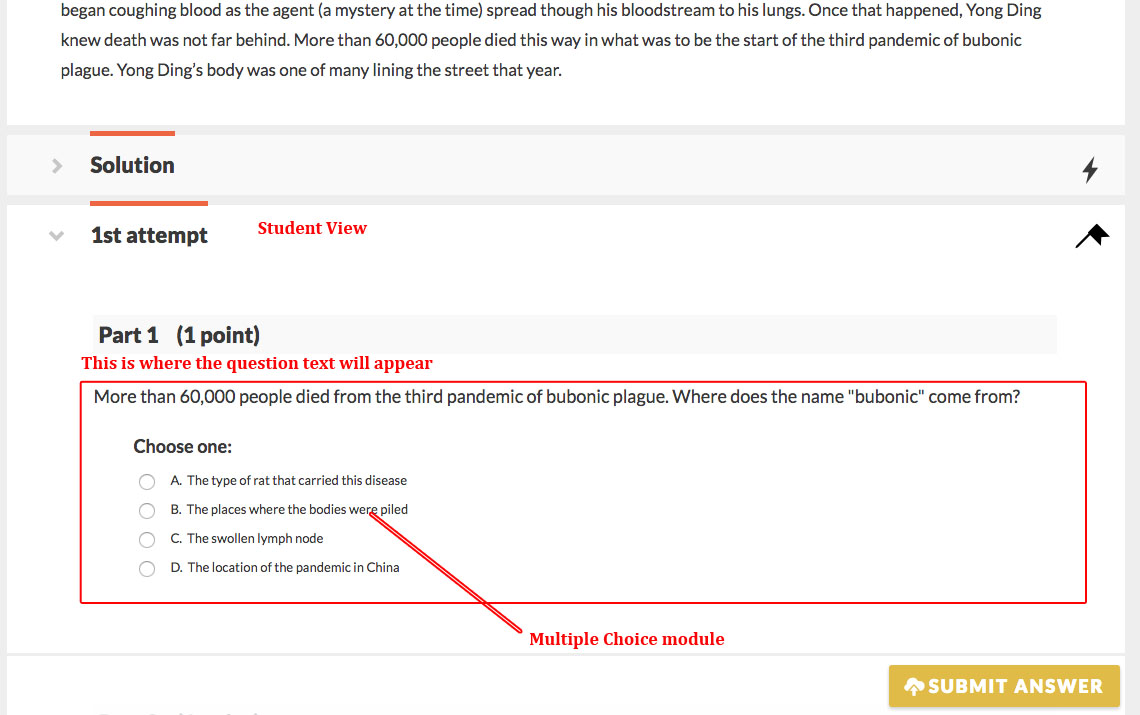
- Multiple-Choice Module
- Multiple-Select Module
- Numeric Entry Module
- Short Answer Module
- Algorithmic Variable
- Graphing Module
- Molecular Drawing Module (both gradable and static)
- Chemical Equation Module (both gradable and static)
- Symbolic (Math) Equation Module (both gradable and static)
- Labeling Module
- Ranking Module
- Sorting Module
To delete a module, place your text cursor next to it and use either the delete or backspace key.
For an in-depth look at how each module functions, and how to build questions around each module, please refer to the existing documentation for that module provided to you by your editor.
Points
The Points section is located just above the Question Text Editor. You can use this section to define the number of points you want your question to be worth.
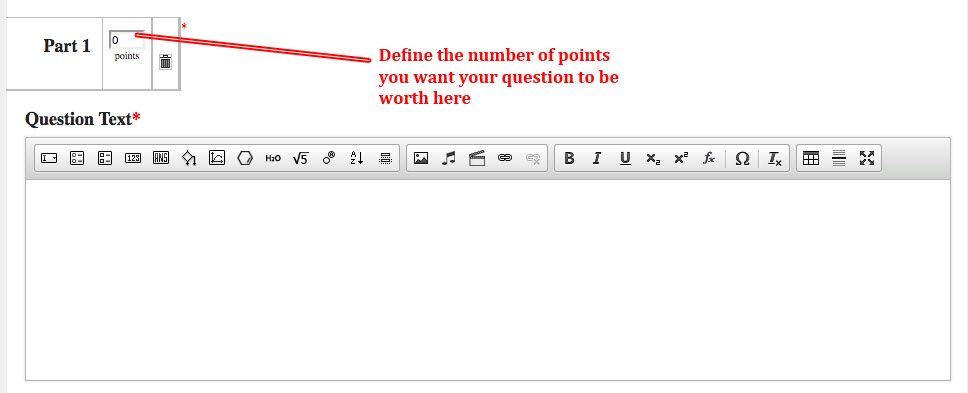
The point value of a question automatically increases by 1 each time you add a module to the Question Text section. So, if you were to add one module to the Question Text section, the Points section will be updated to 1. If you add two modules to the Question Text section, the Points section will be 2, and so on.
When a single Part has multiple modules, students will earn partial credit if they answer some but not all of the modules correctly.

Furthermore, you can manually override the number of points a question is worth by clicking on the editable text field in the Points section and typing in the number of points you want it to be worth.
Please keep in mind that when setting the point value of a question, instructors are able to adjust the total point value of the question in their own assignments.
The Points Section also contains a little trash can. If your question contains multiple parts, you can click on the trash can to permanently delete the Question Text section, the Points section, the Hint Section, and the Part Solution section associated with one of those parts.
Hint Text Section
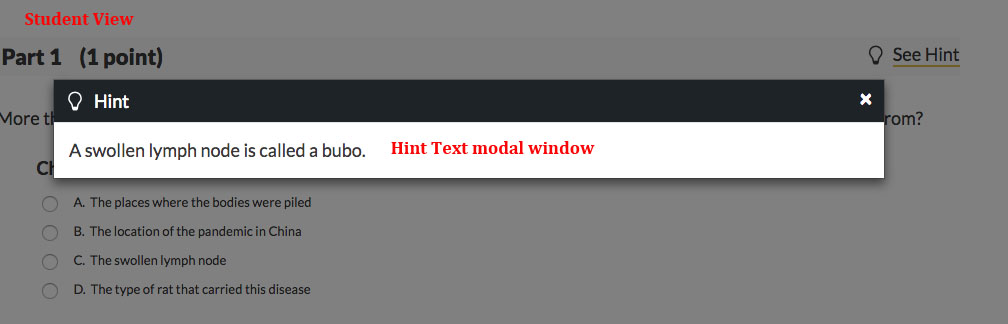
The Hint Text section is located directly underneath the Question Text section. Students can view the Hint as they begin working on the problem. It’s initially hidden, but students can expand it by clicking on a “Hint” icon.
Instructors have the ability to hide Hints in their assignments, so not all students will see them. If there’s explanatory information that the student will need in order to answer the question (such as a key for a graph or table), it should be placed in the Introduction or Question field.
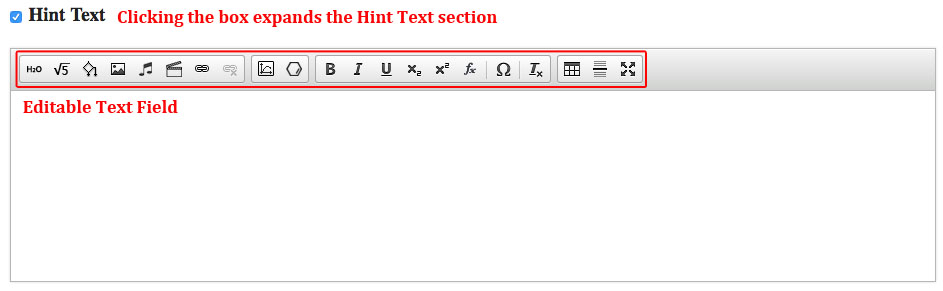
Like the Introduction section, the Hint Text section expands when you click the check box next to the words “Hint Text.” Unchecking the box does not delete the hint; instead, it just collapses the section.
The Text Editor in the Hint Text section has all of the same buttons as the Text Editor in the Introduction section. It also includes a button that allows you to create a static graph, which is located next to the Static Molecular Drawing button.
In student view, the hint appears in a modal window, accessible if you click on the "See Hint" link.
Part Solution Section
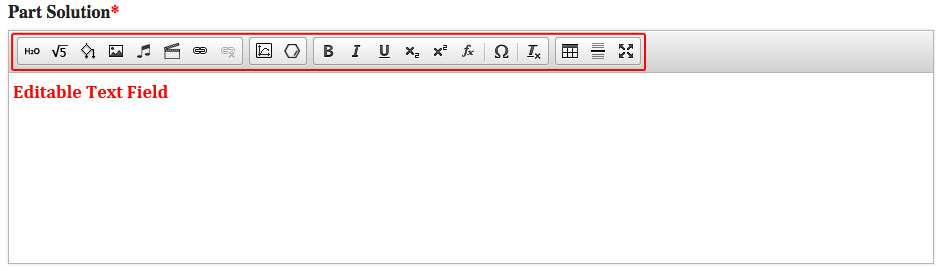
The Part Solution section is located directly underneath the Hint Text section. This is the section you use to write the solution to the problem that students will see when they finish a question.
The Part Solution is meant to explain the solution to the question in the Question Text section that immediately precedes it in the Question Editor. In the event that you are creating a multi-part question, there is an additional Summary Solution section that you can use to summarize all of the solution sections for all of the parts of the question.
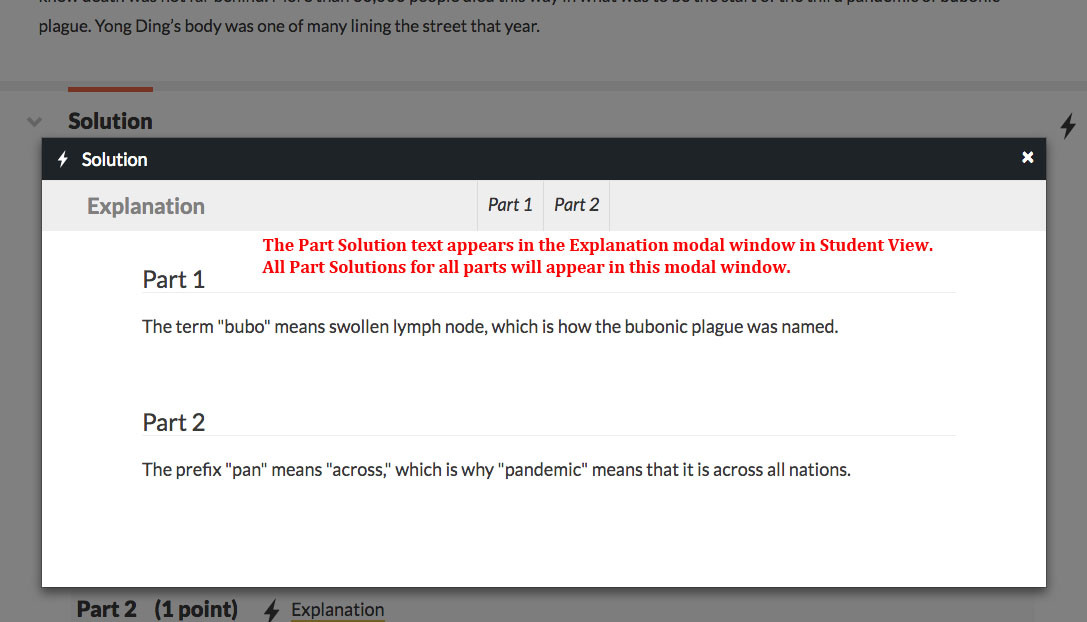
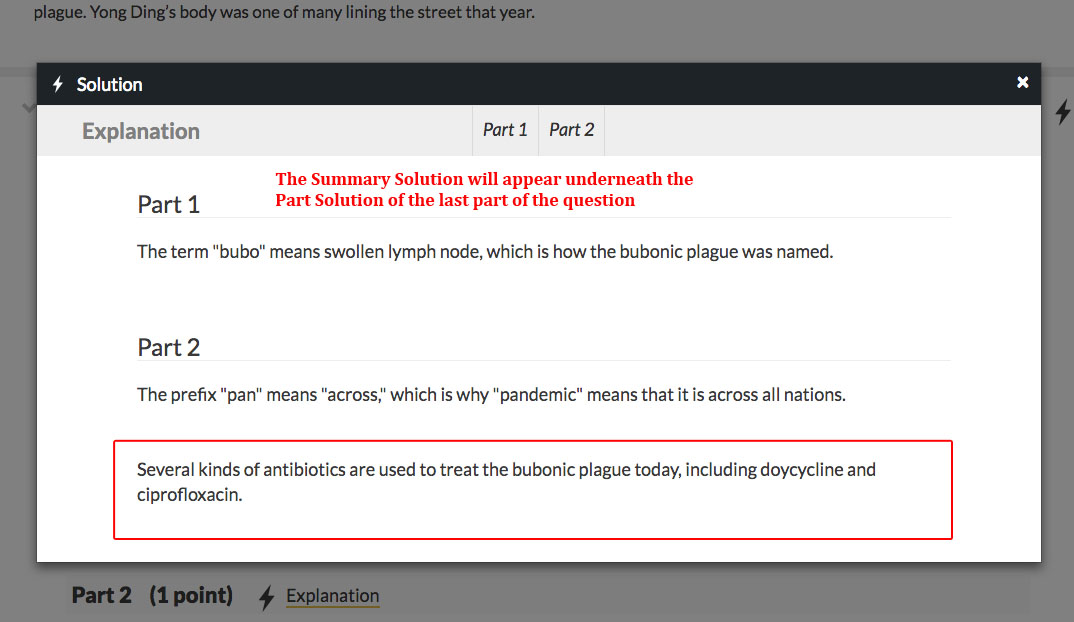
In student view, the Part Solution will appear in the “Explanation” modal window. Students will be directed to this modal window when they finish a question, either by getting it right, giving up, or exhausting their allowed attempts on the problem. Note that a student reading the Solution text may or may not have answered the question correctly. If a question has multiple parts, all Part Solutions will appear in the Explanation modal window.
Although it’s possible to write questions without any Solution content (either Part or Summary), it will generally be expected that a Solution is present. Check with your editor if you’re not sure about their expectations.
Like the Hint Text section, the Text Editor in the Part Solution section has all of the same buttons as the Text Editor in the Introduction section. However, it also includes a button that allows you to create a static graph, which is located next to the Static Molecular Drawing button.
Summary Solution
When a question contains multiple parts, the Summary Solution section is used to explain all of those parts together. You can write a Summary Solution alone, or write a Summary Solution in addition to Part Solutions.
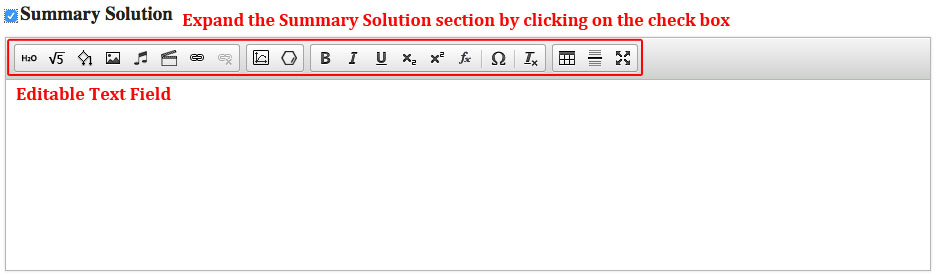
You can expand the Summary Solution section by clicking on the check box next to the words “Summary Solution.” Unchecking the box does not delete what is in the Summary Solution section; it just collapses it.
The Summary Solution section contains the same Text Editor as the Hint Text section and the Part Solution section.
In Student View, the Summary Solution will appear underneath the last Part Solution in the Explanation modal window.
Add Part Button
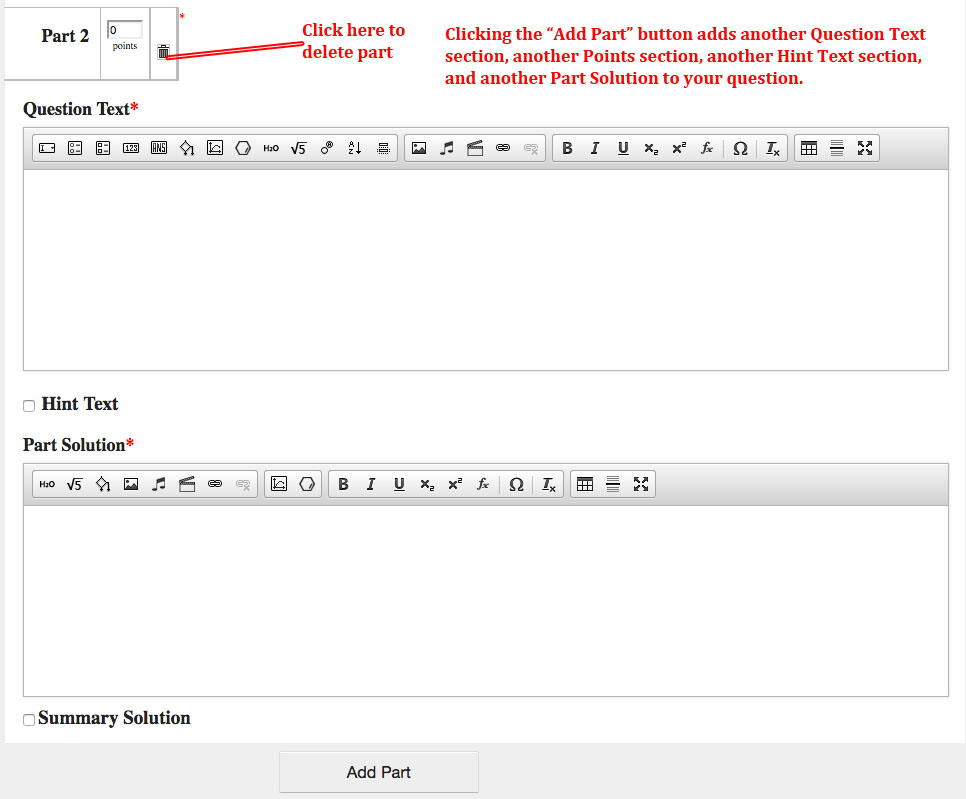
The Add Part button, located directly under the Summary Solution section, adds an additional part to your question. A part consists of a Points section, a Question Text section, a Hint Text section, and a Part Solution. Adding multiple parts to a question is optional.
You can delete parts by clicking on the trash can in the Points section of the part you want to delete.
Auto-save FAQ
The Question Editor contains an auto-save feature, which automatically updates the system with the changes you are making to your question. Although the system auto-saves your question, you should not rely on auto-save alone when authoring a question.
- How often does the system auto-save?
The system auto-saves whenever an action is taken, such as inserting a module into the question text section. It also auto-saves after a certain amount of time has lapsed.
- Does it show a message to the user that it’s been auto-saved?
Yes, it shows this in the upper right hand corner of the Question Editor. When it first saves, the message "Save" will appear in green. When a certain amount of time has lapsed, the system will display in red the length of time since the last auto-save.
- Is there a way to undo or revert changes in a question in the AMS?
No there is not.
Creating a Question
To create a question in Smartwork5, do the following:
- Access the Question Editor by clicking on the “Create” button from the AMS home screen.
- Fill out the necessary metadata for your question. Click on the “Continue” button once this is completed.
- If desired, create the algorithmic variables you want to use in your question by expanding and using the Algorithm Editor. Please refer to the Algo documentation for an in-depth look at how to do this. You can go back to this step at any time to edit your algos during the Question creating process.
- If desired, create an introduction for your question by expanding and using the Introduction section.
- In the Question Text section, write out your question stem.
- Choose the module you would like students to use when answering your question by clicking on the appropriate button in the Module Palette. In the module, define and set the correct answer and correct feedback, as well as the default and incorrect feedback. For an in-depth look at how to do this, please refer to the appropriate documentation for the module you are using.
- If desired, adjust the number of points the question in this Question Text section is worth in the Points section. Remember that the points will increase by one for each module added to the Question Text section associated with this Points section.
- If desired, create a Hint for your question. Many Editors require all questions to have hints; however, check with your Editor for best practices.
- In the Part Solution section, write a solution that students will see if they give up on the question, or exhaust their answer attempts. In many disciplines, such as Chemistry, Editors require that the Part Solution give step-by-step instructions as to how to solve the question. However, check with your Editor for best practices for your particular discipline.
- Save your question.
- Click on preview mode to preview your question as a student. This is a good opportunity to make sure your question is functioning correctly.
- If you are creating a question that has multiple parts, return to the Question Editor and click on the Add Part Button.
- For this new part, add the following; the Question stem and Question module; the Hint Text, and the Part Solution. If desired, adjust the Points section for this new part.
- Repeat until you have added all the desired parts for your question.
- There is no limit as to how many parts you can add to a question; however, please check with your Editor for best practices.
- In the event that you need to delete a part, you can do so by clicking on the trash can in the Points section of the part you want to delete.
- If desired, create a Summary Solution to tie all the parts of your question together.
- Save your question. Preview it in student mode to ensure that all parts are working correctly.