The Multiple-Choice Module is used to create multiple-choice questions.
Getting Started
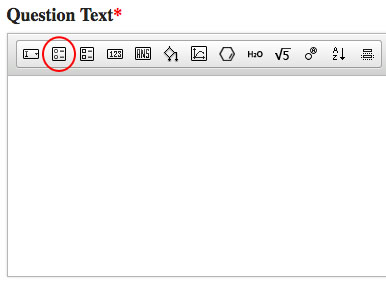
- To insert the Multiple-Choice Module in to the Question Text section, click the multiple-choice button in the Question Type Palette. The symbol on this button is a rectangle that contains two circles and two lines.
- Once inserted into the Question text section, the module will always appear as a question stem and four blank multiple-choice options, as exemplified in the screenshot below:
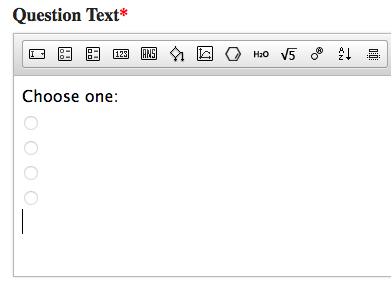
As answer choices are added to the Module editor, they will populate the module that appears in the Question text section.
- To open the Multiple-Choice Module editor, double click on the module.
The Multiple-Choice Module Editor consists of two tabs: an Options tab, in which you write the answer options, and a Feedback tab, in which you write the feedback students will see when they select each of the answer options.
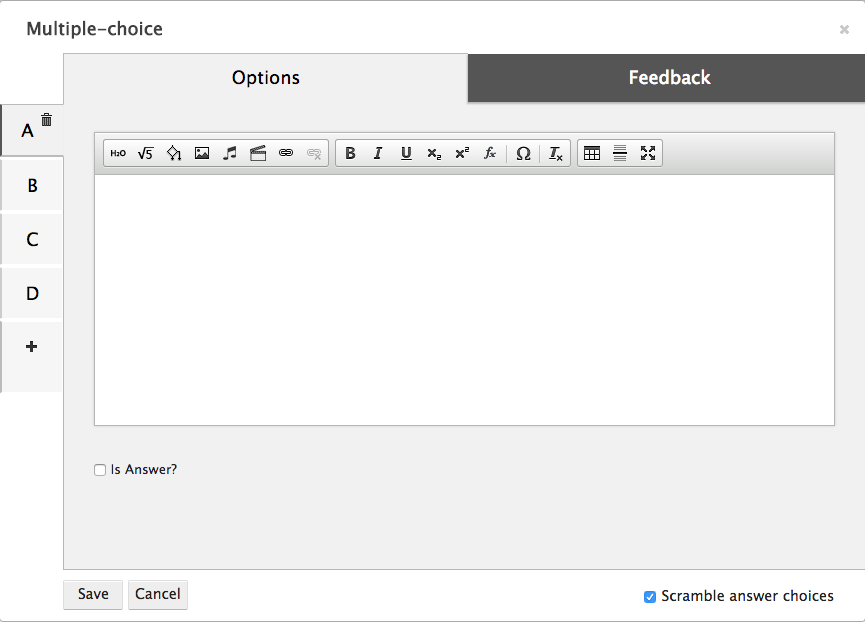
The Multiple Choice Editor also has a Save button, which you can use to save your work and exit the module, and a Cancel button, which allows you to exit the module without saving.
Setting Up the Question
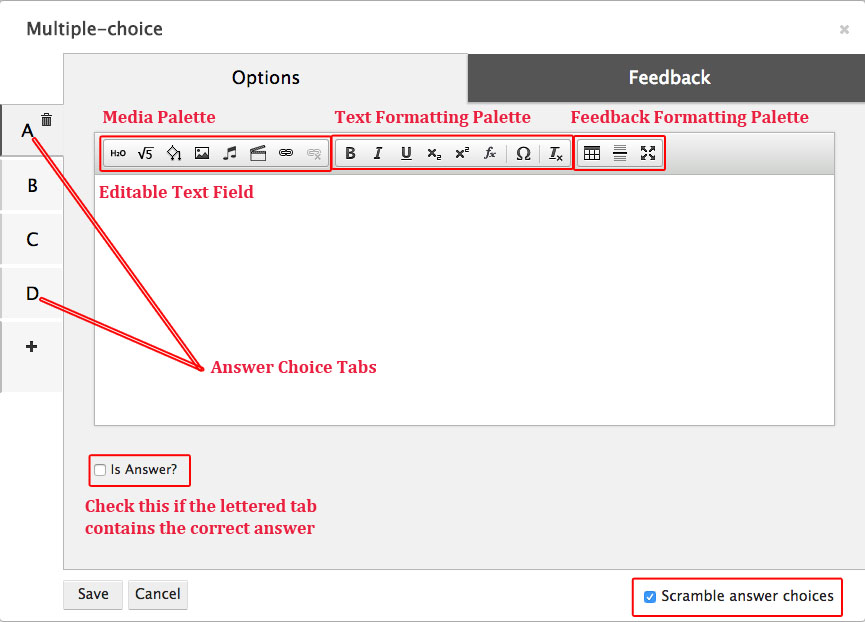
The Options tab is broken down into Answer Choice tabs, which you can use to write out each of the answer options. Only one answer choice should be written per lettered tab.
Although the Answer Choice tabs are lettered, the order of the answer options will randomize in student view. Therefore, it does not necessarily matter which lettered tab the answer options are typed into.
The system will randomize the answer choices if you check “Scramble answer choices” at the bottom of the module. The default setting is for “Scrambled answer choices” to be checked.
Answer Choice tabs can be added by clicking on the plus sign. Answer choice tabs can be deleted by clicking on the trash can in the upper right-hand corner of the tab you want to delete.
Text Editor
Each Answer Choice tab contains a text editor, which allows you to add text and other multimedia to the answer options.
Important Note: Copying and pasting text from a Word Document into Smartwork5 could insert formatting that will corrupt the module. Please enter the text directly into the Text Editor, or copy and paste from a plain text document.
The Media Palette allows you to insert multimedia as answer options.

From left to right, the Media Palette allows you to do the following:
- Insert chemical equations
- Insert symbolic (math) equations
- Insert algorithmic variables
- Insert image files
- Insert music files
- Insert video files
- Insert hyperlinks
- Remove the hyperlinks
The Text Formatting Palette allows you to format text, as well as add special characters.

From left to right, the Text Formatting Palette allows you to do the following:
- Bold text
- Italicize text
- Underline text
- Insert subscripts
- Insert superscripts
- Insert math formulas *This button is being phased out. To insert math equations, use the symbolic equation editor.
- Insert special characters
- Remove any formatting applied to the text
Furthermore, the Feedback Formatting Palette allows you to do the following:

- Insert tables
- Insert line breaks
- Edit text in full screen mode
To set up a question, do the following:
- In Answer Choice tab A, type out one of the answer choices you would like to include in the module. Format the text and insert any multimedia you see fit.
- In Answer Choice tab B, type out another answer choice you would like to include in the module.
- Repeat until all of the answer choices are in the module. Add and subtract Answer Choice tabs as needed.
- At the bottom of the tab with the correct answer choice, check the box that says “Is Answer?”
- Save the question.
Creating Feedback
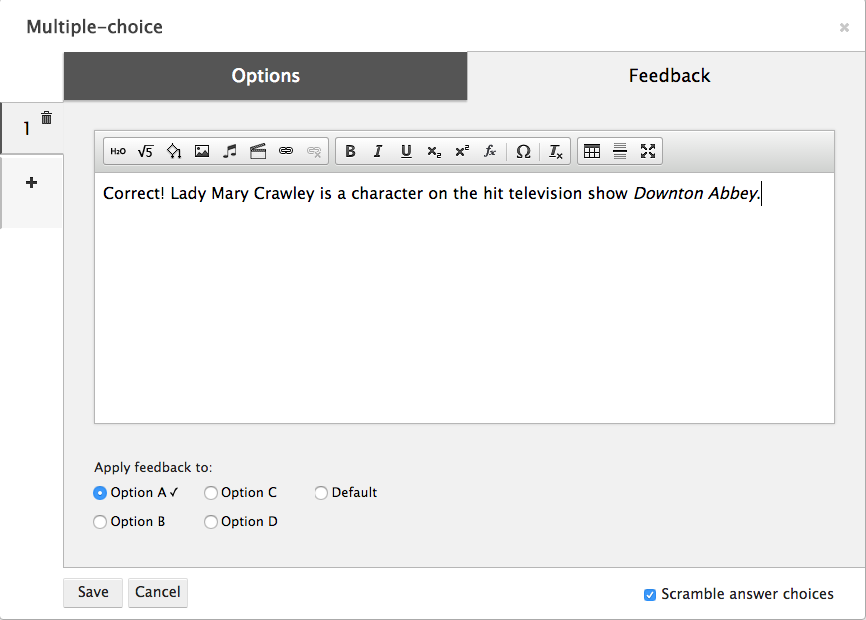
The Feedback tab allows you to write feedback that students will see when they select an answer choice.

This tab contains many of the same elements as the Options tab, such as the Text Editor, and the ability to add or delete tabs by respectively clicking on the + tab and the trashcan.
Linking Feedback to an Answer Option
At the bottom of each tab is a section that allows you to select the answer option to which the feedback should correspond.
There are a few things you should keep in mind when linking feedback to answer options:
- The correct answer option will always have a checkmark next to it. It is good practice to set feedback for the correct answer first.
- A student will see the Default feedback under two circumstances: (a) If she does not submit an answer choice and (b) if the author does not write feedback for a specific incorrect answer choice. It is good practice to set default feedback second.
- If you write default feedback, you do not have to write feedback for every incorrect answer option. However, check with your editor for best practices.
- You can only link one set of feedback to one answer options.
Steps to Create Feedback
To create feedback, do the following:
- In the bottom left-hand corner of the first Feedback tab, select the Answer Option to which you would like to apply feedback.
- Type out the feedback you would like students to see when they select that option.
- Repeat this for as many options as you see fit, taking care to create feedback for the correct answer and to create the Default feedback.
- Save the module.
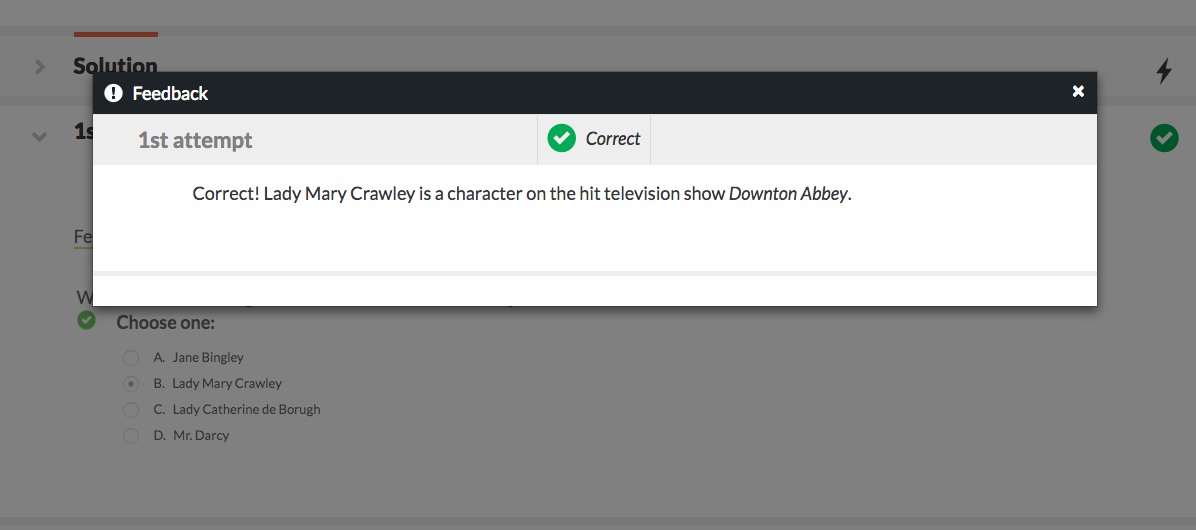
- Go to preview mode in the Question Editor. Check that the feedback is working correctly by selecting each of the answers and clicking “Check Answer.”