
Important:
- To avoid compatibility problems and import failures in some Learning Management Systems, avoid using the following characters in the Test Name and Course Name: # & - – : ; @ / \
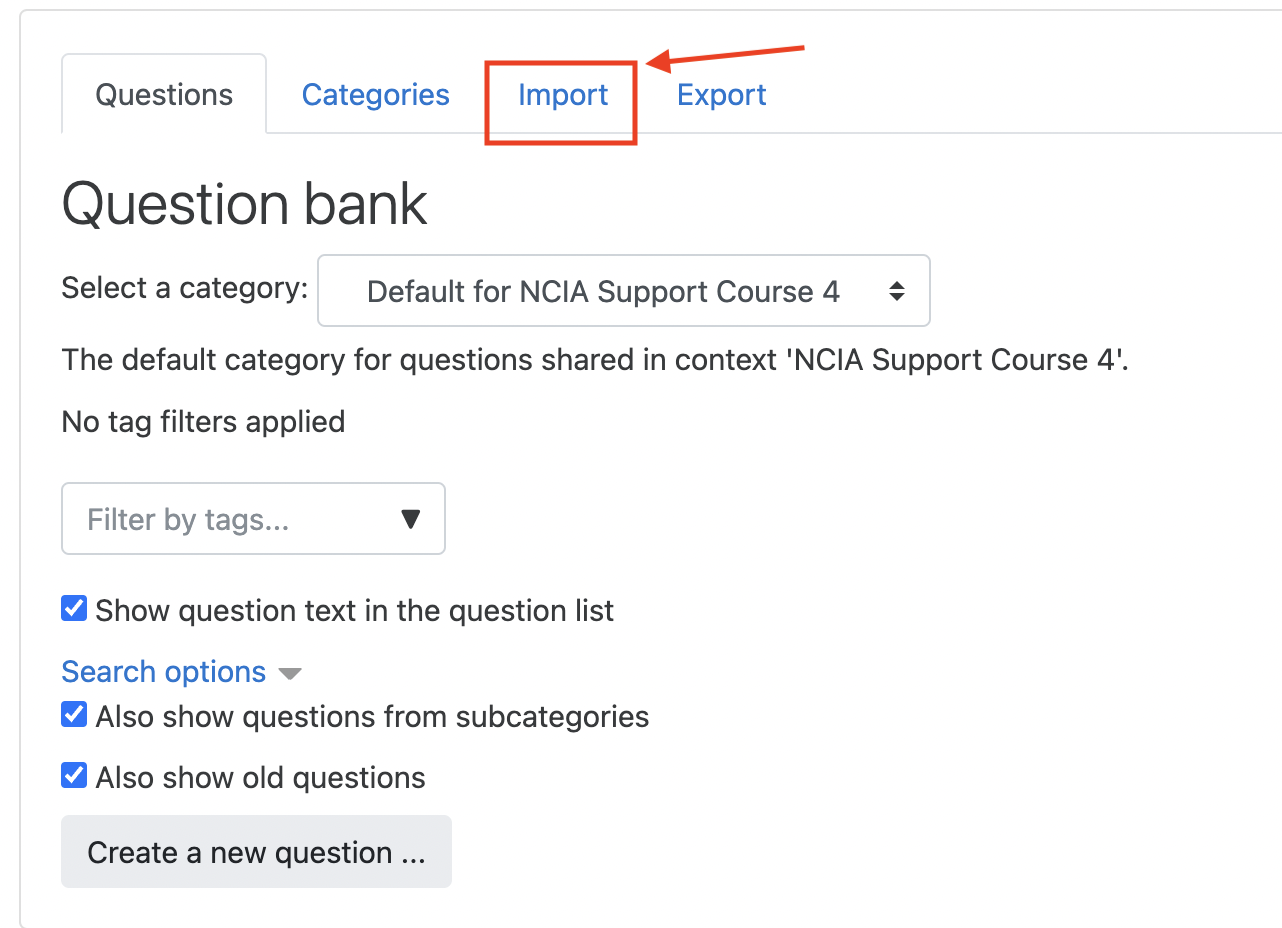
How do I import my test to Canvas?
After building your test, you’ll want to download it before uploading it to your Canvas course. Here's how to do this.
UPLOAD THE FILE
- Log into your Canvas course and navigate to Settings.
- From the Settings link, select Import Course Content on the right-hand column menu.
- In the Import Content window, select Blackboard 6/7/8/9 export .zip as your Content Type. (Note: You will need to select Common Cartridge 1.x Package for “Made by Norton” premade tests.)
- Browse for your saved file ending in ZIP and select All Content.
- Click Import.
Please Note: Selecting Canvas Course Export Package will causes problems for your course.
WORKING WITH THE TEST
- Your test will be visible in three locations in Canvas:
- as a new quiz on your QUIZZES page,
- as an un-published quiz in a new module named "WW Norton" on your Modules page,
- and as a question bank on your Question Banks page.
You can edit, move, or delete any of these instances depending on how you want to use your test.
- Before publishing, be sure to preview questions for proper image display and settings.
- Customize your quiz settings as needed, then publish the quiz to make it visible to students.
* Note that edits made to the test will not be made to the same question in your question banks area, as the two are not linked automatically in Canvas.
How do I import my test to D2L/Brightspace?
After building your test, you’ll want to download it before uploading it to your D2L/Brightspace course. Here’s how to do this.
UPLOAD THE FILE
- Log into your D2L/Brightspace course and navigate to Course Admin.
- Click on the Import/Export/Copy tool and then in the next window, click on Import Components and Start.
- In the pop-up window Import Course Package, click on the Upload button.
- Locate the ZIP file you’ve saved and select it. (Note: for “Made by Norton” premade quizzes, the file exported from Testmaker will be an imscc file.)
- Click on Import All Components and allow the import process to complete.
- Click View Content to return to your course.
WORKING WITH THE TEST
- Your test will be visible in two locations in D2L/Brightspace:
- as a new quiz on your QUIZZES page,
- and as an un-published quiz in a new module named WW Norton on your home page.
You can edit or move the quiz.
- Select your quiz settings before publishing it so it is visible to students.
How do I import my test to Moodle?
After building your test, you’ll want to download it before uploading it to Moodle. Here’s how to do this.
Note: These instructions are for how to import your custom tests. For instructions on how to import “Made by Norton” premade tests, please follow the instructions found here.
1. Log into Moodle.
2. Navigate to the course where you wish to import the test.
3. Under Course Administration select Question bank.

Then select the Import tab from the next screen.
4. From the import tab, select Blackboard as the file format. Then click Choose File, navigate to and select the downloaded zip file, then click Import.

5. Once you have the question bank imported, you will need to create your quiz. To do so, navigate back to the home screen for your course and click “Add an Activity or resource” to the right of Topic modules.
6. In the window that appears, select Quiz from the options on the left. Then click add.
7. Title your quiz, then click Save and Display.
8. On the next screen, click Edit quiz, then navigate to the right of the screen and select the “add” option followed by “from question bank” to add questions from your question bank.


9. In the window that appears, select your quiz from the “Select a category” dropdown and select your questions from the question bank. Then click”add selected questions to the quiz” and save.
You can move the quiz from the top module to the appropriate module using the cross arrows beside the name of the quiz on the Course Main Screen.
How Do I import my test to a Blackboard Course?
After building your test, you’ll want to download it before uploading it to Blackboard. Here’s how to do this.
- Log into your Blackboard course.
- Navigate to the course where you wish to import the test.
- On the left navigation select Packages and Utilities.
- Select Import Package/View Logs.
- Select Import Package from the top navigation bar.
- Under Select Package click Browse My Computer.
- Locate and select the ZIP file downloaded from Norton Testmaker. (Note: For “Made by Norton” premade tests, this will be an imscc file.)
- Scroll down to Select Content Areas. * Ensure that the only item with a check mark is Test, Surveys, and Pools
- Click Submit in the lower right of screen.
You will receive a notice at the top of your course when the operation is complete. You may also receive an email when the process is complete.
Deploy the test to the student-facing area of your course
- Once the import operation is complete, navigate to the area of the course where you wish to place the test for students to access.
- At the top navigation bar select Assessments.
- Select Test.
- Add Test — locate the new test uploaded earlier.
- Click Submit.
- The Test Options screen will appear.
- Modify these settings to meet your requirements for the test.
- Click Submit.
You will return to the area of the course with the quiz now deployed. The quiz will appear at the bottom of the screen.
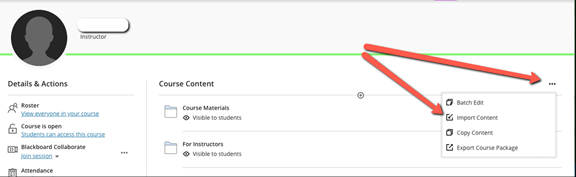
How Do I import my test to a Blackboard Ultra Course?
After building your test, you’ll want to download it before uploading it to Blackboard Ultra. Here’s how to do this.
- Log into your Blackboard Ultra course.
- Navigate to the course where you wish to import the test.
- In the upper right corner, click on the three dots.
- Select Import Content.
- Select Import Course Content.
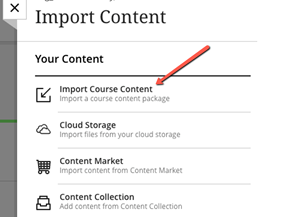
- You will be prompted to select a file from your computer.
- Locate and select the ZIP file downloaded from Norton Testmaker. (Note: For Made by Norton premade tests, this will be an imscc file.)
- Select Import.
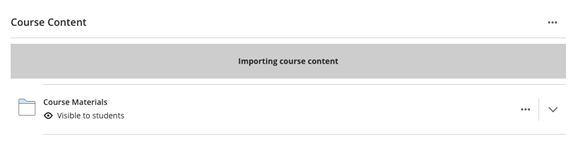
- The quiz will appear in a folder in your content area.


How do I import my test to Schoology?
After building your test, you’ll want to download it before uploading it to your Schoology resources.
You will need to add the test file to your Schoology Resources in order to add the exam to your course.
Upload the file to Schoology
- Log in to Schoology and navigate to your Resources and select Personal from the list.
- Click the down facing arrow in the left column and select Import.
- Select the option to import from Blackboard (ZIP). Note: for “Made by Norton” premade tests, you will need to select Common Cartridge (IMSCC or ZIP).
- Select import to a new collection or choose from an existing collection and give the new folder a name.
- Click Next and upload the file to Schoology.
- Click Next to complete.
For additional functionality and flexibility in Schoology, you can choose to convert the test to an Assessment by choosing the Convert to Assessment option under the gear menu.
Add the test to your course
- Go to the course to which you want to import the exam.
- Click Add Materials and select Import from Resources.
- Find the test you uploaded, select it, and click Import.
- Click Advanced Options to adjust any settings and click Import.
Norton test content can be edited as needed by clicking the gear next to each question either in the test in your Schoology resources or in a test in your course.
Submit a Support Request
Still need help? Submit a support ticket and a customer support specialist will be happy to assist you.
Opened a request already? Click here for an update.