The Molecular Drawing tool is used to insert static and graded molecular drawings into questions. Students are unable to edit static molecular drawings, which are often used for illustrative purposes in the question. Conversely, graded molecular drawings allow students to create and submit molecular drawings for a grade. The Molecular Drawing tool is powered by Marvin JS, the complete user’s guide for which can be found here: https://docs.chemaxon.com/display/marvinjs/Marvin+JS+User's+Guide>
Getting Started
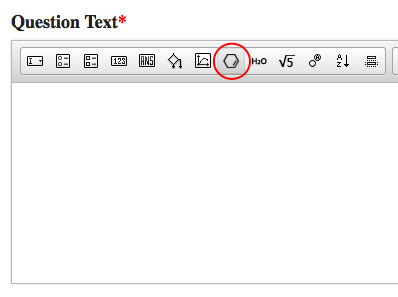
- To insert the Molecular Drawing Module into the Question text section, click on the molecular drawing button in the Question Type Palette. The symbol on this button is a molecular ring. If you scroll over this button, the ALT text says “Chemistry.”
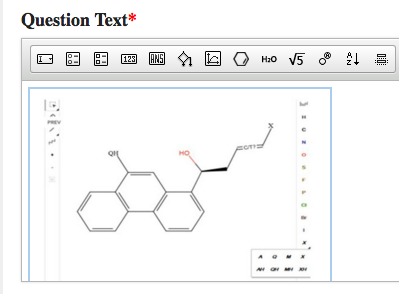
- Once inserted into the Question Text section, the module will always appear as a molecular drawing, as exemplified in the screenshot below:
- To open the Molecular Drawing Module Editor, double click on the module. This will open up the module editor in a new tab.
The Molecular Drawing Tool has two modes: Graded and Static. Static Mode allows you to create molecular drawings that cannot be edited by students. Graded Mode allows you to create molecular drawing problems that students can edit and manipulate for a grade.
The Molecular Drawing Tool also has a Save button, which you can use to save your work and continue working, and a Save and Exit button, which allows you to save your work and exit the editor.
In addition to the Question Text section of the Question Editor, you can also insert Static Molecular Drawings in the Introduction section, the Hint Text section, the Part Solution section, and the Summary Solution section. You can only insert Graded Molecular Drawings into the Question Text section of the Question Editor.
Static Molecular Drawings
The Static Molecular Drawing Tool allows you to create molecular drawings that cannot be edited by students.
Overview of the Static Molecular Drawing Editor’s Toolbars
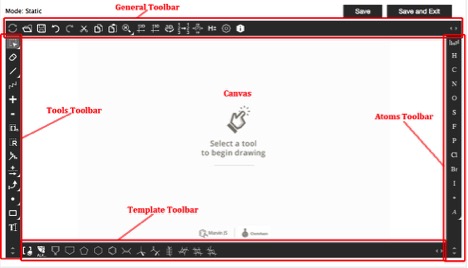
The Static Molecular Drawing Editor consists of a Canvas, where you create your drawing, and four toolbars: The General Toolbar, which allows you to copy, paste, and clear your drawing, among other things; the Tools Toolbar, which you can use to add bonds and insert charges, among other things; the Template Toolbar, which contains various templates for molecular rings; and the Atoms Toolbar, which contains atoms you can use to draw your 2D molecules.
General Toolbar

The General Toolbar is located at the top of the drawing module. From left to right, the General Toolbar consists of the following:
- Undo Button – this allows you to clear your drawing.
- Import Button – this allows you to import existing structures.
- Export Button – this allows you to export existing structures.
- Undo Button – this allows you to undo your last action.
- Restore Button – this allows you to restore your last action.
- Cut Button – this allows you to cut selected structures.
- Copy Button – this allows you to copy selected structures.
- Paste Button – this allows you paste structures that were copied or cut.
- Zoom Button
The Zoom Button expands to allow you to do the following (from left to right):

- Zoom in
- Zoom out
- Zoom all — this sets optimal magnification so that you can view everything on the canvas.
- Zoom to selection — this centers the selected object and zooms in around it.
- 2D Structure Cleaning Button – this allows you to clean your 2D structure so that all the atoms on the canvas are in an organized fashion.
- 3D Structure Cleaning Button – this allows you to clean your 3D structure so that all the atoms on the canvas are in an organized fashion.
- Rotate Button – this allows you to rotate your 3D structure.
- Auto Map Button – this assigns map numbers to the corresponding atoms in a reaction.
- Calculate Stereo Button – this assigns the R or S label to a chiral center and the E or Z label to a double bond.
- Explicit Hydrogen Button – this adds or removes explicit hydrogen from a selected structure.
- Settings Button – this opens the settings dialog window.
- Information Button – opens information about Marvin JS.
For in depth explanations about each tool, please refer to the General Toolbar section of the Marvin JS help notes: https://docs.chemaxon.com/display/marvinjs/General+Toolbar
Tools Toolbar

The Tools Toolbar is located on the left of the drawing module. From top to bottom, the Tools Toolbar consists of the following:
- Selection Button
The Selection Button expands to allow you to do the following (from left to right):

- Select a rectangular area
- Select structures using the Freehand Selection tool
- Delete Button – this allows you to delete a selected structure.
- Bonds Button
The Bonds Button expands to allow you to do the following (from left to right):
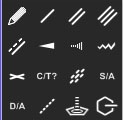
- Draw bonds freehand
- Insert a single bond
- Insert a double bond
- Insert a triple bond
- Insert a aromatic bond
- Insert a single up wedge bond
- Insert a single down wedge bond
- Insert a single up or down query bond
- Insert a Double Cis or Trans query bond
- Insert a Double C/T or Unspecified query bond
- Insert a Single or Double query bond
- Insert a Single or Aromatic query bond
- Insert a Double or Aromatic query bond
- Insert Any query bond
- Insert a Coordinate bod
- Insert a Position variation bond
- Chain Button – this allows you to draw a chain.
- Positive Charge Button – this allows you to insert a positive charge on an atom.
- Negative Charge Button – this allows you to insert a negative charge on an atom.
- Repeating Group Button – this allows you to create a repeating group.
- Smart R-group Button – this allows you to create a Smart R-group.
- R Group Attachment Button – this allows you to insert an R-group attachment.
- Reaction Button – this allows you to insert arrows and plus signs into your molecular drawing. Click once to insert a plus sign, click and drag to insert an arrow.
The Reaction Button expands to allow you to insert the following arrows (from left to right):

- Insert a straight arrow
- Insert a two-headed arrow (resonance arrow)
- Insert an equilibrium arrow
- Electron Flow Arrow Button – this allows you to insert an electron flow arrow.
The Electron Flow Arrow Button expands to allow you to insert the following arrows (from left to right):

- Insert an electron flow double arrow
- Insert an electron flow single arrow
- Radical and Lone Pair Button – this allows you to insert radicals and lone pairs.
The Radical and Lone Pair Button expands to allow you to insert the following (from left to right):

- Insert a radical
- Insert a lone pair
- Graphical Box Button
The Graphical Box Button expands to allow you to do the following (from left to right):

- Insert a rectangle
- Insert an ellipse
- Text Button – this allows you to insert text.
For in depth explanations about each tool, please refer to the Tools Toolbar section of the Marvin JS help notes: https://docs.chemaxon.com/display/marvinjs/Tools+toolbar
Template Toolbar

The Template Toolbar consists of templates you can use to create your 2D Molecule. It is located at the bottom of the drawing module. From left to right, the Template Toolbar consists of the following buttons:
- Abbreviated Groups Button – this allows you to create abbreviated groups.
- Reaxys Group Generics Button – this allows you to insert abbreviations common to various organic compounds.
- Pyrrole Button – this allows you to insert a template for a pyrrole structure.
- Cyclopentane (Unequal Bond Lengths) Button – this allows you to insert a template for a Cyclopentane structure with unequal bond lengths.
- Cyclopentane (Equal Bond Lengths) Button – this allows you to insert a template for a Cyclopentane structure with equal bond lengths.
- Cyclohexane Button – this allows you to insert a template for a Cyclohexane structure.
- Benzene Button – this allows you to insert a template for a Benzene structure.
- Ethene Button – this allows you to insert a template for an Ethene structure.
- Methane Button – this allows you to insert a template for a Methane structure.
- Amino(carboxy)methal group Button – this allows you to insert a template for an Amino(carboxy)methal group.
- 2,3,4,5,6-pentahydroxyhexanal Button – this allows you to insert a template for a 2,3,4,5,6-pentahydroxyhexanal structure.
- Cyclohexane-L Button – this allows you to insert a template for a Cyclohexane-L structure.
- Cyclohexane-R Button – this allows you to insert a template for a Cyclohexane-R structure.
- 6-(hydroxymethyl)oxane-2,3,4,5-tetrol Button – this allows you to insert a template for a 6-(hydroxymethyl)oxane-2,3,4,5-tetrol structure.
For in depth explanations about each button, please refer to the Template Toolbar section of the Marvin JS help notes:
https://docs.chemaxon.com/display/marvinjs/Template+Toolbar
Atoms Toolbar

The Atoms Toolbar contains various atoms that you can use to draw your Molecular Drawing. It is located on the right of the drawing module. In the canvas, you can swap any atom in for another by clicking on the appropriate atom in this toolbar, and then clicking on top of the atom you want to replace.
From top to bottom, the Atoms Toolbar consists of the following buttons:
- The Periodic Table Button – this allows you to select the atom you want to insert by clicking on it in the periodic table.
- Hydrogen Button – this allows you to insert a hydrogen.
- Carbon Button – this allows you to insert a carbon.
- Nitrogen Button – this allows you to insert a nitrogen.
- Oxygen Button – this allows you to insert an oxygen.
- Sulfur Button – this allows you to insert a sulfur.
- Fluorine Button – this allows you to insert a fluorine.
- Phosphorus Button – this allows you to insert a phosphorus.
- Chlorine Button – this allows you to insert a chlorine.
- Bromine Button – this allows you to insert a bromine.
- Iodine Button – this allows you to insert an iodine.
- Chiral Button – this allows you to specify the chiral center of a molecule.
- Query Atoms Button
The Query Atoms Button expands to let you insert the following (from left to right):
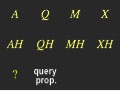
- A: Any of the elements except hydrogen
- Q: A Hetero atom (any atom except carbon and hydrogen)
- M: A metal atom
- X: A Halogen atom
- AH: Any of the elements including hydrogen
- QH: Any of the elements except carbon
- MH: A metal atom or hydrogen
- XH: A halogen atom or hydrogen
- ?: A pseudo atom – this allows you to create your own substituents
- query prop: Draw a query atom
For in depth explanations about each button, please refer to the Atoms Toolbar section of the Marvin JS help notes: https://docs.chemaxon.com/display/marvinjs/Atom+Toolbar
How to Create a Static Molecular Drawing
To create a Static Molecular Drawing, to the following:
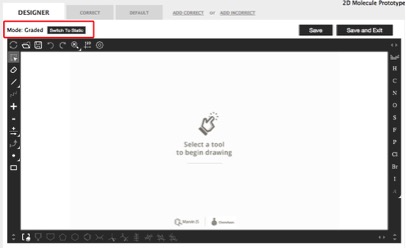
- In the Mode section of the Molecular Drawing Editor, click on the button that says, “Switch to Static.”
- An alert will pop up that says, “Molecule drawing content contained on correct, solution, and incorrect tabs will be deleted when you switch this module from graded to ungraded mode.” This means that any feedback or answers you may have written on those tabs will be lost once you switch to static.
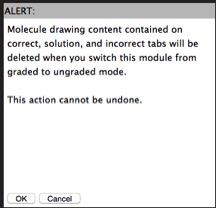
- Click “Ok.”
- You cannot toggle back and forth between static and graded mode. This means that once you save the module as static, you cannot make it a graded module.
- Adjust the settings as desired by going to the Settings Button in the General Tool Bar. This button has a picture of a gear on it.
- A dialog window will pop up that allows you to tell the system to do the following:
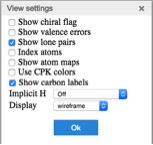
- Show chiral flag – adds an asterisk to all chiral centers
- Show valence errors – underlines atoms which exceed their outer valence requirements
- Show lone pairs – removes and adds e- as bonds and charges are added and removed
- Index atoms – numbers all atoms for quick reference (please note, however, that this numbering is not always done according to IUPAC system)
- Show atom maps – matches two atoms in two different molecules
- Use CPK colors – adds colors to atoms
- Show carbon labels – writes out all carbons as a C
- Turn on/off Implicit H
- On: all hydrogens are automatically added
- Hetero: all hydrogens are automatically added to non-carbon atoms
- Hetero and Terminal: all hydrogens are automatically added to non-carbon atoms and terminal carbons
- Off: no hydrogens are automatically added
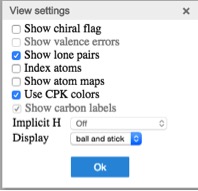
- Set the display – you may choose to display your molecular drawing as a wireframe model, a ball and stick model, a stick model, or a space-fill model. Please check with your editor before setting your display to space-fill.
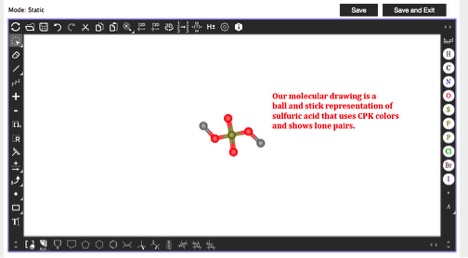
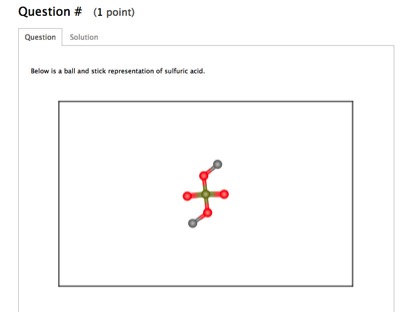
- The default settings for the Static Molecular Drawing Editor are for the system to Show lone pairs, Show carbon labels, set Implicit H to “Off,” and to display the molecules as Wireframe. For the purposes of our example, we will show lone pairs, use CPK colors, and set our display to Ball and Stick.
- Create your molecular drawing in the canvas area.
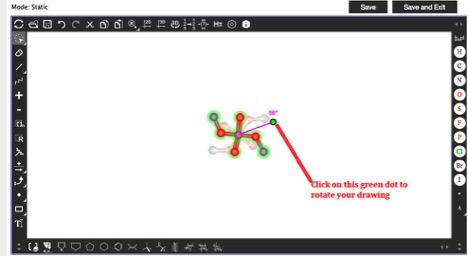
- If desired, rotate your drawing by selecting it via the Selection Button in the Tools Toolbar, clicking on the green circle that appears over the molecule, and dragging it to the desired rotation. The Selection Button either contains a dotted rectangle or a dotted circle, depending on whether the selection is set to rectangle or freehand.
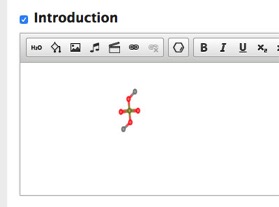
- Save the module and exit the editor. It will appear in the section you created it in in the Question Editor. In our example, we created this static drawing in the Introduction section.
- Preview your question in student mode to make sure your drawing is displaying as desired.
Graded Molecular Drawings
Graded Molecular Drawings allows students to create and submit molecular drawings for a grade. Authors can choose to have students draw molecules for a grade, or they can have students select parts of a molecule that the author draws for a grade.
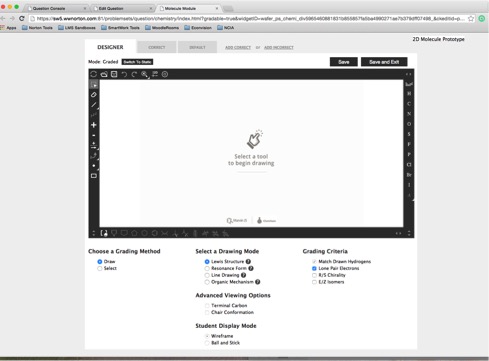
The Graded Molecular Drawing Module initially contains three tabs: A designer tab, in which you set up the question by determining the grading method, the drawing mode, and the grading criteria; a correct answer tab, in which you set the correct answer and the corresponding feedback; and a default tab, in which you set feedback students see when they incorrectly answer the question. Additionally, if there are multiple ways to answer the question correctly, you can set another correct answer by clicking on the “Add Correct” tab. You can also add feedback for specific incorrect answers by clicking on the “Add Incorrect” tab.
Setting Up the Question
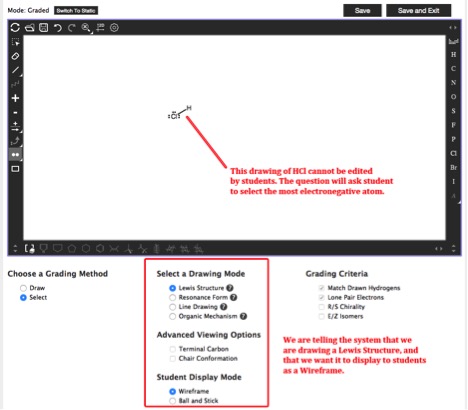
Setting up your graded molecular drawing question occurs on the Designer tab.
There are two main ways students can be graded: 1) they can draw out their own molecule and be graded on its accuracy, or 2) they can select aspects of an existing molecule for a grade (for example, a question may ask a student to select the oxygen atom in a ball and stick model of H2O).
Furthermore, the settings button is deactivated for selection in the graded mode. Authors cannot select the settings. Instead, they can only see the defined settings. Authors change settings in the drawing graded mode by selecting one of the four preset “Drawing Modes.”
Setting Up Questions in Which Students Draw a Molecule
To set up a graded molecular drawing in which students draw a molecule for a grade, do the following:
- In the Choose a Grading Method section of the designer tab, select “Draw.” When you select “Draw,” the Student Display Mode will always be set to “Wireframe.” This means students can only create their drawings in Wireframe mode. You cannot manually override this selection.
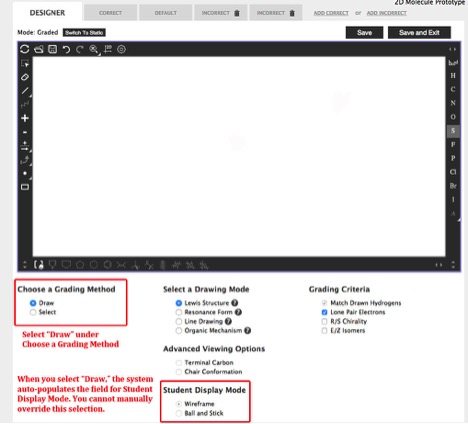
- Under “Select a Drawing Mode,” select the type of drawing you want students to make. The available selections are Lewis Structures, Resonance Form, Line Drawing, or Organic Mechanisms.
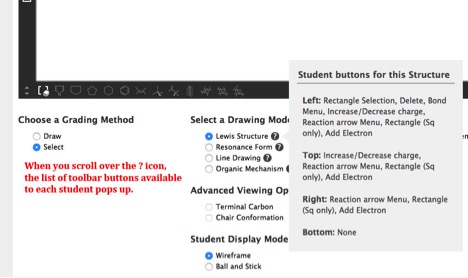
- Different buttons in the toolbars are available to students in student view when you select one of these drawing modes. A complete list of these buttons is listed for each drawing mode. You can access these lists by scrolling over the question mark icon next to each drawing mode. When you select a drawing mode, the buttons NOT available to students will also be greyed out in the authoring toolbars.
- Selecting different drawing modes determines which settings are enabled for the Grading Criteria, Advanced Viewing Options, and Advanced Viewing Options. For complete descriptions of each Grading Criteria selection, please skip down to Step 3. The following is a complete list of what auto-populates in the Grading Criteria and Advanced Viewing Options fields:
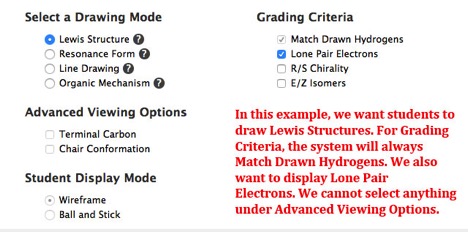
i.If you select “Lewis Structure”…
- “Match Drawn Hydrogens” under Grading Criteria auto-populates as checked. You cannot override this setting.
- “Lone Pair Electrons” under Grading Criteria also auto-populates; however, you can override this setting if desired.
- “R/S Chirality” and “E/Z Isomers” under Grading Criteria are open for selection.
- Advanced Viewing Options is locked in this mode, meaning you cannot select any of these options if you select “Lewis Structure.”
ii.If you select “Resonance Form”…
- “Lone Pair Electrons” under Grading Criteria auto-populates as checked. You cannot override this setting.
- “Match Drawn Hydrogens” under Grading Criteria also auto-populates as checked, but you can override this setting if desired.
- “R/S Chirality” and “E/Z Isomers” under Grading Criteria are open for selection.
- Advanced Viewing Options is locked in this mode, meaning you cannot select any of these options if you select “Resonance Form.”
iii.If you select “Line Drawing”…
- Everything under Grading Criteria is open for selection, but no options are preselected.
- Everything under Advanced Viewing Options is open for selection.
iv.If you select “Organic Mechanism”…
- “Lone Pair Electrons” under Grading Criteria auto-populates as checked. You cannot override this setting.
- “Match Drawn Hydrogens,” “R/S Chirality,” and “E/Z Isomers” are available for selection.
- “Chair Conformation” under Advanced Viewing Options is locked in this mode, meaning you cannot select this option if you select “Organic Mechanism.”
- “Terminal Carbon” under Advanced Viewing Options is open for selection in this mode.
- Select your Grading Criteria, choosing among the options available to you based on the Drawing Mode.
The Grading Criteria are:
a. Match Drawn Hydrogens
If selected: Students must add explicit hydrogens to a structure in the same way as the programmed answer.
If unselected: Students are allowed to have implied hydrogens. The structure must be drawn chemically correct.
b. Lone pairs
If selected: Students must add lone pairs on a structure to match the lone pairs in the programmed answer. (Note: This means if an author does not add lone pairs to an atom, but a student does, then the student will be marked off).
If unselected: Students are not given the lone pair icon, and therefore cannot add lone pairs. (Note: The student’s answer must still match the author, therefore an author should be careful to not add lone pairs to structures in this mode).
c. R/S
If selected: Students will be allowed to use the wedge and dash bond. The absolute configuration of the student’s answer must match that of the programmed answer. (If an author has the “match drawn hydrogen” setting selected, then bonds to hydrogens on chiral carbons must be added.)
If unselected: Students are not given access to the wedge and dash bond. Student’s answer will not be graded on absolute configuration.
d. E/Z
If selected: Students will be given the Ethene template icon. The geometric isometery of the student’s answer must match that of the programmed answer. (If an author has the “match drawn hydrogen” setting selected, then bonds to hydrogens on the sp2 stereocenters carbons must be added.)
If unselected: Students will not be given access to the Ethene icon (but they will still have access to the double bond drawing tool). Student’s answer will not be graded on geometric isometery.
- If one of the two organic drawing modes is chosen select your Advanced Viewing Options, choosing among the options available to you based on the Drawing Mode. Advanced Viewing Options are only available for the two organic modes. The Advanced Viewing Options are:
- Terminal Carbons: All terminal carbons are written out as a C with the correct number of hydrogens automatically added.
- Chair Conformation: The pre-made Chair and Fischer Projection templates are enabled for student use.
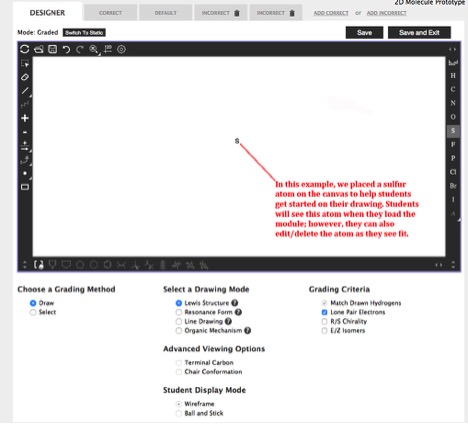
- OPTIONAL: If desired, get students started on their drawing by placing an atom, or part of a molecule, on the canvas.
- Any drawing you place on the designer tab’s canvas will auto-populate for the student when she attempts to answer the question.
- In drawing mode, anything placed on the designer tab’s canvas is NOT static. In other words, students can edit/delete anything the author places on the designer tab’s canvas. If students fail to answer the question correctly, students can also click the “Undo” button, which will reset everything on the designer tab, including what was placed there by the author.
- Authors may want to place atoms on the designer tab’s canvas as a way to give students a place to start. Check with your editor for best practices.
- Save the question.
Setting Up Questions in Which Students Select Part of a Molecule
To set up a graded molecular drawing in which students select aspects of an existing molecule for a grade, do the following:
- Adjust the settings as desired by going to the Settings Button in the General Tool Bar. For in-depth instructions on how to do this, see step 2 of the “How to Create a Static Molecular Drawing” section.
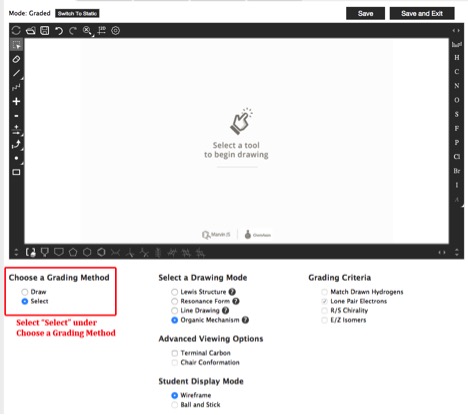
- Under Choose a Grading Method, select “Select.”
- Select your Drawing Mode.
- Similar to when “Draw” is selected, Grading Criteria, Advanced Viewing Options, and Student Display Mode auto-populate depending on which Drawing Mode you select.
i.If you select “Lewis Structure”…
- Under Grading Criteria, the system auto-populates “Match Drawn Hydrogens” and “Lone Pair Electrons” as checked. You cannot manually override these selections.
- “R/S Chirality and “E/Z Isomers” lock, meaning you cannot select them in this drawing mode.
- Advance Viewing Options locks, meaning you cannot select any of the options in this category.
ii.If you select “Resonance Form”…
- Under Grading Criteria, the system auto-populates “Match Drawn Hydrogens” and “Lone Pair Electrons” as checked. You cannot manually override these selections.
- “R/S Chirality and “E/Z Isomers” lock, meaning you cannot select them in this drawing mode.
- Advance Viewing Options locks, meaning you cannot select any of the options in this category.
- Under Student Display Mode, the system auto-populates “Wireframe” as the way your drawing will display to students. You cannot manually override this selection.
iii.If you select “Line Drawing”…
- The Grading Criteria selection locks, meaning you cannot select any of these options in this drawing mode.
- All options under Advanced Viewing Options are open for selection.
iv.If you select “Organic Mechanism”…
- Under Grading Criteria, the system auto-populates “Lone Pair Electrons” as checked. You cannot manually override this selection.
- “Match Drawn Hydrogens,” “R/S Chirality,” and “E/Z Isomers” lock, meaning you cannot select them in this drawing mode.
- Under Advanced Viewing Options, “Chair Conformation” locks, meaning you cannot select it in this drawing mode.
- Under Advanced Viewing Options, “Terminal Carbon” is open for selection.
- Under Student Display Mode, the system auto-populates “Wireframe” as the way your drawing will display to students. You cannot manually override this selection.
- Scroll over the question mark icon next to each drawing mode to see the toolbar buttons that are available to students.
- Depending on the drawing mode you selected, select from the Advanced Viewing Options available to you. For an explanation of each of the Advanced Viewing Options, please see step 4 of “Setting Up Questions in Which Students Draw a Molecule.”
- Depending on the drawing mode you selected, select the Student Display Mode. You may choose to display your model as a Wireframe, or as a Ball and Stick model. However, if you selected either “Resonance Form” or “Organic Mechanism” as your Drawing Mode, you can only display your drawing as a Wireframe.
- On the canvas, draw your molecule, paying careful attention to include what you want students to select. Unlike in “Draw” mode, everything you draw on the canvas is static in “Select” mode. This means students cannot alter your drawing in any way.
7. Save the module.
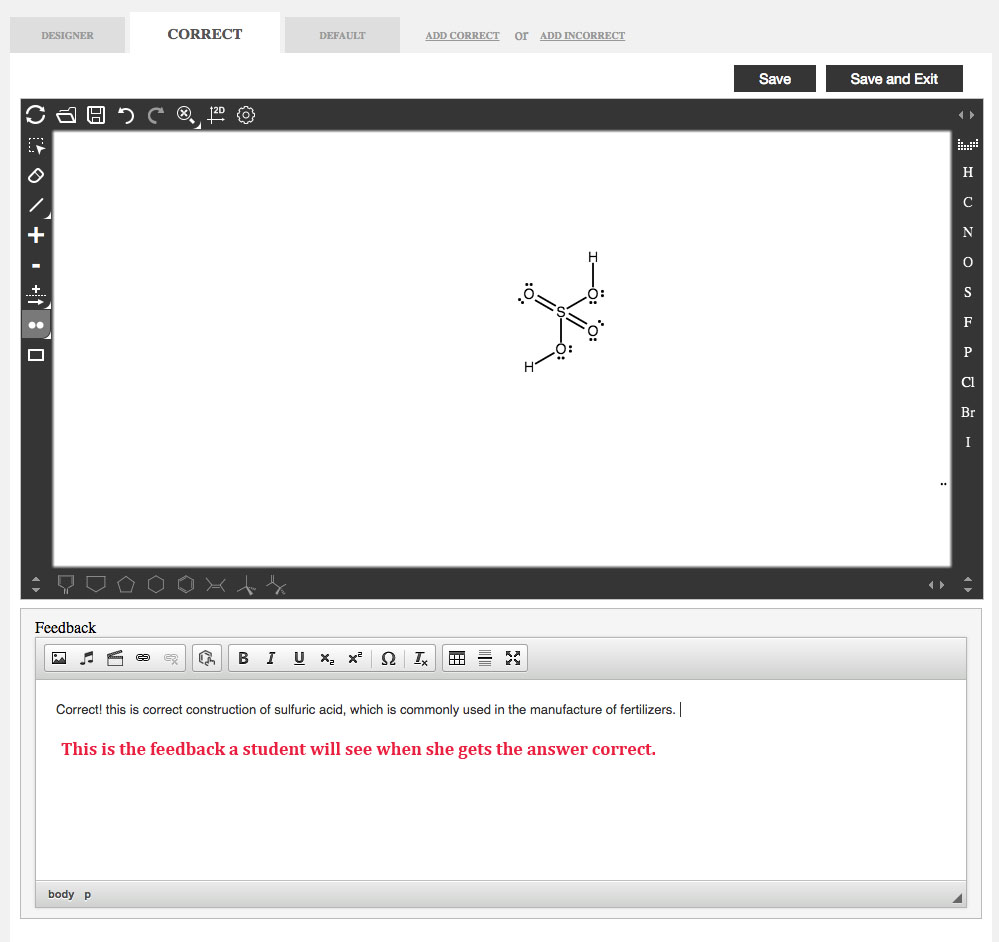
Setting the Correct Answers
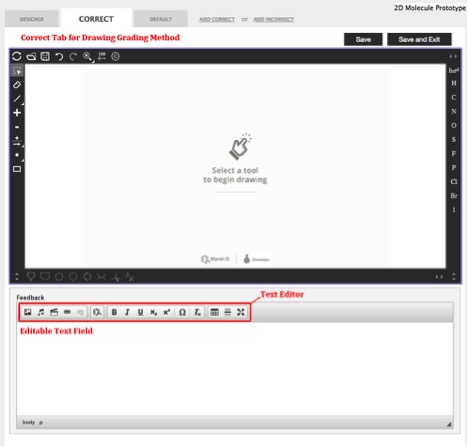
The correct tab contains two main parts: a canvas, where you can construct your correct answer, and an editable text field, where you can write feedback that the student will see when she recreates the correct answer.
Furthermore, for questions that have more than one correct answer, you can create additional correct tabs by clicking on the “Add Correct” link.
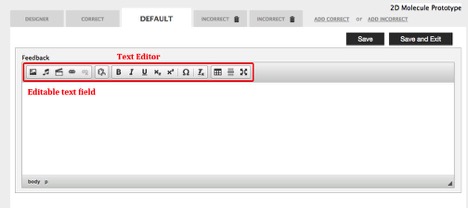
Text Editor
Important Note: Copying and pasting text from a Word Document into Smartwork5 could insert formatting that will corrupt the module. Please enter the text directly into the Text Editor, or copy and paste from a plain text document.
Each Feedback tab contains an editable text field, and a Text Editor, which allows you to add text and other multimedia to the feedback.
The Media Palette allows you to insert multimedia as into your feedback.
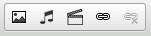
From left to right, the Media Palette allows you to do the following:
- Insert image files
- Insert music files
- Insert video files
- Insert hyperlinks
- Remove the hyperlinks
The Chem Pad Button allows you to insert a static molecular drawing into your feedback.

The Text Formatting Palette allows you to format text, as well as add special characters.

From left to right, the Text Formatting Palette allows you to do the following:
- Bold text
- Italicize text
- Underline text
- Insert subscripts
- Insert superscripts
- Insert math formulas
- Insert special characters
- Remove any formatting applied to the text
Furthermore, the Feedback Formatting Palette allows you to do the following:

- Insert tables
- Insert line breaks
- Edit text in full screen mode
How to Set Correct Answers
To set a correct answer, do the following:
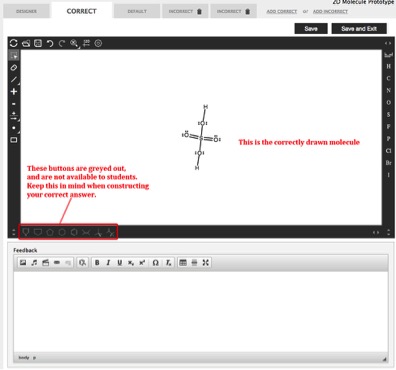
1a) If you created a problem in which students are expected to draw the molecule, draw the molecule correctly on the canvas.
- When constructing your molecule, remember that the Buttons that are not available to the student are greyed out.
b.If your structure contains lone pairs, please note that you can add up to four sets of lone pairs by clicking on the Lone Pair Button and then clicking on the atom you would like to add lone pairs to up to four times. Clicking on the atom a fifth time clears all the lone pairs you added.
1b) If you created a problem in which students are expected to select part of a molecule, click on the portion of the molecule you want students to select. Once you do this, this portion of the molecule will be highlighted in green. Use the Undo and Restore Buttons to edit your selection.
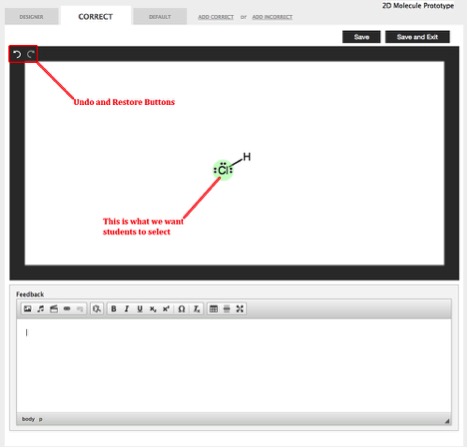
- In the editable text field, write the feedback you want a student to see when she gets the answer correct. Use the text editor to format your feedback as needed.
- Save and exit the module.
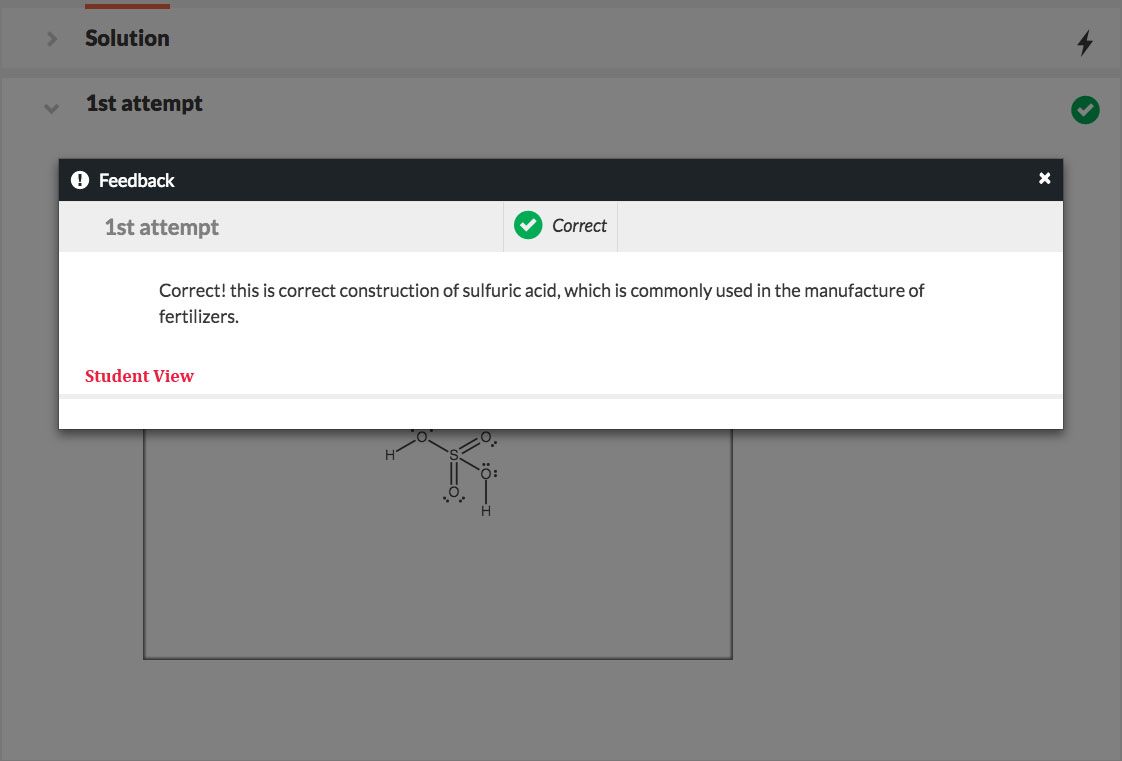
- Check that your correct feedback is working correctly by going to preview mode and recreating your correct answer.
- When setting your correct answer, please note that the system does not grade bond lengths.
- The system also does not grade bond angles (note when R/S and E/Z grading occurs the bond angles need to approximate the 108.5 and 120 degree angles respectively).
- The system recognizes conformational and rotational isomers as identical.
5. If there are multiple correct answers, go back into the 2D Molecular Drawing Editor and add additional correct tabs until all of the correct answers have been accounted for. Adding a tab will COPY the drawing on the tab you are currently on into the new tab. This means if you create a new correct tab while viewing the current correct tab, the drawing on the current correct tab will copy into your new correct tab. This allows you to edit the drawing on the new tab instead of redrawing it every time.
- Save and exit the module editor. Make sure that the feedback for these new correct tabs is working correctly by testing them in preview mode.
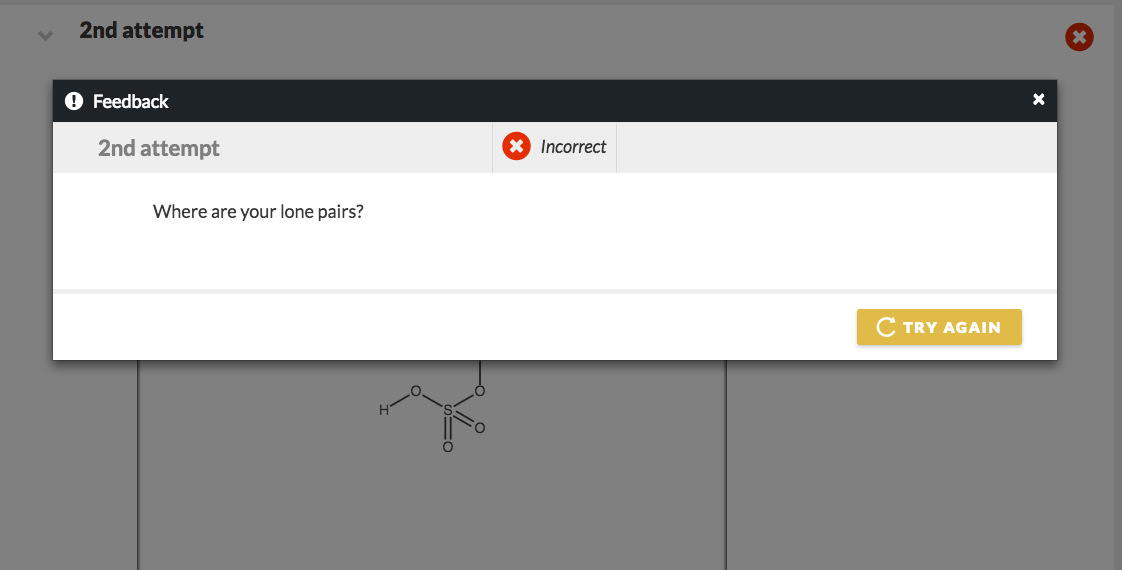
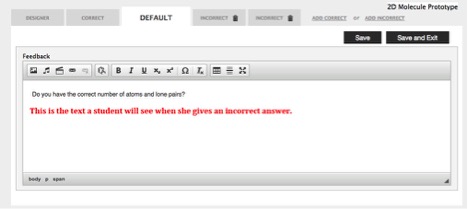
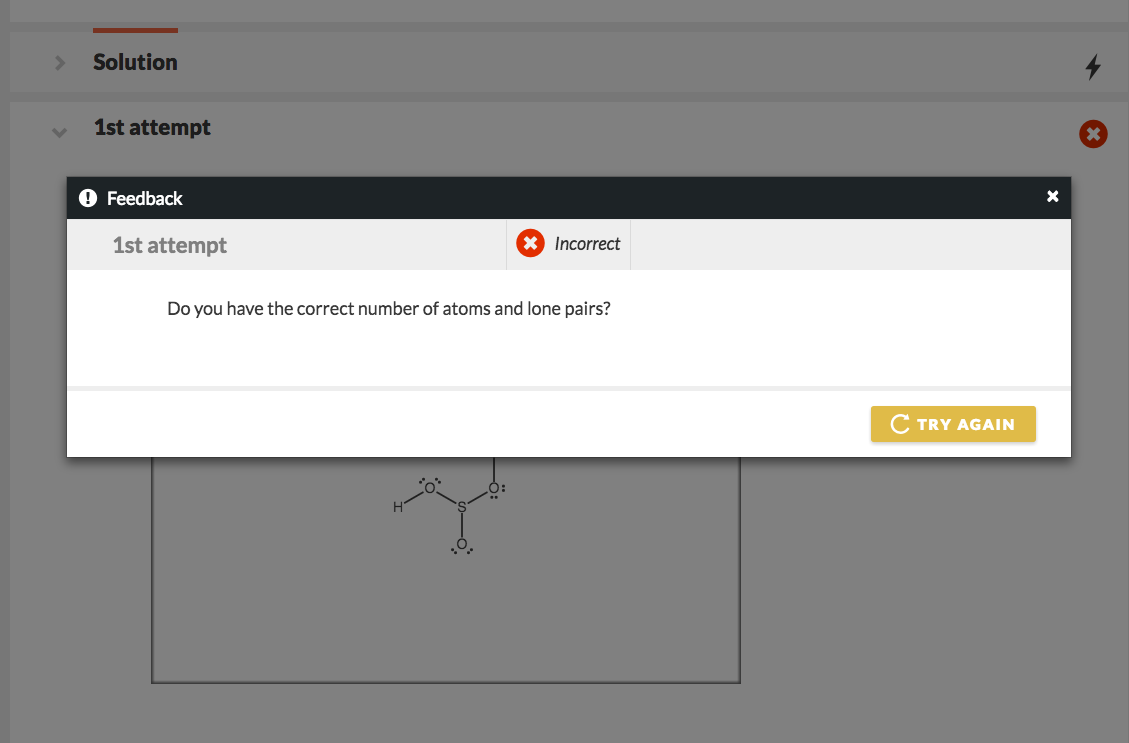
Creating Default Feedback
Students see default feedback when they give an unspecific incorrect answer, or if they fail to give an answer.
To set default feedback, do the following:
- In the 2D Molecular Drawing Editor, click on the default tab.
- In the editable text field, type out what you want the student to see when she gives an incorrect answer. Use the formatting palettes in the Text Editor as needed.
- Save and exit the module.
- Go to Preview Mode in the Question editor. Test that your feedback is working correctly by constructing an incorrect answer.
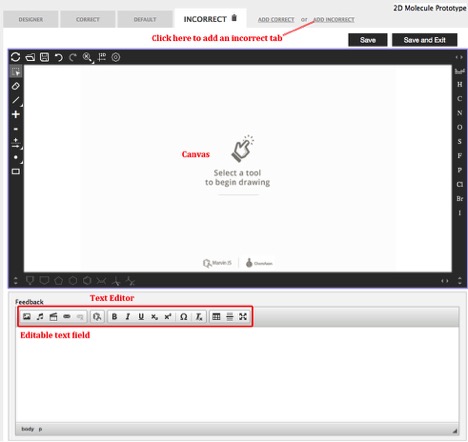
Creating Specific Incorrect Feedback
You can also create feedback for specific incorrect answers, allowing you to trap for specific mistakes a student may make.
You can add incorrect feedback tabs by going to the top of the Molecular Drawing Editor and clicking on the
“Add Incorrect” link.
To add specific incorrect feedback, do the following:
- At the top of the Molecular Drawing Editor, click on the link that says “Add Incorrect” to add a tab for specific incorrect feedback.
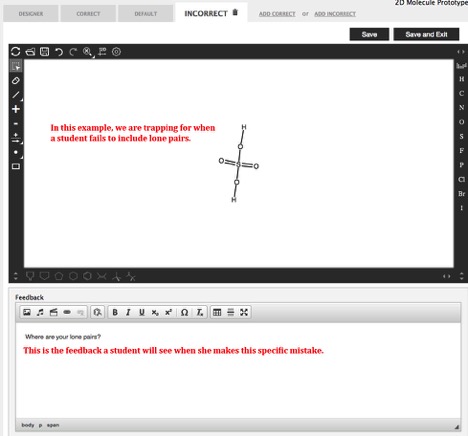
2a. If you created a problem in which students are expected to draw the molecule, construct the incorrect version of the molecule on the canvas
a. Adding a tab (correct or incorrect) will COPY the drawing on the tab you are currently on into the new tab. This means if you create an incorrect tab while viewing the correct tab, the drawing on the correct tab will copy into your new incorrect tab. This allows you to edit the drawing on the new tab instead of redrawing it every time. If you are on the default tab when you click “Add Incorrect,” the system will give you a blank incorrect feedback tab.
b. When constructing your molecule, remember that the Buttons that are not available to the student are greyed out.
c. If your structure contains lone pairs, please note that you can add up to four sets of lone pairs by clicking on the Lone Pair Button and then clicking on the atom you would like to add lone pairs to up to four times. Clicking on the atom a fifth time clears all the lone pairs you added.
2b. If you created a problem in which students are expected to select part of a molecule, click on the portion of the molecule that you want the system to recognize as incorrect. Once you do this, this portion of the molecule will be highlighted in green. Use the Undo and Restore Buttons to edit your selection.
- In the editable text field, type out the feedback you want a student to see when she gives this specific incorrect answer. Use the text editor to format as desired.
- Save and exit the module.
- Go to Preview Mode in the Question editor. Test that your feedback is working correctly by constructing your specific incorrect answer.